MySQL 是一款关系型数据库管理系统。
一、MySQL基础 1.1 安装MySQL docker-compose
1
2
3
4
5
6
7
8
9
10
11
12
13
14
15
16
version: '3.8' services: db: image: mysql:5.7.35 command: --default-authentication-plugin=mysql_native_password restart: always ports: - 3306 :3306 environment: MYSQL_ROOT_PASSWORD: toortoor adminer: image: adminer:latest restart: always ports: - 8080 :8080
1.2 基础SQL语句
刷新权限
数据库基本操作
1 2 3 4 5 6 create database [if not exists ] `db_name`;drop database [if exists ] `db_name`;use `db_name`;
表基本操作
1 2 3 4 5 6 7 8 9 10 11 12 13 14 15 16 17 18 19 20 21 22 23 24 25 create table [if not exists ] `table_name`;drop table [if exists ] `table_name`;describe `table_name`;create table if not exists `students`( `id` int (4 ) not null auto_increment comment '学号' , `name` varchar (30 ) not null default '匿名' comment '姓名' , `pwd` varchar (20 ) not null default '123456' comment '密码' , `gender` varchar (2 ) not null default '女' comment '性别' , `brithday` datetime default null comment '出生日期' , `address` varchar (100 ) default null comment '家庭住址' , `email` varchar (50 ) default null comment '邮箱' , primary key(`id`) ) engine= innodb default charset= utf8;
修改表
1 2 3 4 5 6 7 8 9 10 alter table `table_name` rename as new_`table_name`;alter table `table_name` add age int (10 );alter table `table_name` modify age varchar (10 );alter table `table_name` change age new_age int (10 );alter table `table_name` drop age;
查看创建语句
1
2
show create database `db_name`;show create table `table_name`;
1.3 引擎INNODB和MYISAM区别
特性
INNODB
MYISAM
事务
支持
不支持
数据行锁定
支持
不支持
外键
支持
不支持
全文索引
不支持
支持
空间占用
约为MYSIAM的2倍
较小
不同引擎在文件上的区别
innodb:
*.frm:表结构定义文件ibdata1:数据文件
mysiam:
*.frm:表结构定义文件*.MYD:数据文件*.MYI:索引文件
二、MySQL数据操作 2.1 外键 外键就是一个表的某一列去引用另一个表的某一列
1 2 3 4 5 6 7 8 9 10 11 12 13 14 15 16 create table `grade`( `grade_id` int (10 ) not null auto_increment comment '年级' primary key(`grade_id`) )engine= innodb default charset= utf8 create table `students`( `id` int (4 ) not null auto_increment comment '学号' , `name` varchar (30 ) not null default '匿名' comment '姓名' , `grade_id` int (10 ) not null comment '年级' , primary key(`id`), key `FK_grade_id` (`grade_id`), constraint `FK_grade_id` foreign key (`grade_id`) references `grade` (`grade_id`) )engine= innodb default charset= utf8
如果要给已经存在的表添加外键
1 alter table `table_name` add constraint `FK_name` foreign key (`列名称`) references `引用的表名` (`引用的列名称`)
删除外键
1 alter table `table_name` drop foreign key 'FK_name'
2.2 DML数据操纵语言 2.2.1 insert 1 2 3 4 insert into `table_name`(`字段1 `,`字段2 `,`字段3 `) values ('值1' ),('值2' ),('值3' );insert into `students`(`name`) values ('cqm' ),('lwt' );insert into `students`(`name`,`pwd`,`email`) values ('lwt' ,'111' ,'lwt@qq.com' );
2.2.2 update 1 2 3 4 5 6 7 update `table_name` set `字段`= '值' where 条件;update `students` set `name`= 'handsome_cqm' where `id`= 1 ;update `students` set `name`= 'cqm' where `name`= 'handsome_cqm' update `students` set `name`= 'newlwt' ,`email`= 'new@qq.com' where `name`= 'lwt' ;update `students` set `name`= 'cqm' where id between 1 and 2 ;
2.2.3 delete 1 2 3 4 delete from `table_name` where 条件;delete from `students` where `id`= 1 ;truncate `table_name`;
delete 和 truncate 区别:
都可以清空表,都不会删除表结构
truncate 可以重置自增列,且不会影响事务delete 清空表后,如果引擎是 innodb ,重启数据库自增列就会变回1,因为是存储在内存中的;如果引擎是 myisam ,则不会,因为是存储在文件中的
2.3 DQL数据库查询语言 2.3.1 select
查询所有数据
1 select * from `table_name`;
查询某列数据
1 select `name`,`gander` from `students`;
给字段结果起别名
1 select `name` as '姓名' ,`gender` as '性别' from `students`;
concat 函数
1 select concat('姓名:' ,`name`) from `students`;
去重
1 select distinct `字段` from `table_name`
批量操作数据
1 select `score`+ 1 as `new_score` from `table_name`;
2.3.2 where
逻辑运算符运用
1 2 3 select `score` from `table_name` where `score` >= 95 and `score` <= 100 ;select `score` from `table_name` where `score` between 95 and 100 ;select `score` from `table_name` where not `score` != 95 and `score` != 100 ;
模糊查询
运算符
语法
描述
is null
a is null
a 为空,结果为真
is not null
a is not null
a 不为空,结果为真
between
a between b and c
若 a 在 b 和 c 之间,结果为真
like
a like b
如果 a 匹配 b,结果为真
in
a in ( b,c,d,e )
如果 a 在某个集合中的值相同,结果为真
查找花名册中姓陈的名字
1 2 3 4 select `name` from `table_name` where `name` like '陈%' ;select `name` from `table_name` where `name` like '陈_明' ;
查找特定学号的信息
1 select `name` from `table_name` where `id` in (1 ,2 ,3 );
查找地址为空或不空的同学
1 2 select `name` from `table_name` where `address` is null ;select `name` from `table_name` where `address` is not null ;
2.3.3 联表查询 联表查询包括:
inner(内连接):如果表中有至少一个匹配,则返回行
left(外连接):即使右表中没有匹配,也从左表返回所有的行
right(外连接):即使左表中没有匹配,也从右表返回所有的行
full(外连接):只要其中一个表中存在匹配,则返回行
inner 实际就是取两个表的交集,例如有两个表,一个表有学生的基本信息,另一个表有学生的成绩,两个表都有学生的学号列,那么就可以联合起来查询
1 select `name`,`subjectno`,`score` from `students` inner join `result ` where student.id = result.id
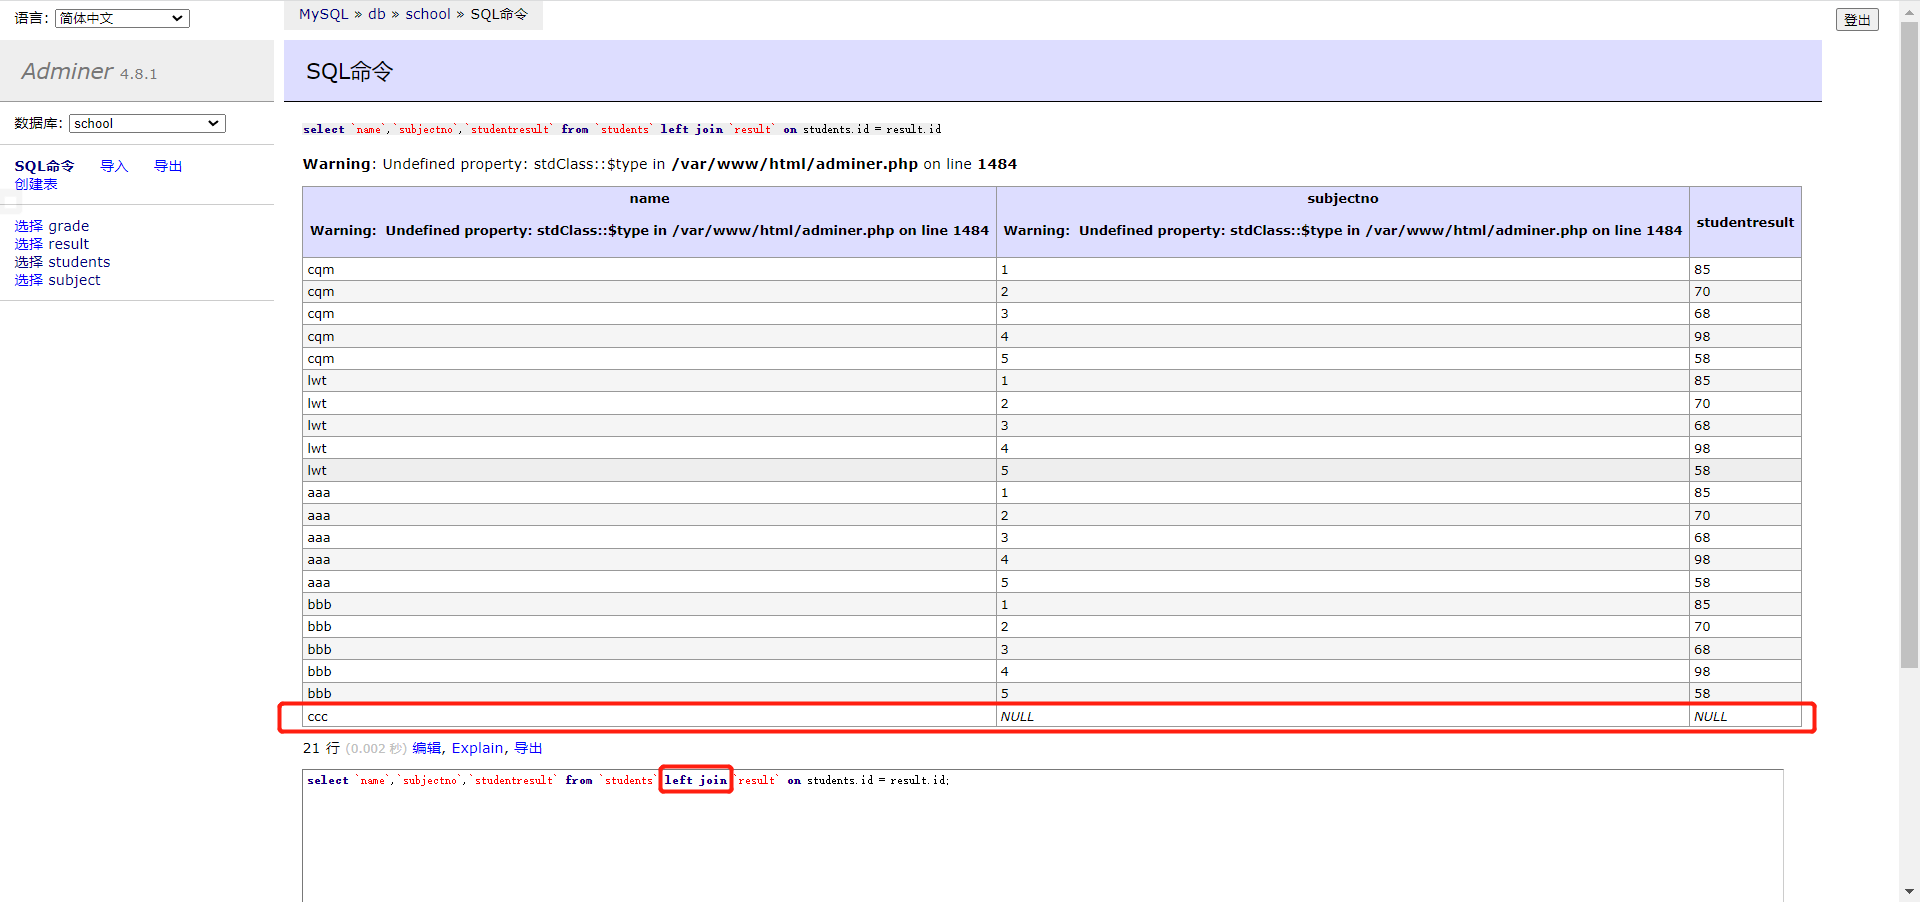
left 假设学生表中有 ccc 这么一个学生,但成绩表里没有 ccc 学生的成绩,如果使用了左连接,左表是学生表,右表是成绩表,那么也会返回 cqm 学生的值,显示为空
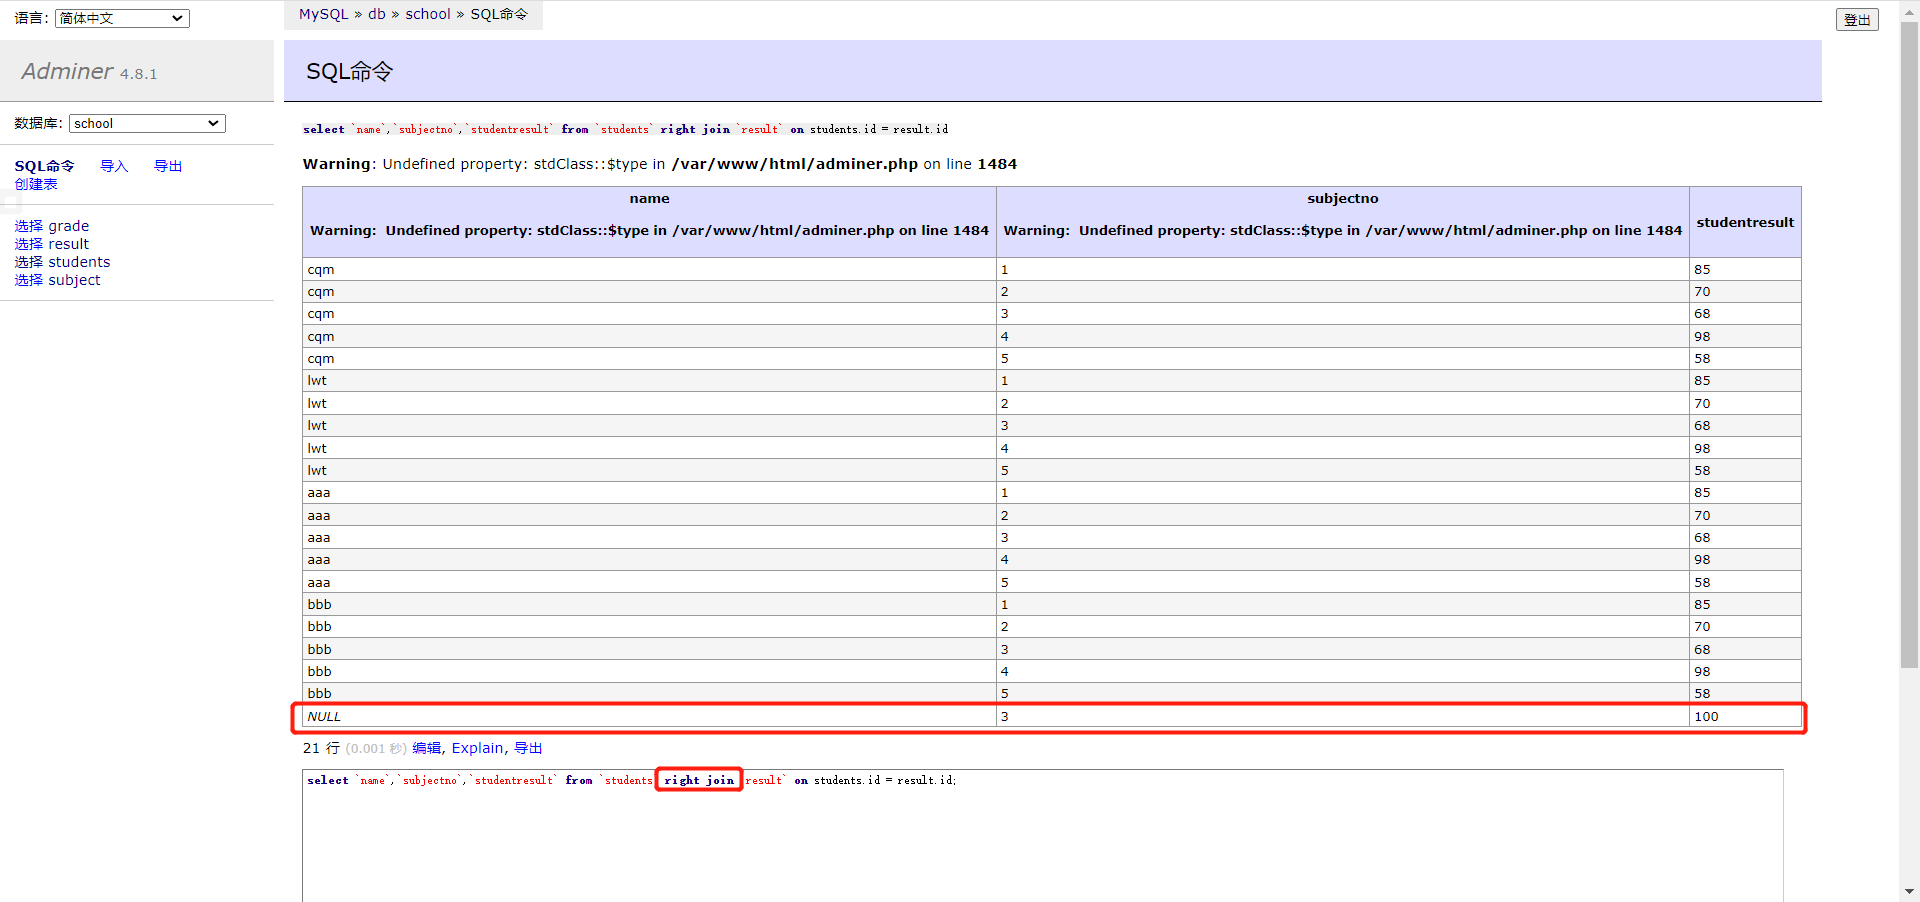
right 相反,如果成绩表里有个 ddd 学生的成绩,但学生表里没有这个学生的信息,如果使用了右连接,左表是学生表,右表是成绩表,那么也会返回 ddd 学生的成绩,注意这时候就看不到 ccc 学生的成绩信息了,因为左表中没有 ccc 学生的成绩信息
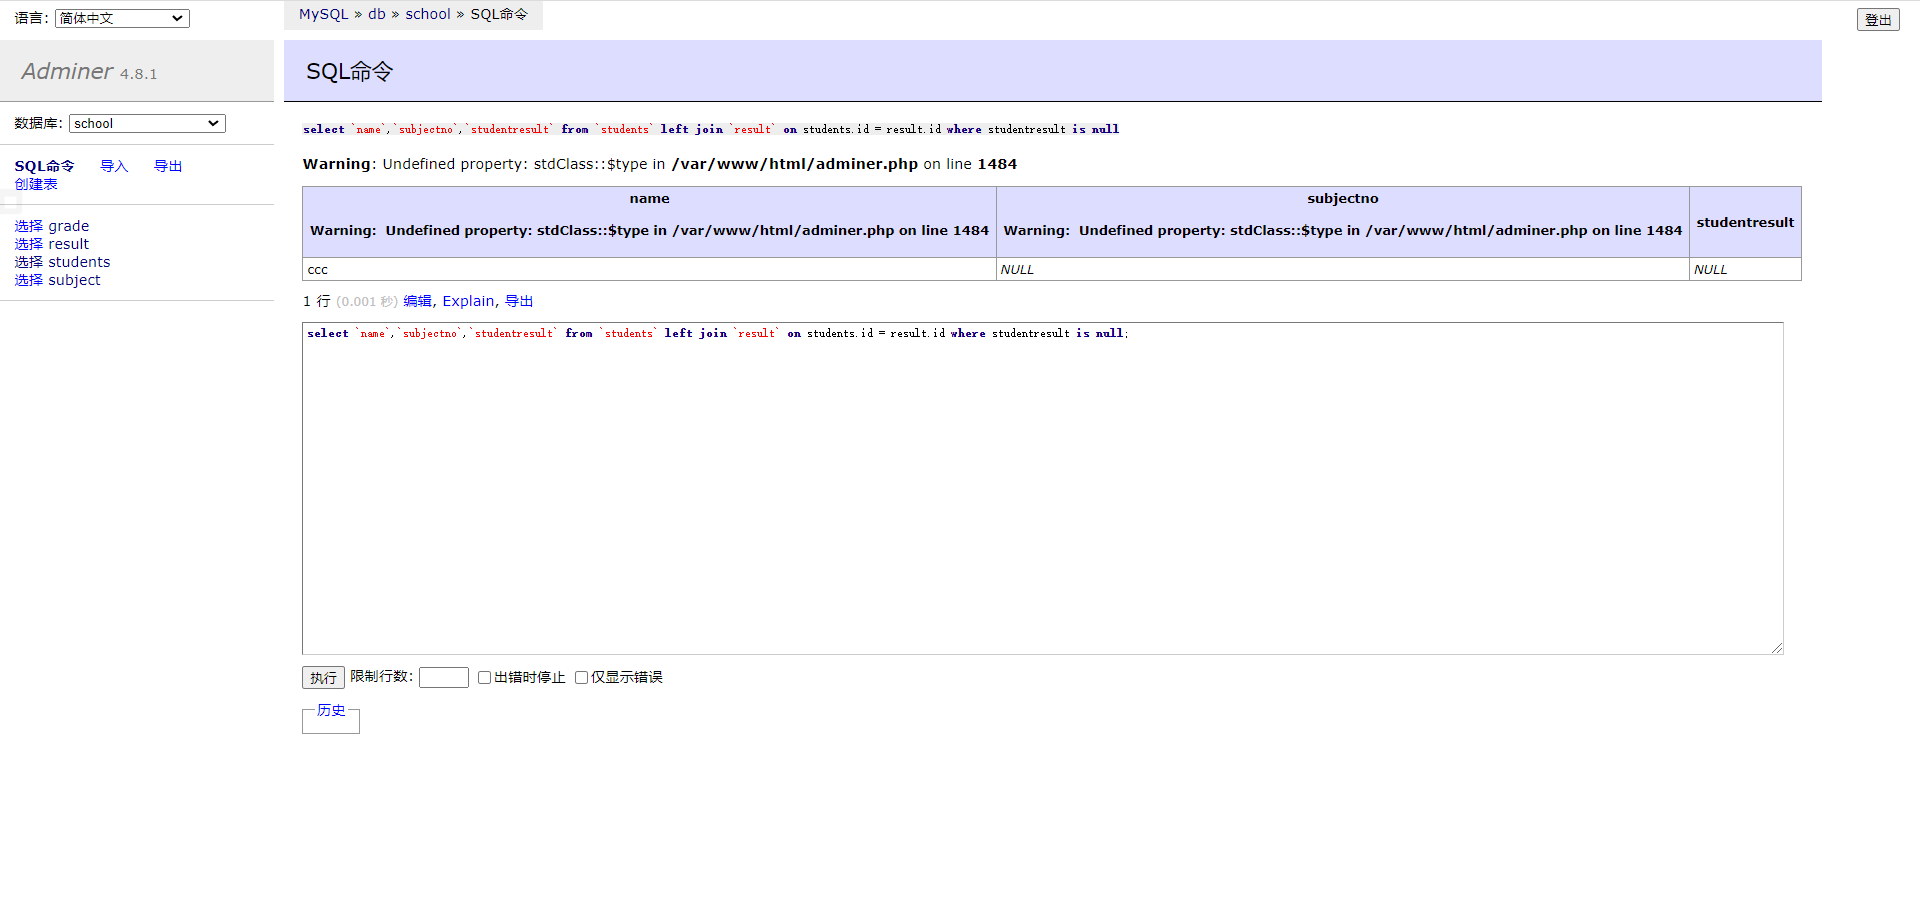
通过联表查询就可以查出缺考的同学
查询参加考试了的同学信息
1 select distinct `name` from `students` right join `result ` on students.id = result.id where `score` is not null ;
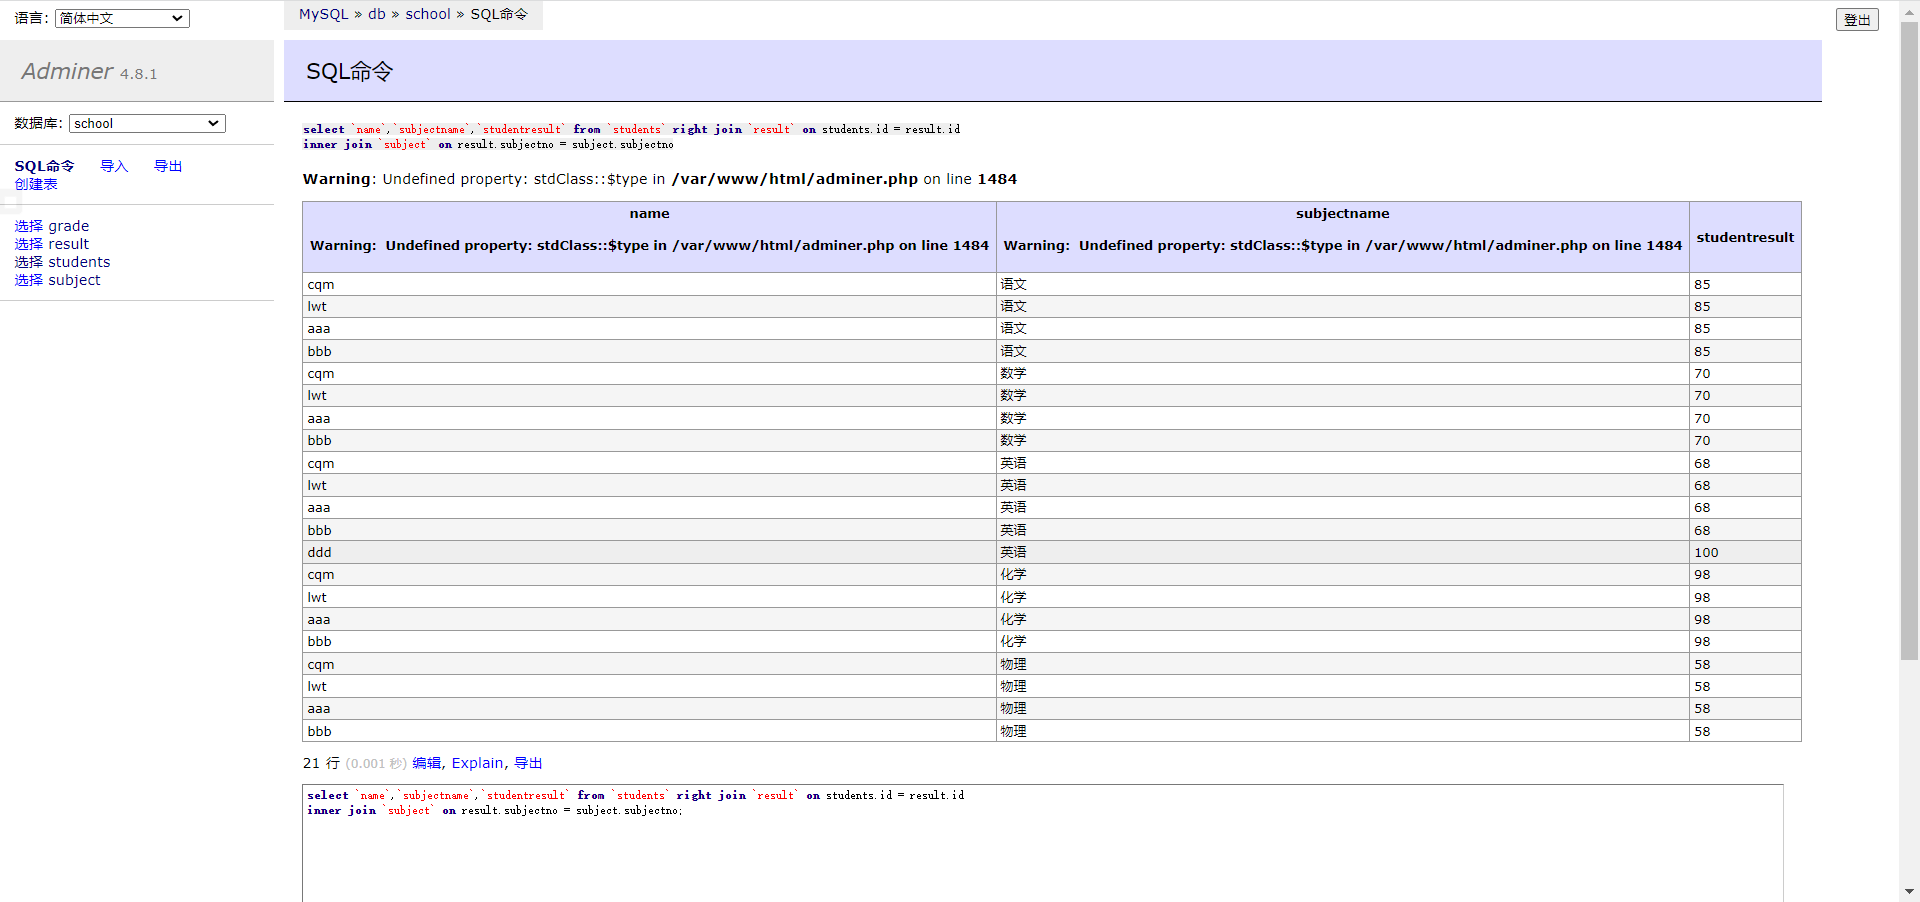
查询参加了考试的同学以及所对应的学科成绩
2.3.4 where和on的区别 在进行联表查询的时候,数据库都会在中间生成一张临时表,在使用外连接时,on 和 where 区别如下:
on 条件是在生成临时表时使用的条件,它不管 on 中的条件是否为真,都会返回左边表中的记录。where 条件是在临时表生成好后,再对临时表进行过滤的条件。这时已经没有 left join 的含义(必须返回左边表的记录)了,条件不为真的就全部过滤掉。如果是 inner join ,则无区别
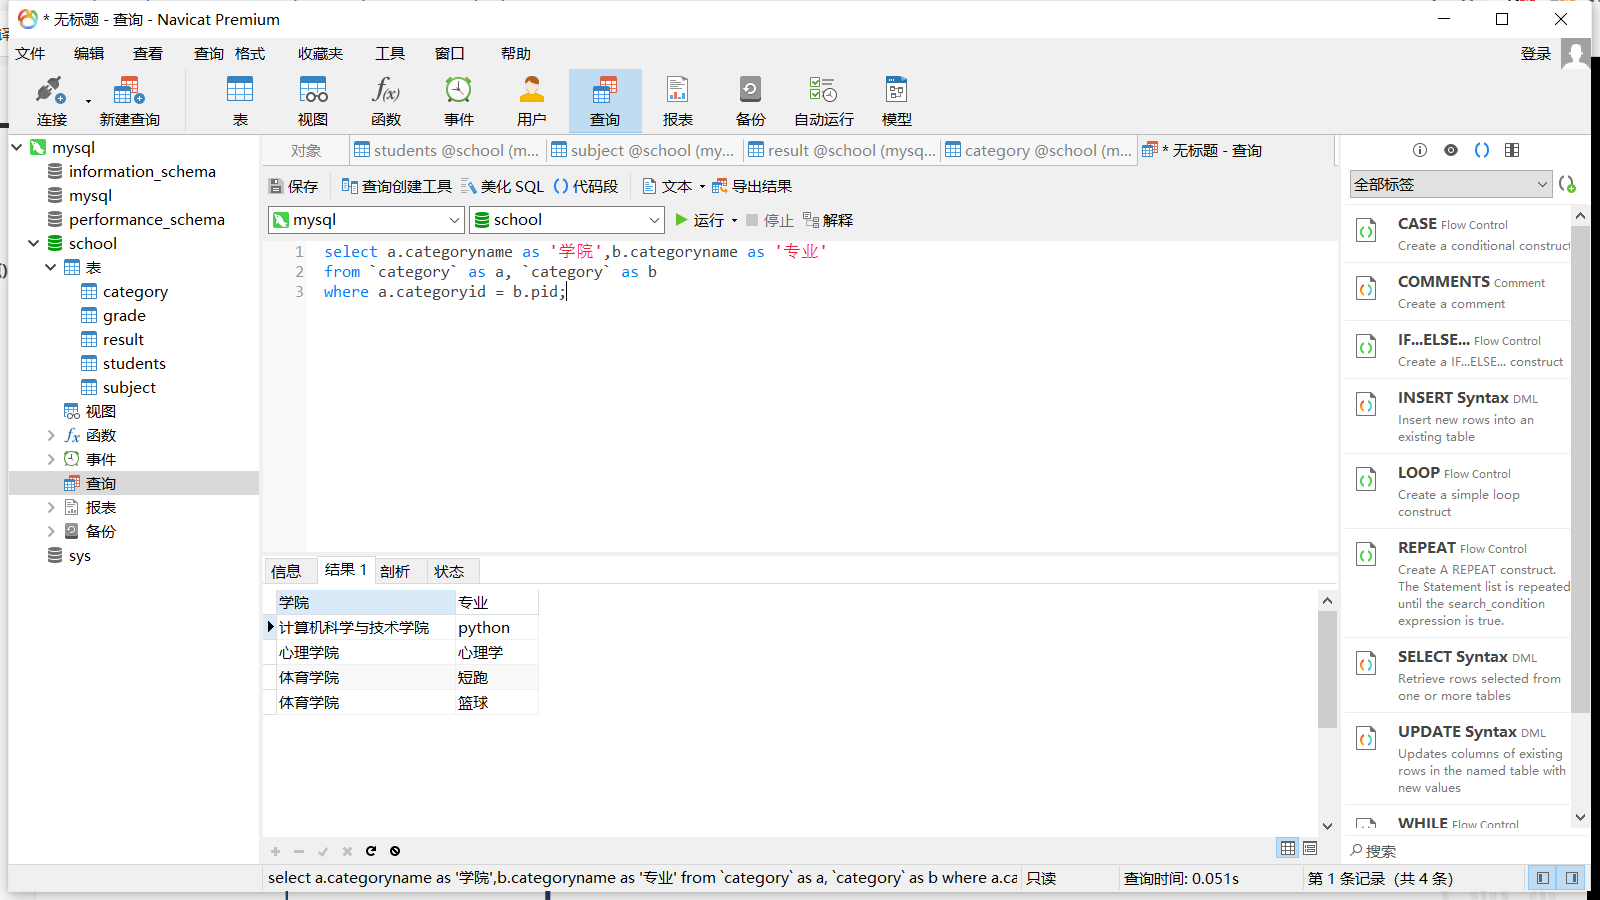
2.3.5 自连接 自连接实际上就是一张表与自己连接,将一张表拆为两张表
原表
categoryid
pid
categoryname
2
1
计算机科学与技术学院
3
1
心理学院
4
1
体育学院
5
2
python
6
3
心理学
7
4
短跑
8
4
篮球
父类表
category
categoryname
2
计算机科学与技术学院
3
心理学院
4
体育学院
子类表
category
所属父类
categoryname
5
计算机科学与技术学院
python
6
心理学院
心理学
7
体育学院
短跑
8
体育学院
篮球
自查询结果
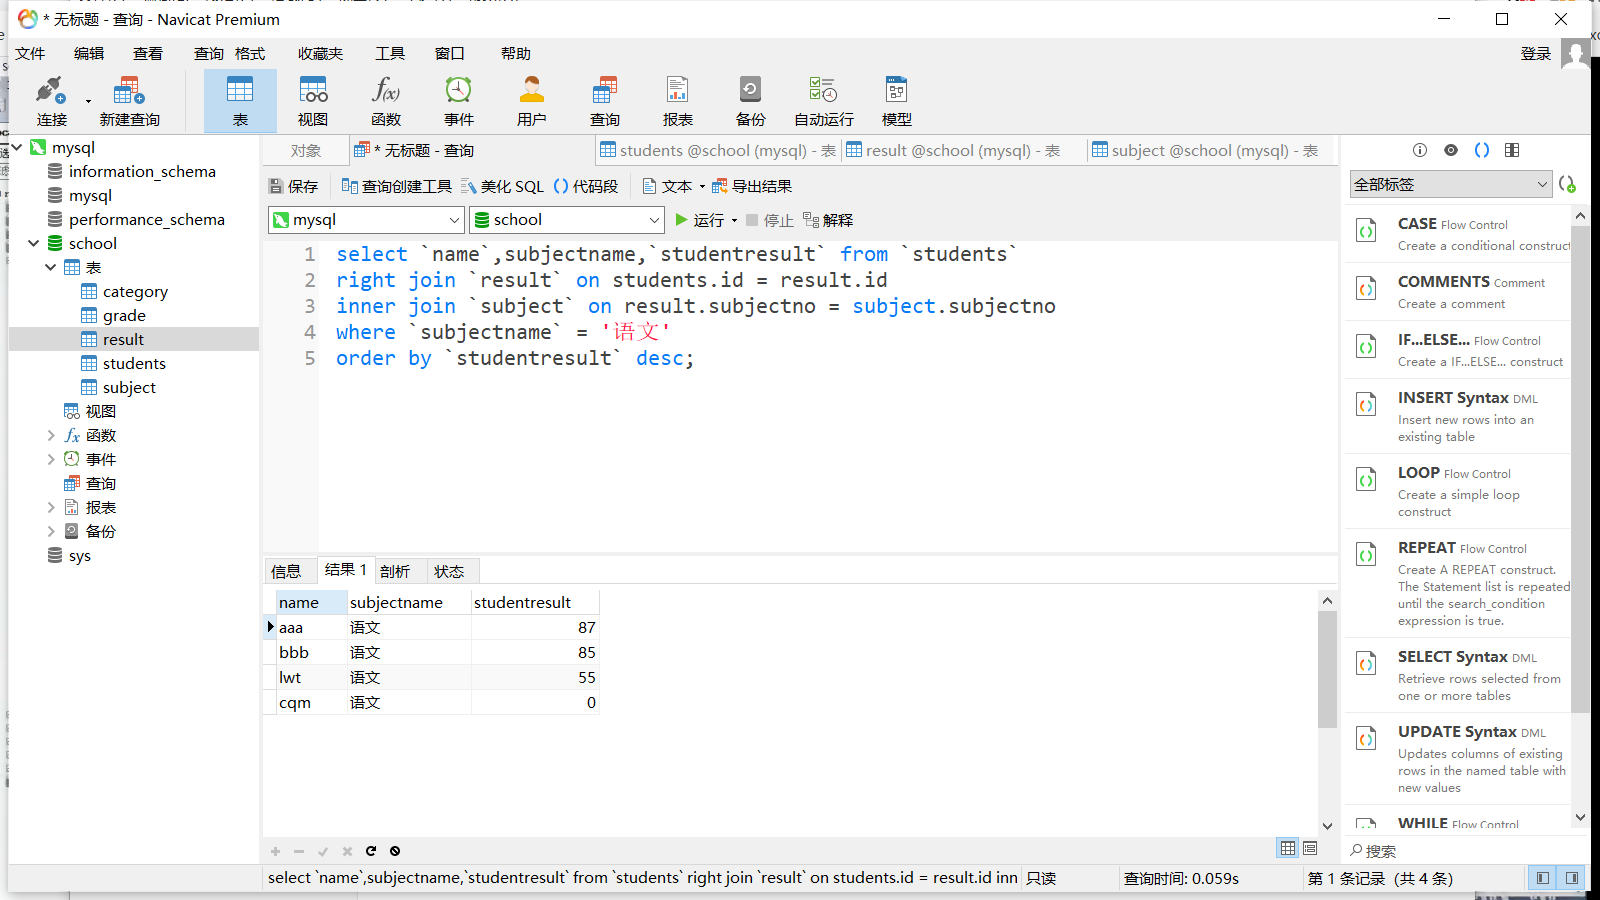
2.3.6 分页和排序 排序 order by
查询语文成绩并排序
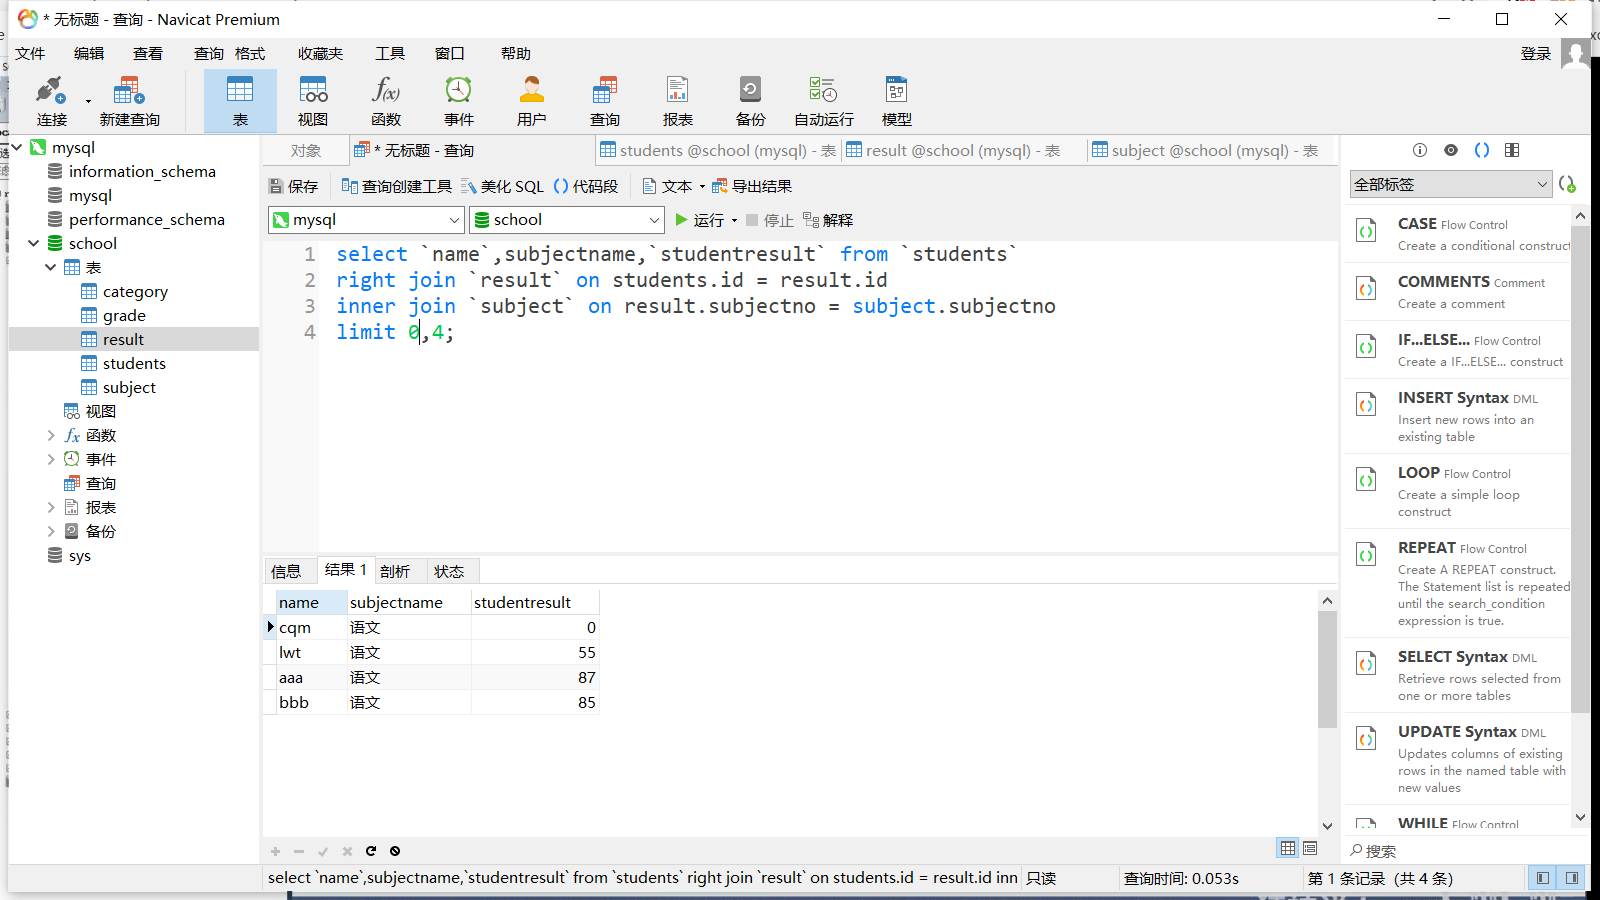
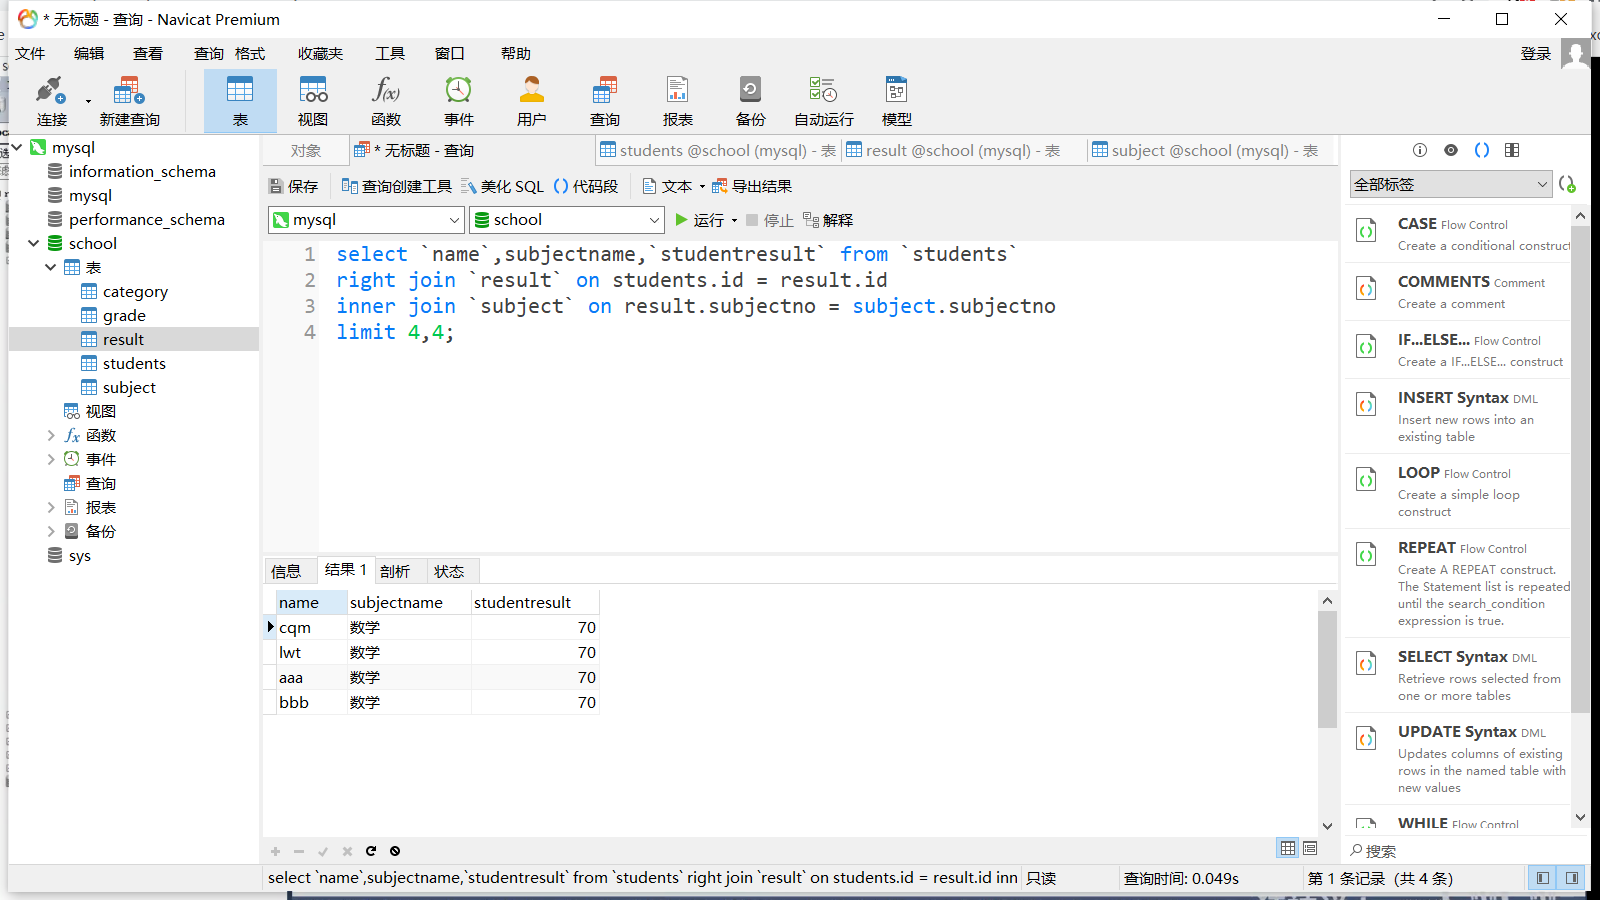
分页 limit
打印第一页语文成绩
打印第二页数学成绩
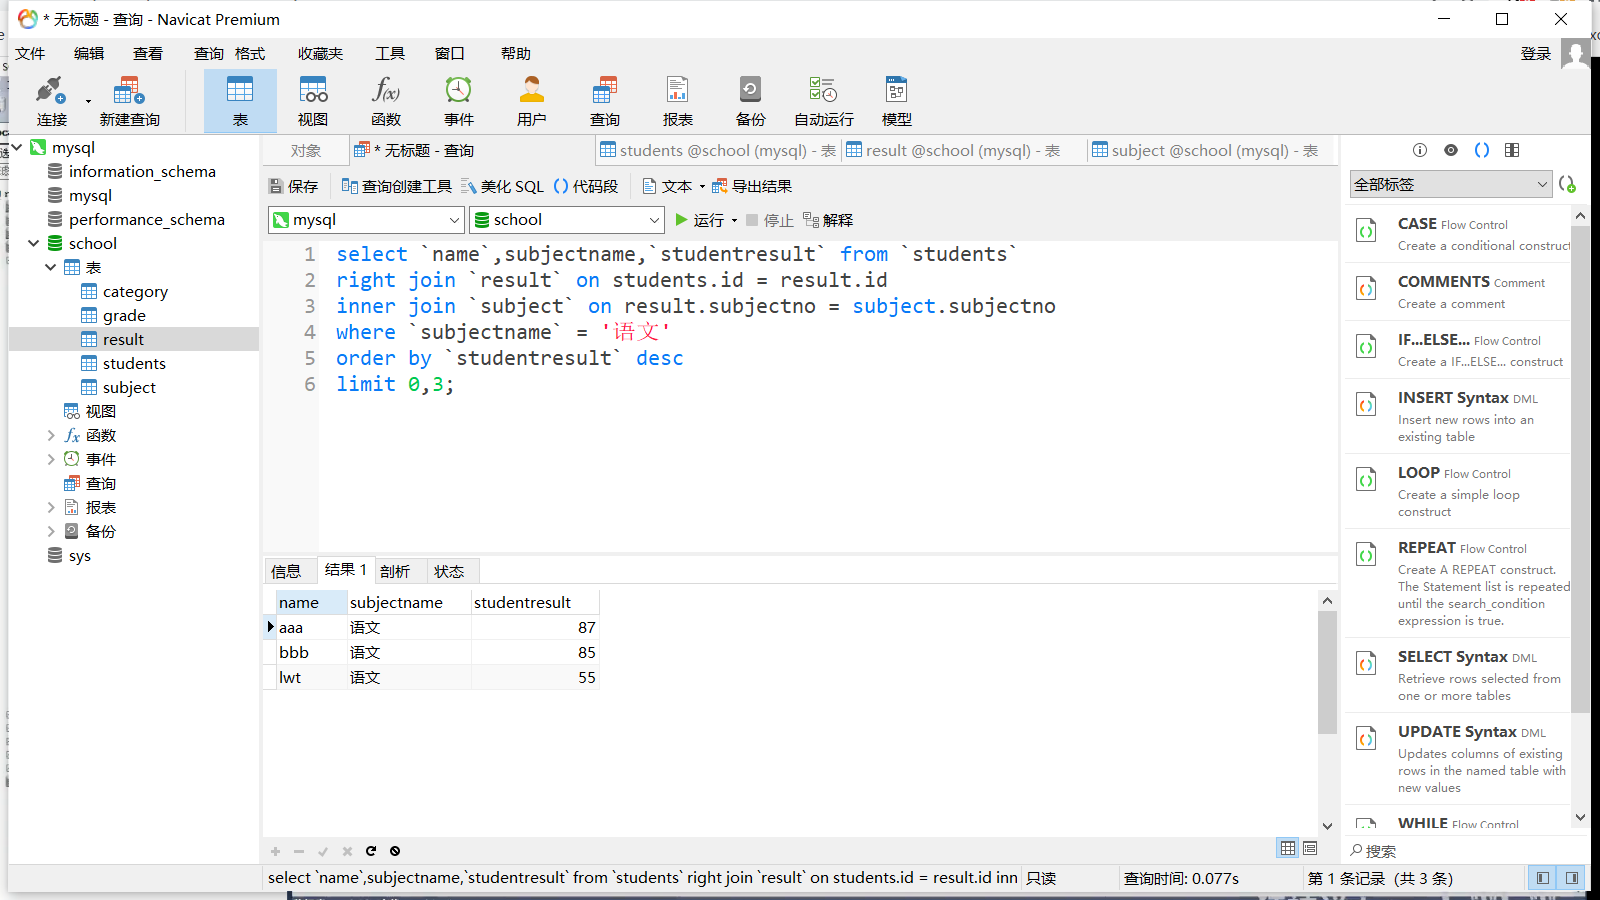
分页和排序配合起来就可以查询学生的前几名成绩,例如语文成绩前三名
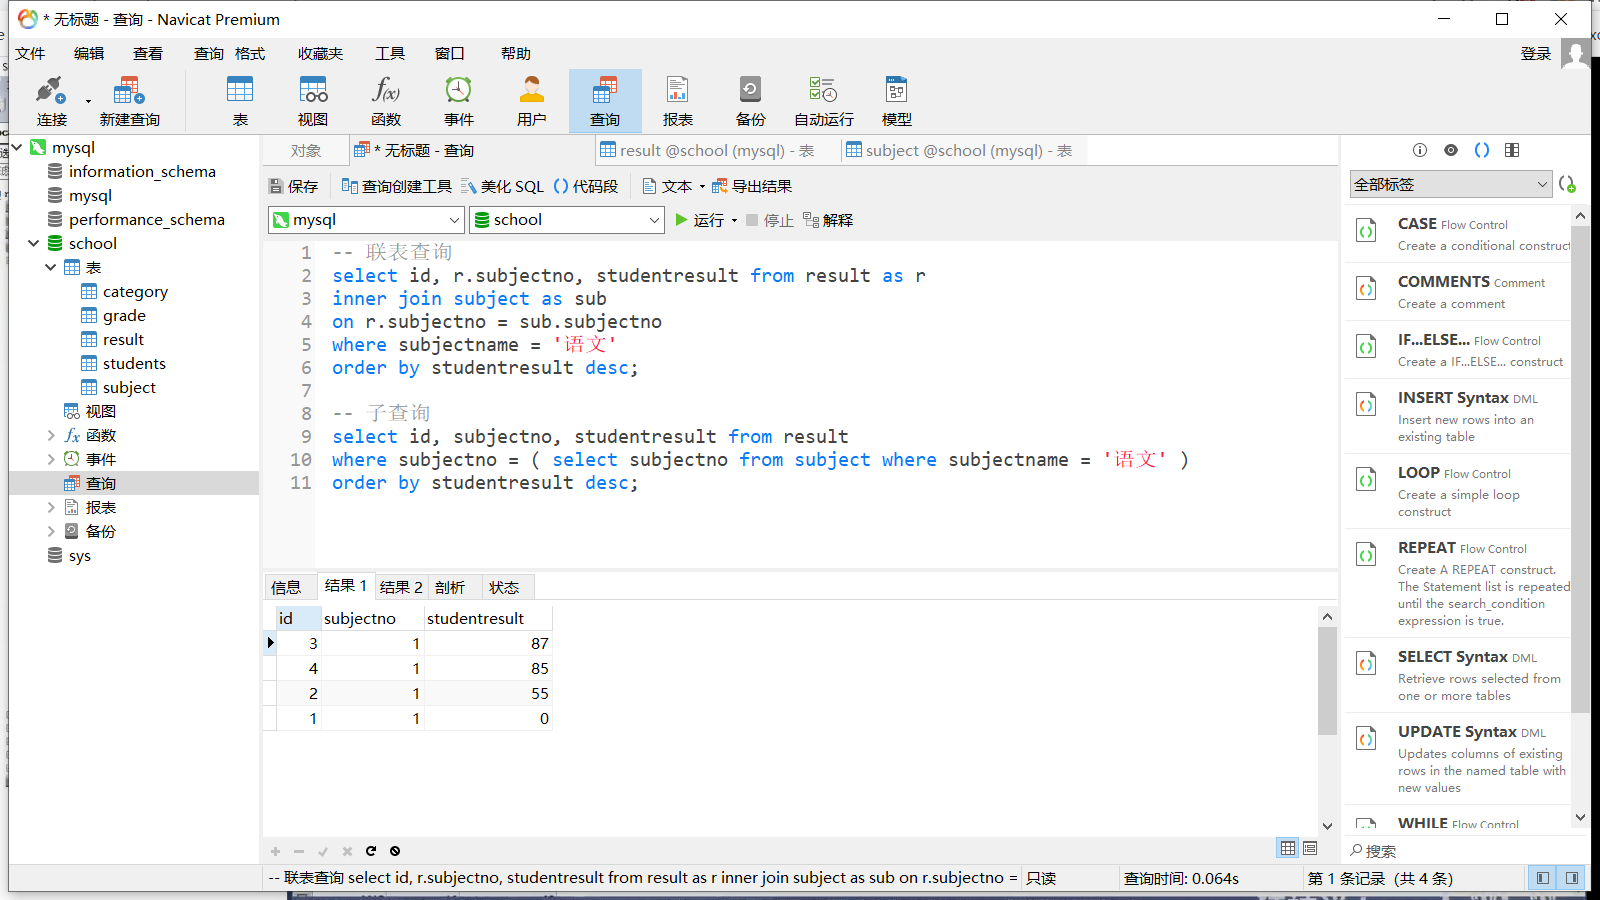
2.3.7 子查询 本质上就是在判断语句里嵌套一个查询语句,例如要查询所有语文成绩并降序排序,可以通过联表查询和子查询两种方式实现
2.4 聚合函数 2.4.1 count count 函数用于计数,例如查询有多少学生
1 select count (`name`) from students;
函数内所带的参数不同,背后运行也不同:
count(字段):会忽略空值,不计数
count(*):不会忽略空值
count(1):不会忽略空值
从效率上看:如果查询的列为主键,那么 count(字段) 比 count(1) 快,不为主键则反之;如果表中只有一列,则 count(*) 最快
2.4.2 sum 顾名思义,用于求和,例如查询所有成绩之和
1 select sum (`score`) as '总分' from result
2.4.3 avg 1 select avg (`score`) as '平均分' from result
2.4.4 max和min 1 select max (`score`) as '最高分' from result
1 select min (`score`) as '最低分' from result
查询所有科目的平均分、最高分和最低分
1 2 3 4 5 6 select subjectname, avg (studentresult), max (studentresult), min (studentresult)from `result `inner join `subject`on `result `.subjectno = `subject`.subjectnogroup by result.subjectno;
通过分组后的次要条件,查询平均分大于 80 分的科目
1 2 3 4 5 6 7 select subjectname, avg (studentresult) as 平均分from `result `inner join `subject`on `result `.subjectno = `subject`.subjectnogroup by `result `.subjectnohaving 平均分 > 80 ;
2.5 MD5加密 在数据库中,密码等敏感信息都不会以明文的形式存储的,可以通过md5 进行加密
1 2 update students set pwd= md5(pwd);
1 2 insert into students values (1 , 'cqm' , md5('12345' ))
2.6 事务 事务就是一系列 SQL 语句,要么全部执行,要么全部不执行。
事务的特性(ACID):
原子性(Atomicity):所有操作要么全部成功,要么全部失败
一致性(Consistency):事务的执行的前后数据的完整性保持一致
隔离性(Isolation):一个事务执行的过程中,不受到别的事务的干扰
持久性(Durability):事务一旦结束,就会持久到数据库
隔离所导致的一些问题:
脏读:一个事务读取到了另一个事务没提交的数据
不可重复读:一个事务的多次查询结果不同,是因为查询期间数据被另一个事务提交而修改了
虚读:一个事务A在进行修改数据的操作时,另一个事务B插入了新的一行数据,而对于事务A来看事务B添加的那行就没有做修改,就发生了虚读
事务关闭自动提交
事务开启
事务提交
事务回滚
事务结束
保存点
1 2 3 4 5 6 savepoint 保存点名称rollback to savepoint 保存点名称release savepoint 保存点名称
2.7 索引 索引是帮助 MySQL 高效获取数据的数据结构。
索引的分类:
主键索引(primary key):只有一列可以作为主键,且主键的值不可重复,一般用于用户ID之类的
唯一索引(unique key):唯一索引可以有多个,且值唯一
常规索引(key):例如一个表中的数据经常用到,就可以添加个常规索引
全文索引(fulltext):快速定位数据
查看某个表的所有索引
1 show index from `table_name`;
添加全文索引
1 alter table `table_name` add fulltext index `index_name`(`要添加索引的字段名`);
添加常规索引
1 2 create index `id_table_name_字段名` on `table_name`('字段名' );
索引使用原则:
并不是索引越多越好
不要对进程变动的数据添加索引
数据量小的表不需要索引
索引一般用于常查询的字段上
2.8 权限管理 在 MySQL 中,用户表为 mysql.user,而权限管理其实都是在该表上操作。
创建用户
1 2 3 4 5 6 create user 'user_name' @'host' identified by 'user_password' ;
修改当前用户密码
1 set password = password('new_password' );
修改指定用户密码
1 set password for user_name = password('new_password' );
重命名
1 rename user user_name to new_user_name;
授权
1 2 grant 权限 on `db_name`.`table_name` to 'user_name' @'host' ;
授予某个用户部分权限
1 grant select ,insert on mysql.user to 'cqm' @'%' ;
给某个用户授予全部数据库的权限
1 2 grant all privileges on * .* to 'cqm' @'%' ;
删除用户
1 drop user 'user_name' @'host' ;
取消权限
1 revoke 权限 on `db_name`.`table_name` from 'user_name' @'host' ;
查询用户权限
1 show grants for 'user_name' @'host' ;
2.9 备份 备份文件都是以 .sql 为后缀的文件。
导出
1 2 3 4 5 # -d:要操作的数据库 # -h:指定主机 # -P:指定端口 # --all-databases:操作所有数据库 mysqldump -uroot -ppassword -d db1_name db2_name > db_backup.sql
导入
1 mysqldump -uroot -ppassword -d db_name < db_backup.sql
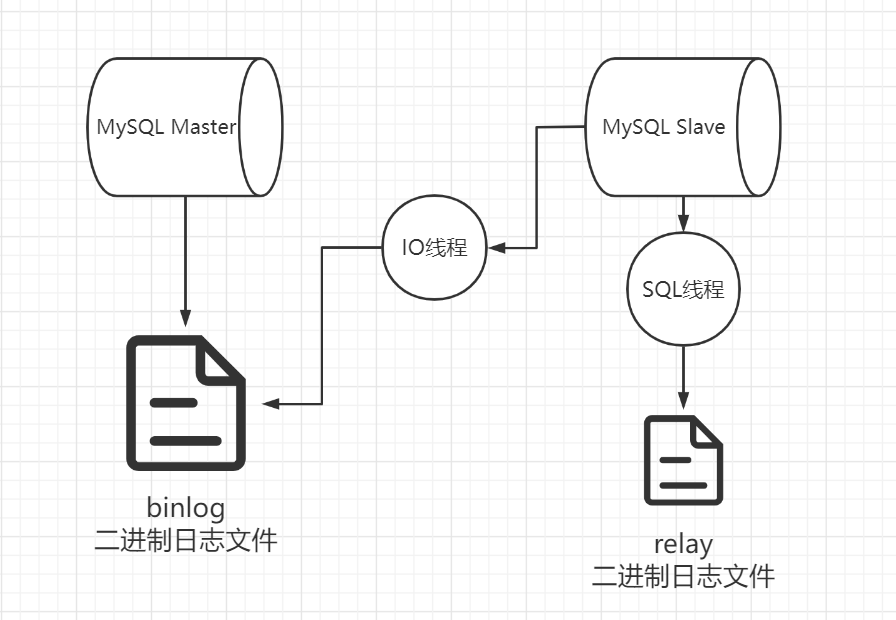
三、MySQL配置 3.1 主从同步/复制 MySQL 主从同步即每当主数据库进行了数据的操作后,就会将操作写入 binlog 文件,从数据库会启动一个 IO 线程去监控主数据库的 binlog 文件,并将 binlog 文件的内容写入自己的 relaylog 文件中,同时会启动一个 SQL 线程去监控 relaylog 文件,如果发生变化就更新数据。
主从复制的类型:
statement模式(sbr):只有修改数据的 SQL 语句会记录到 binlog 中,优点是减少了日志量,节省 IO,提高性能,不足是可能会导致主从节点之间的数据有差异。
row模式(rbr):仅记录被修改的数据,不怕无法正确复制的问题,但会产生大量的 binlog。
mixed模式(mbr):sbr 和 rbr 的混合模式,一般复制用 sbr,sbr 无法复制的用 rbr。
主从同步实现
docker-compose.yaml
1 2 3 4 5 6 7 8 9 10 11 12 13 14 15 16 17 18 19 20 21 22 23 version: '3.8' services: mysql_master: image: mysql:5.7.35 command: --default-authentication-plugin=mysql_native_password restart: always environment: MYSQL_ROOT_PASSWORD: toortoor ports: - 3306 :3306 volumes: - ./master/my.cnf:/etc/mysql/my.cnf mysql_slave: image: mysql:5.7.35 command: --default-authentication-plugin=mysql_native_password restart: always environment: MYSQL_ROOT_PASSWORD: toortoor ports: - 3307 :3306 volumes: - ./slave/my.cnf:/etc/mysql/my.cnf
master/my.cnf
1 2 3 4 5 6 7 8 9 10 11 12 13 [mysqld] server-id = 1 #节点ID,确保唯一 log-bin = mysql-bin #开启mysql的binlog日志功能 sync_binlog = 1 #控制数据库的binlog刷到磁盘上去,0不控制,性能最好;1每次事物提交都会刷到日志文件中,性能最差,最安全 binlog_format = mixed #binlog日志格式,mysql默认采用statement,建议使用mixed expire_logs_days = 7 #binlog过期清理时间 max_binlog_size = 100m #binlog每个日志文件大小 binlog_cache_size = 4m #binlog缓存大小 max_binlog_cache_size= 512m #最大binlog缓存大 binlog-ignore-db=mysql #不生成日志文件的数据库,多个忽略数据库可以用逗号拼接,或者复制这句话,写多行 auto-increment-offset = 1 #自增值的偏移量 auto-increment-increment = 1 #自增值的自增量 slave-skip-errors = all #跳过从库错误
slave/my.cnf
1 2 3 4 5 6 7 [mysqld] server-id = 2 log-bin=mysql-bin relay-log = mysql-relay-bin replicate-wild-ignore-table=mysql.% replicate-wild-ignore-table=test.% replicate-wild-ignore-table=information_schema.%
在 master 创建复制用户并授权
1 2 3 create user 'repl_user' @'%' identified by 'toortoor' ;grant replication slave on * .* to 'repl_user' @'%' identified by 'toortoor' ;flush privileges;
查看 master 状态
1 2 3 4 5 6 show master status;+ | File | Position | ...+ | mysql- bin.000003 | 844 | ...+
在从数据库配置
1 2 3 4 5 6 7 8 9 change master to MASTER_HOST = '172.19.0.3' , MASTER_USER = 'repl_user' , MASTER_PASSWORD = 'toortoor' , MASTER_PORT = 3306 , MASTER_LOG_FILE= 'mysql-bin.000003' , MASTER_LOG_POS= 844 , MASTER_RETRY_COUNT = 60 , MASTER_HEARTBEAT_PERIOD = 10000 ;
启动从配置
1 2 start slave;show slave status\G;
如果配置失败,可以执行
1 2 stop slave; set global sql_slave_skip_counter= 1 ;
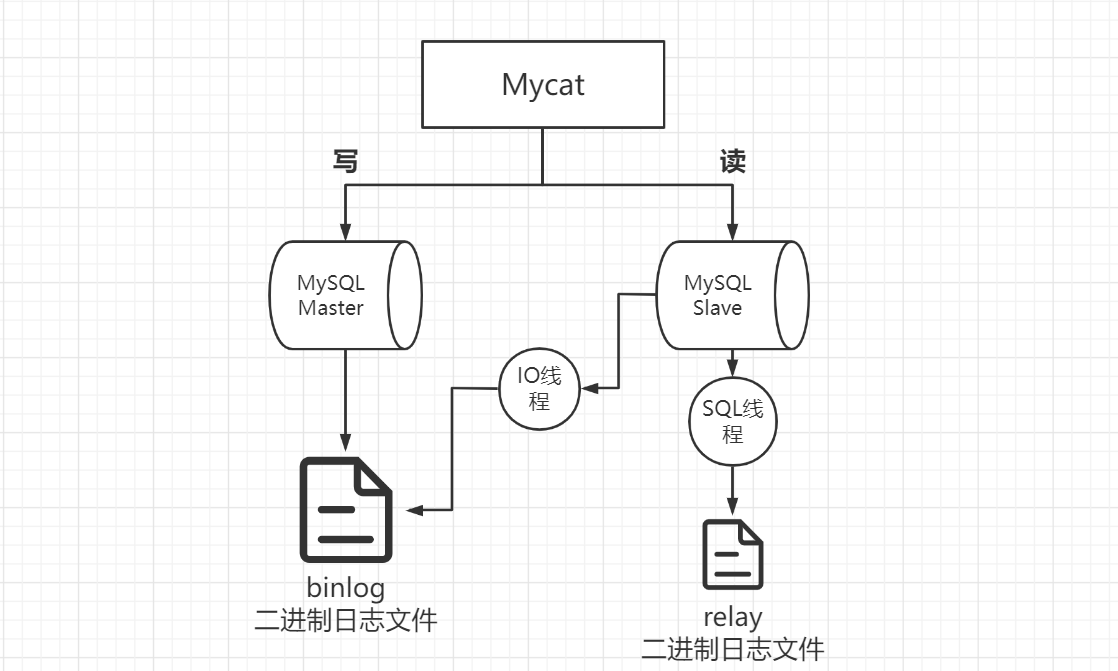
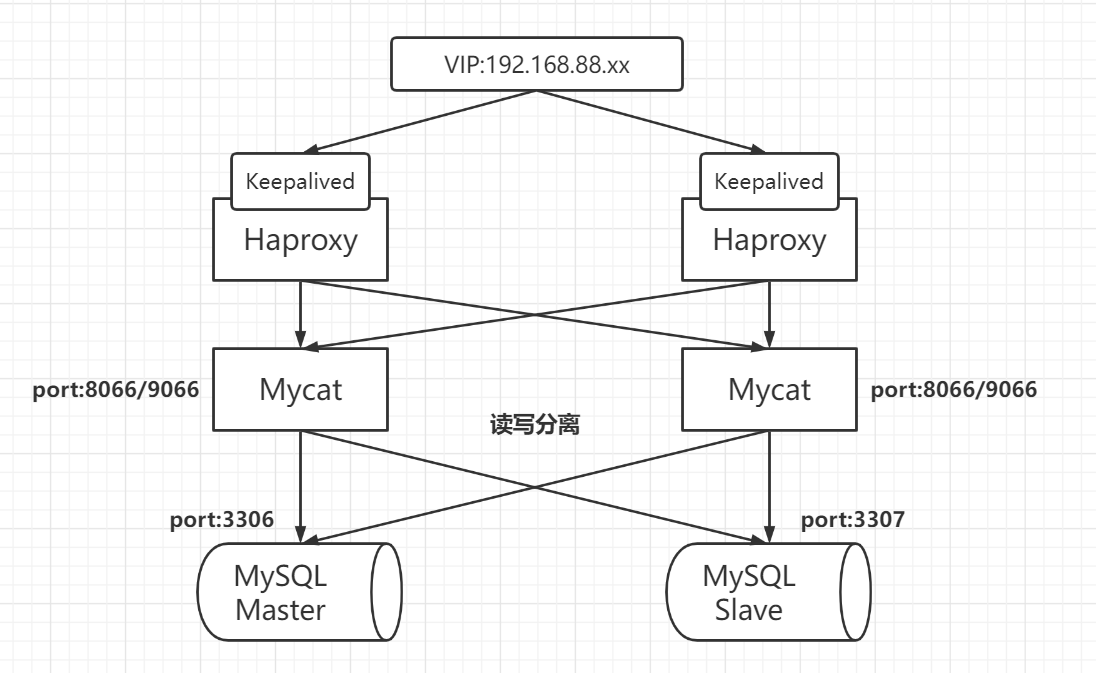
3.2 Mycat读写分离 在一般项目中,对于数据库的操作读要远大于写,而如果所有的操作都放在一个节点上,那么就很容易出现压力过大而宕机,读写分离就可以很好解决该问题,主要通过 mycat 的中间件来实现。
分库分表类型:
水平拆分:将不同等级的会员信息写到不同的表中
垂直拆分:将买家信息、卖家信息、商品信息、支付信息等不同信息写到不同的表中
Mycat的主要文件:
文件
说明
server.xml
设置 Mycat 账号、参数等
schema.xml
设置 Mycat 对应的物理数据库和表等
rule.xml
分库分表设置
server.xml
1 2 3 4 5 6 7 8 9 10 11 12 13 14 15 16 17 18 19 20 21 22 23 24 25 26 27 28 29 30 <user name ="root" defaultAccount ="true" > <property name ="password" > 123456</property > <property name ="schemas" > TESTDB</property > <property name ="defaultSchema" > TESTDB</property > </user > <user name ="user" > <property name ="password" > user</property > <property name ="schemas" > TESTDB</property > <property name ="readOnly" > true</property > <property name ="defaultSchema" > TESTDB</property > </user >
schema.xml
1 2 3 4 5 6 7 8 9 10 11 12 13 14 15 16 17 18 19 20 21 22 23 24 25 26 27 28 29 30 31 32 33 34 35 36 37 38 39 40 41 42 43 44 45 46 47 48 49 50 51 52 53 <mycat:schema xmlns:mycat ="http://io.mycat/" > <schema name ="TESTDB" checkSQLschema ="true" sqlMaxLimit ="100" randomDataNode ="dn1" > <table name ="customer" primaryKey ="id" dataNode ="dn1,dn2" rule ="sharding-by-intfile" autoIncrement ="true" fetchStoreNodeByJdbc ="true" > <childTable name ="customer_addr" primaryKey ="id" joinKey ="customer_id" parentKey ="id" > </childTable > </table > </schema > <dataNode name ="dn1" dataHost ="localhost1" database ="db1" /> <dataNode name ="dn2" dataHost ="localhost1" database ="db2" /> <dataNode name ="dn3" dataHost ="localhost1" database ="db3" /> <dataHost name ="localhost1" maxCon ="1000" minCon ="10" balance ="0" writeType ="0" dbType ="mysql" dbDriver ="jdbc" switchType ="1" slaveThreshold ="100" > <heartbeat > select user()</heartbeat > <writeHost host ="hostM1" url ="jdbc:mysql://localhost:3306" user ="root" password ="root" > <readHost host ="hostS1" url ="jdbc:mysql://localhost:3306" user ="root" password ="root" /> </readHost > </writeHost > </dataHost > </mycat:schema >
rule.xml
1 2 3 4 5 6 7 8 9 10 11 12 13 <tableRule name ="mod-long" > <rule > <columns > id</columns > <algorithm > mod-long</algorithm > </rule > </tableRule > ... <function name ="mod-long" class ="io.mycat.route.function.PartitionByMod" > <property name ="count" > 2</property > </function >
在 master 节点创建数据库
1 2 3 create database db1;create database db2;
在每个库里创建表
1 2 3 4 5 create table students( id int (4 ), name varchar (10 ), primary key(`id`) )engine= innodb default charset= utf8;
开启 Mycat,默认开启8066服务端端口和9066管理端端口
在有安装 mysql 的主机登录 Mycat,也可以通过 navicat 连接
1 mysql -uroot -ptoortoor -h 192.168.88.136 -P 8066
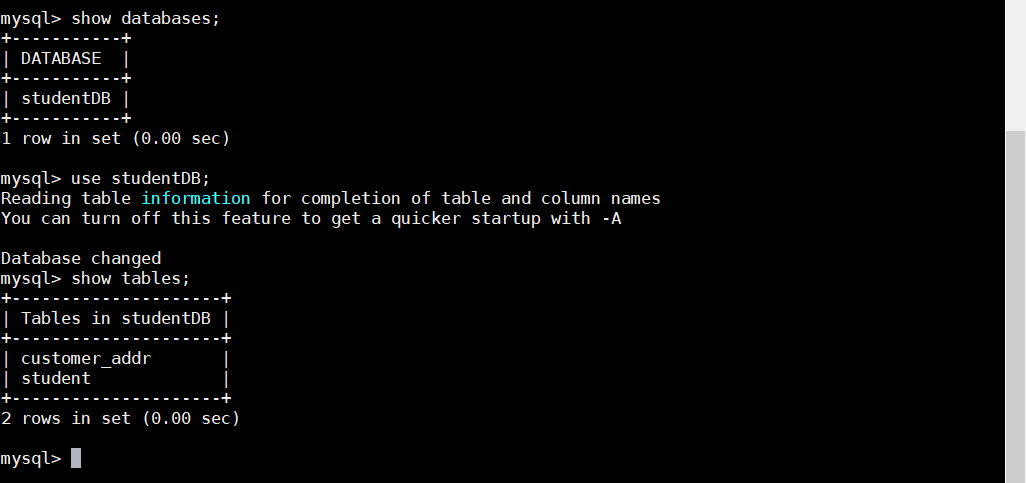
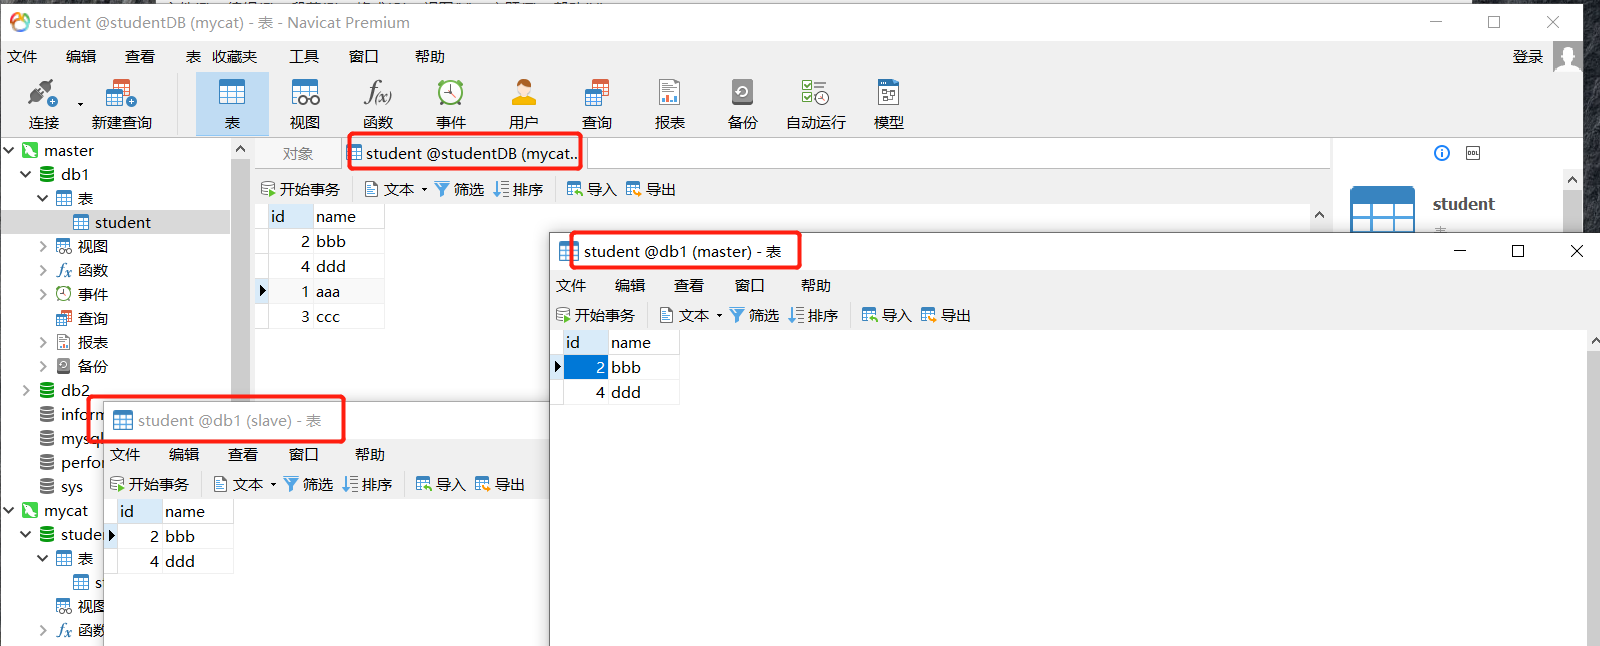
只要在 Mycat 进行 SQL 操作,都会流到 mysql 集群中被处理,也可以看到已经实现了分库分表
3.3 使用haproxy实现Mycat高可用 haproxy 可以实现 Mycat 集群的高可用和负载均衡,而 haproxy 的高可用通过 keepalived 来实现。
安装 haproxy
修改日志文件
1 2 3 4 5 vim /etc/rsyslog.conf # Provides UDP syslog reception $ ModLoad imudp $ UDPServerRun 514 systemctl restart rsyslog
配置 haproxy
1 2 3 4 5 6 7 8 9 10 11 12 13 14 15 16 17 18 19 20 21 22 23 24 25 26 27 28 29 30 31 32 33 34 35 36 37 38 39 40 41 42 43 44 45 46 47 48 49 50 51 52 53 54 55 56 57 58 59 60 61 62 63 vim /etc/haproxy/haproxy.cfg # haproxy的配置文件由两个部分构成,全局设定和代理设定 # 分为五段:global、defaults、frontend、backend、listen global # 定义全局的syslog服务器 log 127.0.0.1 local2 chroot /var/lib/haproxy pidfile /var/run/haproxy.pid maxconn 4000 user haproxy group haproxy # 设置haproxy后台守护进程形式运行 daemon stats socket /var/lib/haproxy/stats defaults # 处理模式 # http:七层 # tcp:四层 # health:状态检查,只会返回OK mode tcp # 继承global中log的定义 log global option tcplog option dontlognull option http-server-close # option forwardfor except 127.0.0.0/8 # serverId对应的服务器挂掉后,强制定向到其他健康的服务器 option redispatch retries 3 timeout http-request 10s timeout queue 1m timeout connect 10s timeout client 1m timeout server 1m timeout http-keep-alive 10s timeout check 10s maxconn 3000 frontend mycat # 开启本地监控端口 bind 0.0.0.0:8066 bind 0.0.0.0:9066 mode tcp log global default_backend mycat backend mycat balance roundrobin # 监控的Mycat server mycat1 192.168.88.135:8066 check inter 5s rise 2 fall 3 server mycat2 192.168.88.135:8066 check inter 5s rise 2 fall 3 server mycatadmin1 192.168.88.136:9066 check inter 5s rise 2 fall 3 server mycatadmin2 192.168.88.136:9066 check inter 5s rise 2 fall 3 listen stats mode http # 访问haproxy的端口 bind 0.0.0.0:9999 stats enable stats hide-version # url路径 stats uri /haproxy stats realm Haproxy\ Statistics # 用户名/密码 stats auth admin:admin stats admin if TRUE
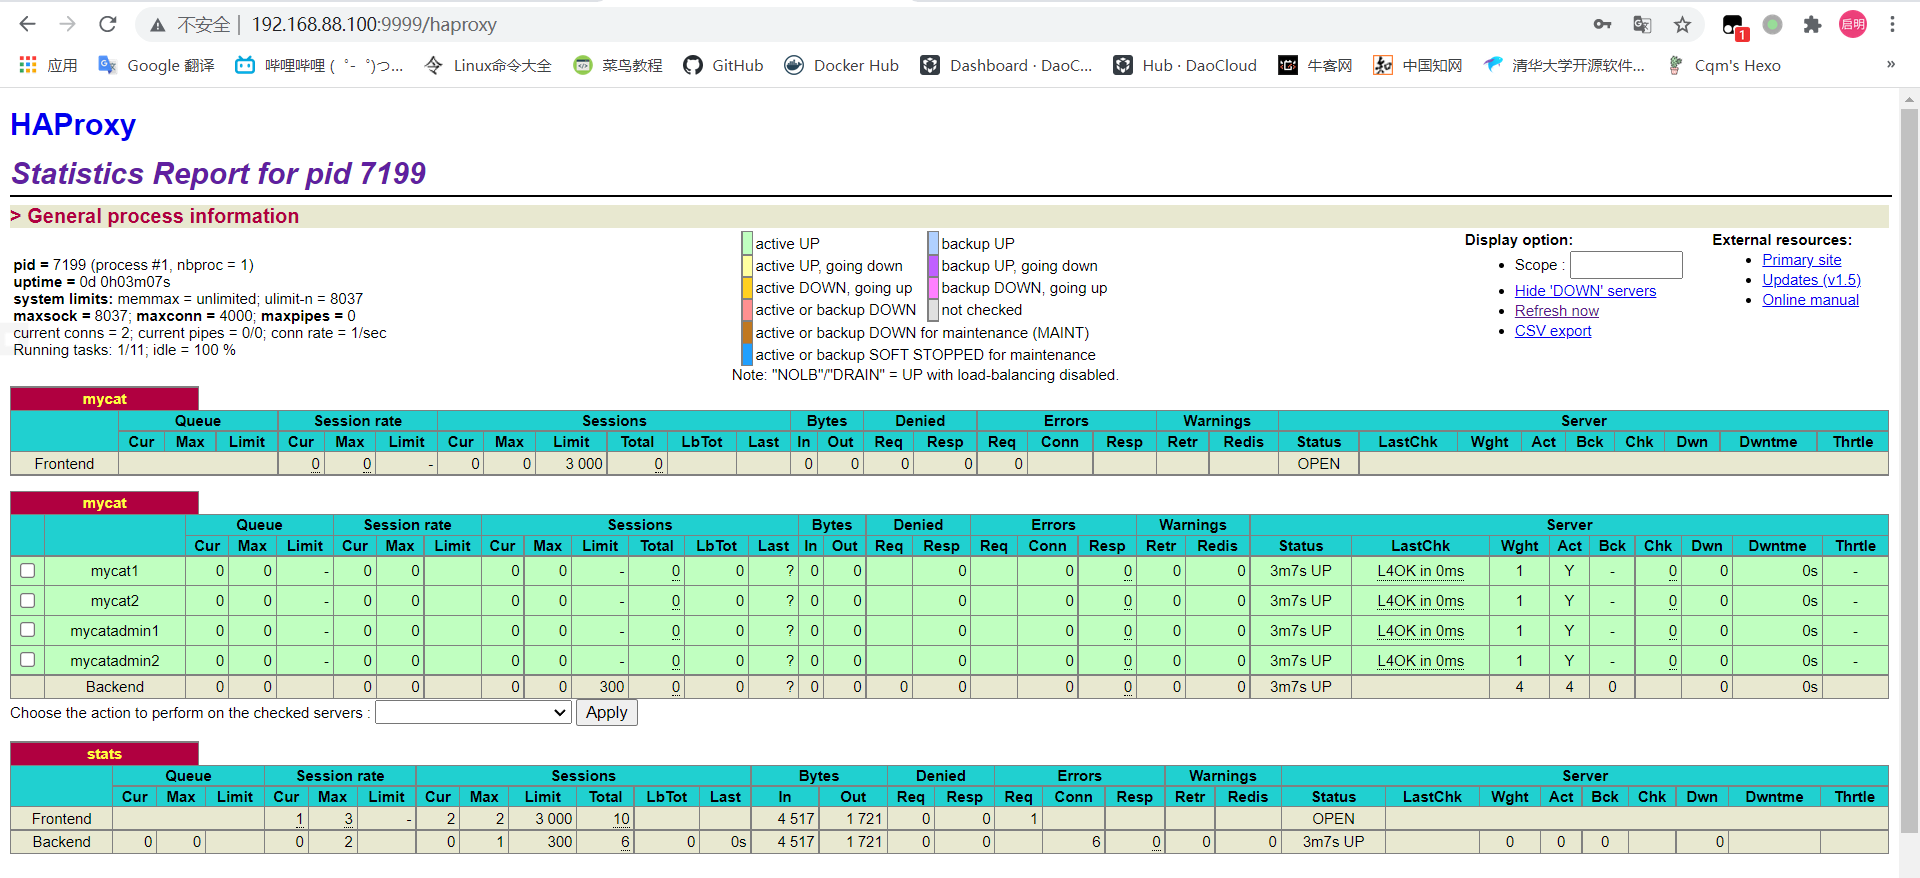
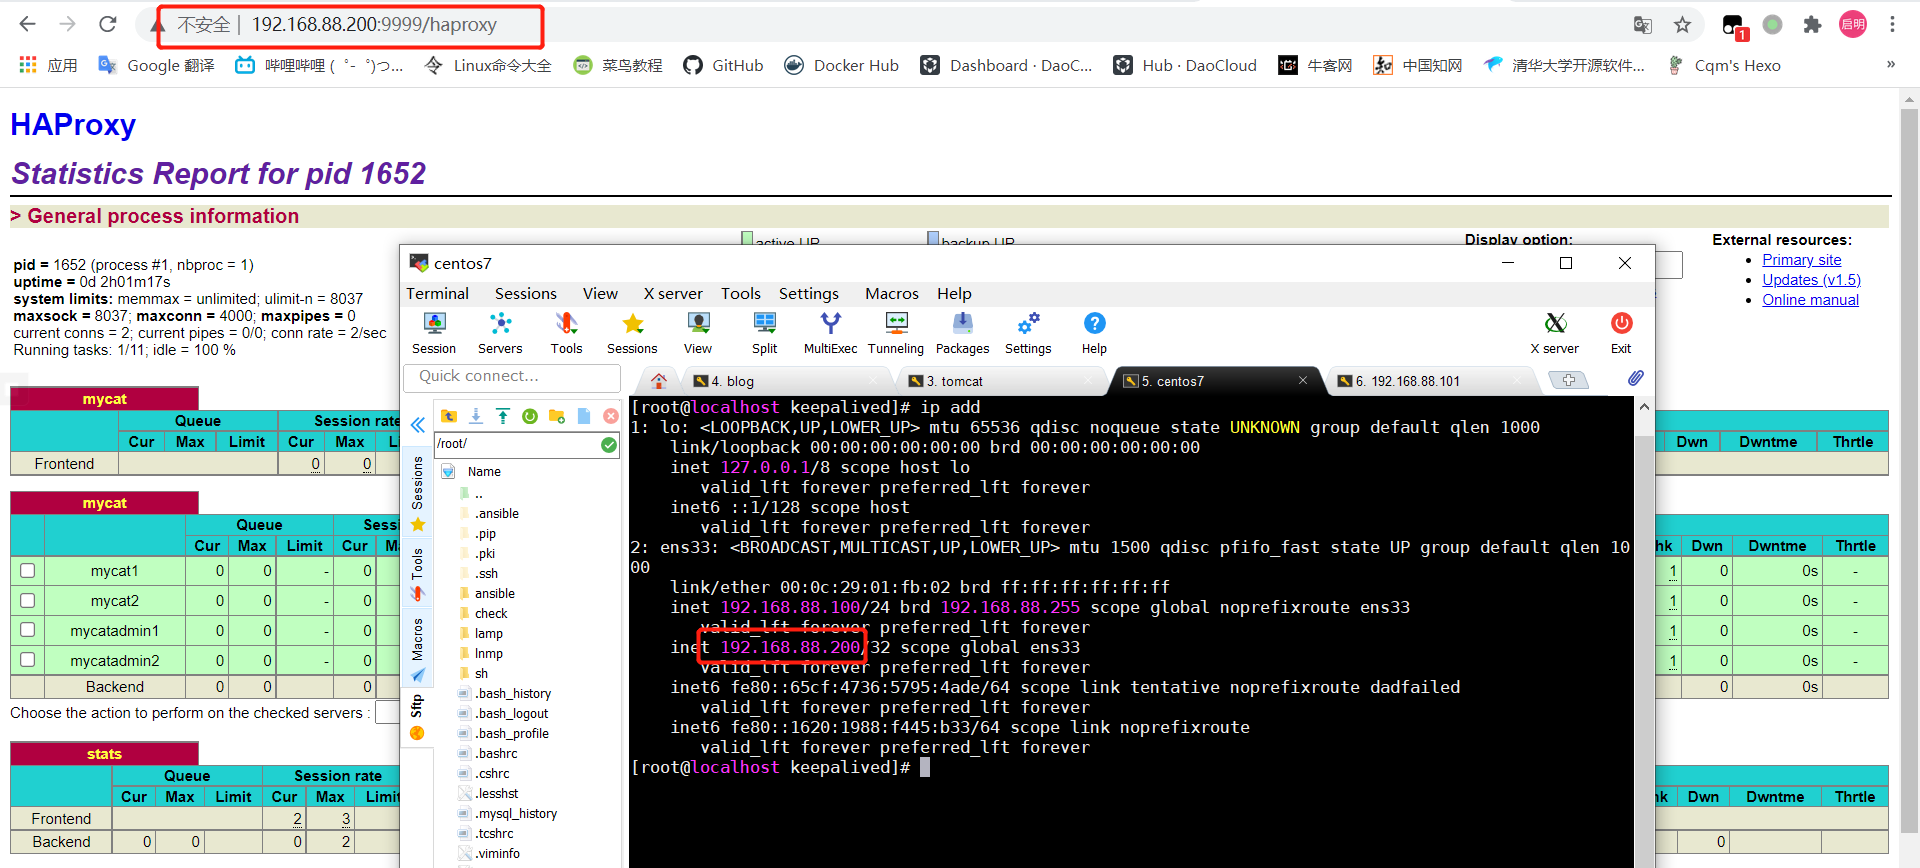
访问 haproxy
3.4 使用keepalived实现去中心化
安装 keepalived
1 yum -y install keepalived
配置 Master 节点
1 2 3 4 5 6 7 8 9 10 11 12 13 14 15 16 17 18 19 20 21 22 23 24 25 26 27 28 29 30 31 32 33 34 35 36 37 38 39 40 41 42 43 44 vim /etc/keepalived/keepalived.conf ! Configuration File for keepalived global_defs { # 识别节点的id router_id haproxy01 } vrrp_instance VI_1 { # 设置角色,由于抢占容易出现 VIP 切换而闪断带来的风险,所以该配置为不抢占模式 state BACKUP # VIP所绑定的网卡 interface ens33 # 虚拟路由ID号,两个节点必须一样 virtual_router_id 30 # 权重 priority 100 # 开启不抢占 # nopreempt # 组播信息发送间隔,两个节点必须一样 advert_int 1 # 设置验证信息 authentication { auth_type PASS auth_pass 1111 } # VIP地址池,可以多个 virtual_ipaddress { 192.168.88.200 } # 将 track_script 块加入 instance 配置块 track_script{ chk_haproxy } } # 定义监控脚本 vrrp_script chk_haproxy { script "/etc/keepalived/haproxy_check.sh" # 时间间隔 interval 2 # 条件成立权重+2 weight 2 }
配置 Slave 节点
1 2 3 4 5 6 7 8 9 10 11 12 13 14 15 16 17 18 19 20 21 22 23 24 25 26 27 28 29 30 31 vim /etc/keepalived/keepalived.conf ! Configuration File for keepalived global_defs { router_id haproxy02 } vrrp_instance VI_1 { state BACKUP interface ens33 virtual_router_id 30 priority 80 # nopreempt advert_int 1 authentication { auth_type PASS auth_pass 1111 } virtual_ipaddress { 192.168.88.200 } track_script{ chk_haproxy } } vrrp_script chk_haproxy { script "/etc/keepalived/haproxy_check.sh" interval 2 weight 2 }
编写监控脚本
1 2 3 4 5 6 7 8 9 10 11 12 13 14 15 16 17 18 19 20 21 22 23 24 25 26 vim /etc/keepalived/haproxy_check.sh # !/bin/bash START_HAPROXY="systemctl start haproxy" STOP_KEEPALIVED="systemctl stop keepalived" LOG_DIR="/etc/keepalived/haproxy_check.log" HAPS=`ps -C haproxy --no-header | wc -l` date "+%F %H:%M:%S" > $LOG_DIR echo "Check haproxy status" >> $LOG_DIR if [ $HAPS -eq 0 ]; then echo "Haproxy is down" >> $LOG_DIR echo "Try to turn on Haproxy..." >> $LOG_DIR echo $START_HAPROXY | sh sleep 3 if [ `ps -C haproxy --no-header | wc -l` -eq 0 ]; then echo -e "Start Haproxy failed, killall keepalived\n" >> $LOG_DIR echo $STOP_KEEPALIVED | sh else echo -e "Start Haproxy successed\n" >> $LOG_DIR fi else echo -e "Haproxy is running\n" >> $LOG_DIR fi
启动 keepalived 后可以看到 VIP 被哪台服务器抢占了,通过该 VIP 就可以访问到对应的 haproxy,haproxy 就会将流量流到后面的 Mycat,再由 Mycat 来实现分表分库;haproxy 停止后 keepalived 也会通过脚本尝试去重新开启,如果开启不成功就会停止 keepalived,VIP 就由 slave 节点抢占,用户依旧可以通过 VIP 来操控数据库,且无感知。
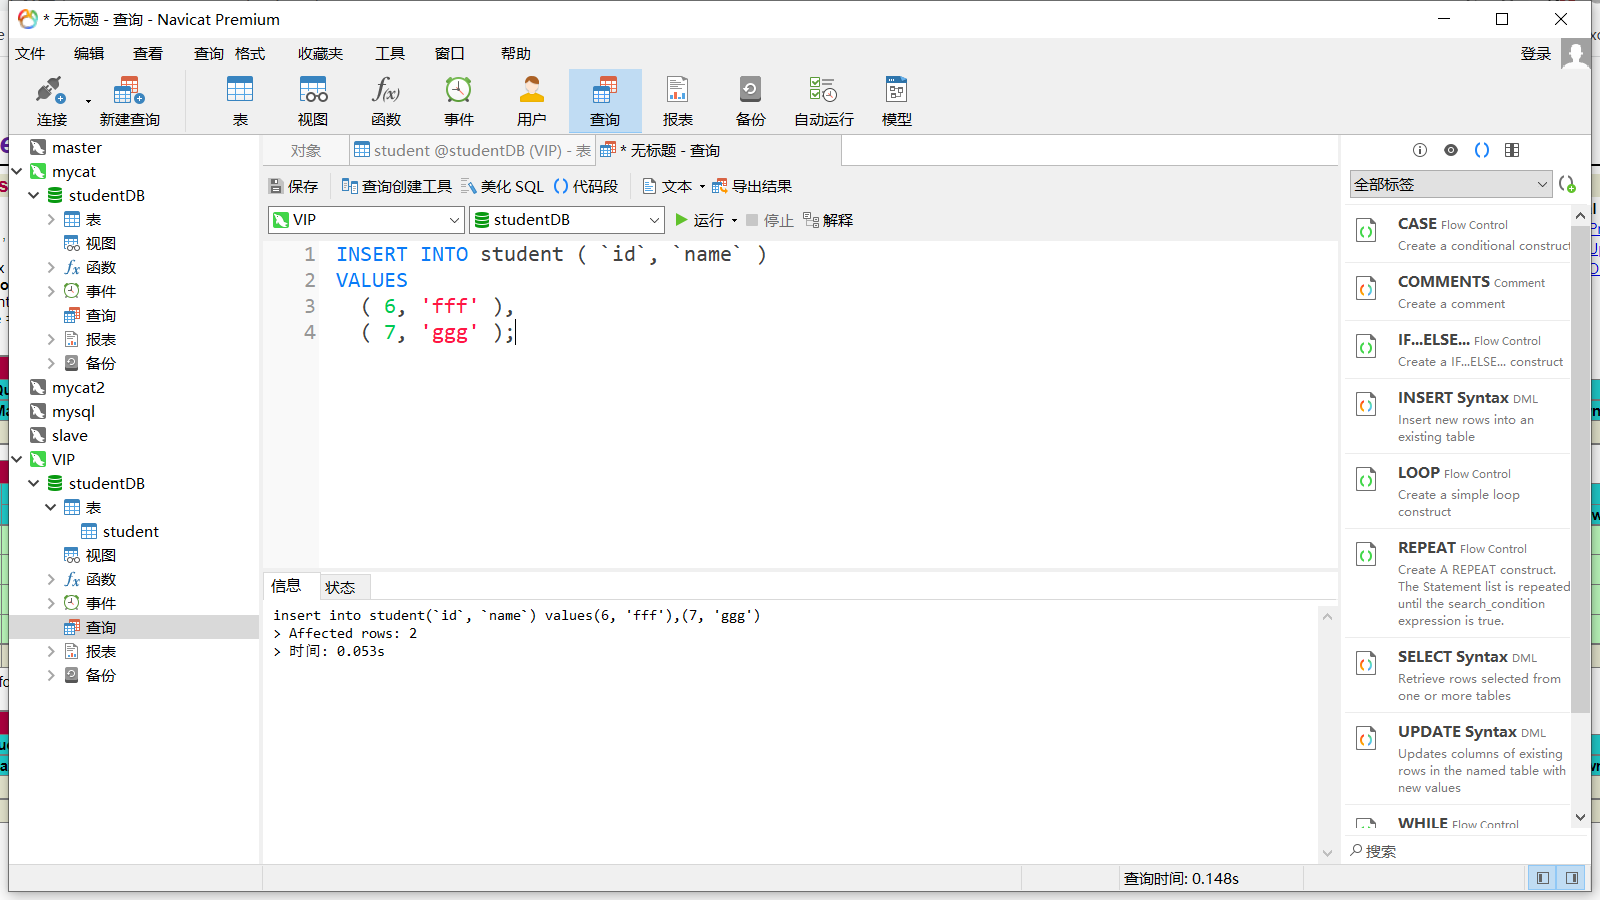
通过 VIP 去连接 Mycat 插入数据,尝试能否实现分库分表
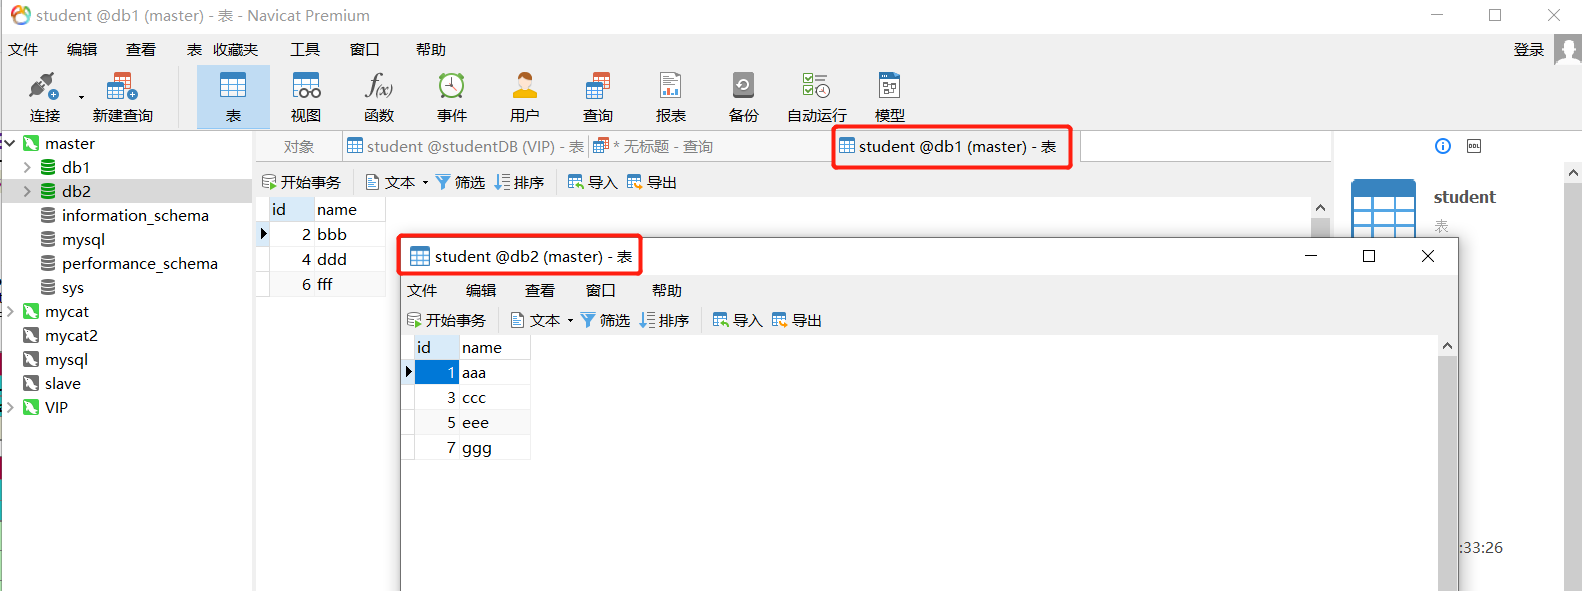
可以看到插入的数据都分到了 db1、db2 中
3.5 Sharding JDBC读写分离 Apache ShardingSphere 是一套开源的分布式数据库解决方案组成的生态圈,它由 JDBC、Proxy 和 Sidecar(规划中)这 3 款既能够独立部署,又支持混合部署配合使用的产品组成。
Sharding JDBC 同样也可以实现分库分表、数据分片、读写分离等功能,但与 Mycat 不同的是,Mycat 是一个独立的程序,而 Sharding JDBC 是以 jar 包的形式与应用程序融合在一起运行的。

