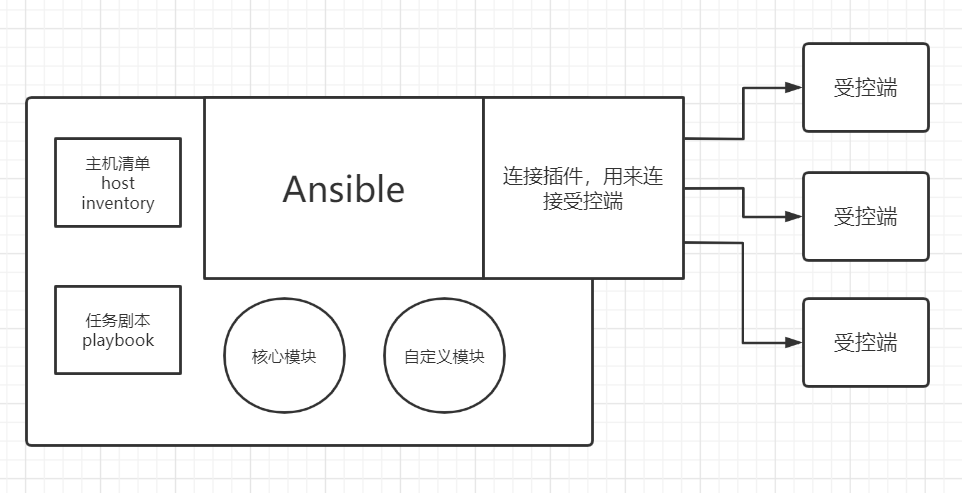
一、Ansible简介 ansbile是一个IT自动化的配置管理工具,自动化主要体现在Ansible集成了丰富的模块,可以通过一个命令完成一系列的操作,进而减少运维重复性的工作和维护成本,提高工作效率。
1.1 为什么需要ansible 思考:假设我们要在10台服务器上安装并运行nginx,要如何操作?
ssh远程登录到服务器
执行yum -y install nginx
执行systemctl start nginx
执行systemctl enable nginx
重复十次。。。
可以看到简单的工作要做十次是很浪费时间的,这时候我们就需要ansible了。
1.2 ansible有哪些功能
批量执行远程命令,可以同时对N台主机执行命令
批量配置软件服务,可以用自动化的方式配置和管理服务
实现软件开发功能,jumpserver底层使用ansible来实现自动化管理
编排高级的IT任务,playbook是ansbile的一门编程语言,可以用来描绘一套IT架构
二、Ansible安装 2.1 在控制端上安装ansible 直接利用yum源安装即可,ansible配置文件一般不需要做变动
2.2 ansible配置文件的优先级
如果当前目录不存在ansible.cfg,会采用默认的配置文件
1
2
3
4
ansible --version ... config file = /etc/ansible/ansible.cfg ...
如果当前目录存在ansible.cfg,则会采用当前目录的配置文件
1
2
3
4
ansible --version ... config file = /root/project1/ansible.cfg ...
2.3 ansible的Inventory 利用密钥来连接被控端
在项目目录下创建hosts文件
1
2
3
4
5
cd project1 vim hosts [cqm] 192.168.88.133 192.168.88.134
创建密钥
1
2
3
ssh-keygen ls /root/.ssh/ authorized_keys id_rsa id_rsa.pub known_hosts
将公钥传送至被控端主机
1
2
ssh-copy-id -i ~/.ssh/id_rsa.pub root@192.168.88.133 ssh-copy-id -i ~/.ssh/id_rsa.pub root@192.168.88.134
测试是否不需要密码就可以连接
1
2
ssh root@192.168.88.133 ssh root@192.168.88.134
三、Ansible的ad-hoc和常用模块 3.1 ansible的ad-hoc ad-hoc简而言之就是“临时命令”,执行完就结束,并不会保存
主要格式为:ansible + -i + 指定主机清单 + 指定主机组名称 + -m + 指定模块 + -a + 具体命令
使用ad-hoc后返回结果的颜色:
绿色:被控端主机没有发生变化
黄色:被控端主机发生了变化
红色:出现故障
3.2 ansible基本命令
直接执行命令
1 ansible -i hosts 主机组名 -m 模块 -a 命令
列出某个主机组的主机清单
1 ansible -i hosts 主机组名 --list-hosts
查看某个模块使用教程
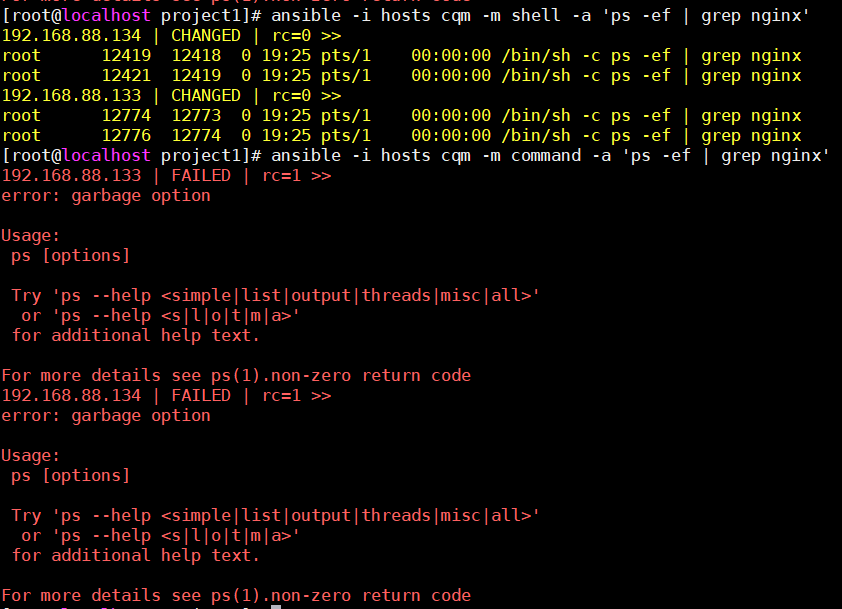
3.2 shell和command模块 shell和command本质上都是用来执行linux的基础命令,如cat、ls等等,但command不支持用|这种管道符命令
例子,同样的命令在command上会报错
1 2 ansible -i hosts cqm -m shell -a 'ps -ef | grep nginx' ansible -i hosts cqm -m command -a 'ps -ef | grep nginx'
3.3 yum模块 1 2 3 4 5 6 7 ansible -i hosts cqm -m yum -a 'name=httpd state=latest enablerepo=epel' name:指定安装软件名称 state: 1.latest为安装最新版本 2.absent为卸载 3.present为安装 enablerepo:指定在哪个yum源下安装
3.4 copy模块 1 2 3 4 5 6 7 ansible -i hosts cqm -m copy -a 'src=./httpd.conf dest=/etc/httpd/conf/httpd.conf owner=www group=www mode=0755' src:表示要复制的文件路径 dest:要复制到被控端的哪个路径 owner:复制文件的属主 group:复制文件的属组 mode:文件的权限,0755为rwxr-xr-x(r:4,w:2,x:1),也可以写成(u+rwx,g+x,o-rwx)的形式 backup:如果被控端有同名文件,是否保留
3.5 file模块 1 2 3 # 更改文件权限 ansible -i hosts cqm -m file -a 'path=/etc/nginx/nginx.conf owner=www group=www mode=0644' path:代表要改变文件的路径(被控端)
1 2 3 4 5 # 创建符号连接(软连接) ansible -i hosts cqm -m file -a 'src=/root/test1 dest=/root/test2 mode=0755 state=link' src:源文件路径(被控端) dest:软连接路径(被控端) state:link创建软连接
1 2 3 4 5 6 7 8 # 创建文件和文件夹 ansible -i hosts cqm -m file -a 'path=/root/text state=touch/directory mode=0644 recurse=yes' path:要创建在哪 state: 1.touch表创建文件 2.directory表创建文件夹 3.absent表删除 recurse: 递归授权
3.6 service模块 1 2 3 4 5 6 7 8 ansible -i hosts cqm -m service -a 'name=httpd state=started enabled=yes' name:服务名称 state: 1.started启动 2.stopped关闭 3.restarted重启 4.reloaded重载 enabled:是否开机自启
3.7 group模块 1 2 3 4 5 6 7 ansible -i hosts cqm -m group -a 'name=cqm state=present gid=1000 system=yes/no' name:创建组名称 state: 1.present创建组 2.absent删除组 gid:组id system:是否设置为系统组
3.8 user模块 1 2 3 4 5 6 7 8 9 ansible -i hosts cqm -m user -a 'name=cqm uid=1000 group=cqm shell=/bin/bash state=present create_home=no' name:创建用户名称 uid:用户id group:添加到哪个组 shell:使用/bin/bash创建用户,或/sbin/nologin state: 1.present创建用户 2.absent删除用户 create_home:是否创建家目录,默认为yes
1 2 3 4 ansible -i hosts cqm -m user -a 'name=cqm uid=1000 groups=cqm1,cqm2 append=yes state=present system:yes' groups:添加到哪些组 append:添加到多个组时添加该项 system:是否设置为系统用户
1 2 ansible -i hosts cqm -m user -a 'name=cqm state=absent remove=yes' remove:是否删除家目录
3.9 cron模块 1 2 3 4 5 6 7 8 9 10 11 ansible -i hosts cqm -m cron -a 'name="check dirs" minute=0 hour=5,2 job="ls -al > /dev/null"' name:创建定时任务名称 minute:分钟 hour:小时 job:任务 state:删除定时任务用absent # 在被控端可查看 crontab -l # Ansible: check dirs 0 5,2 * * * ls -al > /dev/null
3.10 mount模块 1 2 3 4 5 6 7 8 9 10 11 12 13 14 15 16 17 ansible -i hosts cqm -m mount -a 'path=/root/data src=/dev/sr0 fstype=iso9660 opts="ro" state=present' path:挂载到哪 src:被挂载的目录,可以是以下形式 1.UUID形式:src="UUID=......" 2.ip形式:src="192.168.88.128:/data",一般用于挂载nfs服务器的目录 fstype:挂载类型 1.iso9660:文件系统是一个标准CD-ROM文件系统 2.ext4:Linux系统下的日志文件系统 3.xfs:高性能的日志文件系统 4.none state:挂载类型 1.present:开机挂载,仅将挂载配置写入/etc/fstab 2.mounted:挂载设备,并将配置写入/etc/fstab 3.unmounted:卸载设备,不会清除/etc/fstab写入的配置 4.absent:卸载设备,会清理/etc/fstab写入的配置 opts:权限等,默认填defaults /etc/fstab:磁盘被手动挂载之后都必须把挂载信息写入/etc/fstab这个文件中,否则下次开机启动时仍然需要重新挂载。
3.11 firewalld模块 1 2 3 4 5 6 7 8 9 10 11 12 13 14 15 16 ansible -i hosts cqm -m firewalld -a 'service=https permanent=yes enable=yes immediate=yes state=enabled' service:放行服务 port:放行端口,如80/tcp source:放行指定ip地址范围,如192.168.88.0/24 state:表防火墙策略状态 1.enabled策略生效 2.disabled禁用策略 3.present添加策略 4.absent删除策略 zone:指定防火墙信任级别 1.drop:丢弃所有进入的包,而不给出任何响应 2.block:拒绝所有外部发起的连接,允许内部发起的连接 3.public:允许指定的进入连接 4.internal:范围针对所有互联网用户 permanent:yes为永久生效 immediate:yes为立即生效
3.12 unarchive模块 unarchive模块能够实现解压再拷贝的功能
1 2 3 4 ansible -i hosts cqm -m unarchive -a 'src=./apache.tar.gz dest=/etc/httpd mode=0755 owner=www group=www' src:压缩文件路径 dest:解压到哪 remote_src:设置为yes时表示压缩包已经在被控端主机上,而不是ansible控制端本地
3.13 get_url模块 1 2 3 4 ... url:下载链接 dest:保存文件地址 mode:设置权限
3.14 template模块 template与copy用法相同,但template可以实别变量,而copy不行。
3.15 yum_repository模块 yum_repository可以用来配置yum源
1 2 3 4 5 6 7 8 9 10 11 12 13 14 15 - name: Configure Nginx YUM Repo yum_repository: name: nginx description: Nginx YUM Repo file: nginx baseurl: http://nginx.org/packages/centos/7/$basearch/ gpgcheck: no enabled: yes state: present name:相当于.repo文件中括号的[仓库名] description:相当于.repo文件中的name file:相当于.repo文件的名称 baseurl:相当于.repo文件中baseurl gpgcheck:相当于.repo文件中gpgcheck enabled:相当于.repo文件中enabled
四、Ansible的Playbook playbook是ansible的另一种使用方式,被称为“剧本”,与ad-hoc不同的是,playbook可以实现持久使用。
playbook是由一个或多个play组成的列表,play的主要功能在于将事先归并为一组的主机装扮成事先通过ansible中的task定义好的角色,从根本上来讲,所谓的task无非就是调用ansible的一个module,将多个play组织在一个playbook中,即可实现同时完成多项任务。
playbook的核心元素
hosts:被控主机清单
tasks:任务集
vars:变量
templates:模板
handlers和notify:触发器
tags:标签
4.1 利用playbook安装apache playbook采用的是yml语法,举个栗子
1 2 cd /etc/project1 vim httpd.yml
1 2 3 4 5 6 7 8 9 10 11 12 13 14 15 16 17 18 19 20 21 22 23 24 25 26 27 28 29 30 31 32 33 34 35 36 37 38 39 40 41 42 43 44 45 46 47 - hosts: cqm tasks: - name: Install Httpd Service yum: name: httpd state: latest - name: Create www Group group: name: www state: present - name: Create www User user: name: www group: www shell: /sbin/nologin state: present - name: Configure Httpd Conf copy: src: ./httpd.conf dest: /etc/httpd/conf/httpd.conf owner: www group: www mode: 0644 - name: Start Httpd Service service: name: httpd state: started enabled: yes - name: Configure Firewall firewalld: zone: public ports: 8080 /tcp permanent: yes immediate: yes state: enabled
1 2 3 4 # 检查语法 ansible-playbook --syntax -i hosts httpd.yml # 执行playbook ansible-playbook -i hosts httpd.yml
4.2 利用playbook部署nfs
准备好nfs配置文件
1 2 3 cd /root/project1 cat exports /root/nfs_data 192.168.88.0/24(rw,no_root_squash)
编写nfs.yml文件
1 2 3 4 5 6 7 8 9 10 11 12 13 14 15 16 17 18 19 20 21 22 23 24 25 26 27 28 29 30 31 32 33 34 35 36 37 38 39 40 41 42 43 44 45 46 47 48 49 50 51 52 53 54 55 56 57 58 59 60 61 62 - hosts: 192.168 .88 .133 tasks: - name: Create Share Directory file: path: /root/nfs_data mode: 0744 owner: root group: root recurse: yes state: directory - name: Install NFS Service yum: name: nfs-utils state: latest - name: Configure NFS copy: src: ./exports dest: /etc/exports backup: yes - name: Start NFS Service service: name: nfs state: started enabled: yes - name: Stop Firewall Service service: name: firewalld state: stopped - hosts: 192.168 .88 .134 tasks: - name: Create Share Directory file: path: /root/nfs_data state: directory - name: Install NFS Service yum: name: nfs-utils state: latest - name: Start NFS Service service: name: nfs state: started enabled: yes - name: Mount NFS Share Directory mount: path: /root/nfs_data src: 192.168 .88 .133 :/root/nfs_data fstype: nfs opts: defaults state: mounted
执行playbook
1 ansible-playbook -i hosts nfs.yml
五、Ansible的变量 5.1 在play中设置变量 1 2 3 4 5 6 7 8 9 10 11 12 - hosts: cqm vars: - web_package: httpd - ftp_package: vsftpd tasks: - name: Install {{ web_package }} and {{ ftp_package }} Service yum: name: - "{{ web_package }} " - "{{ ftp_package }} " state: latest
5.2 在vars_file中设置变量 1 2 3 cat vars.yml web_package: httpd ftp_package: vsftpd
1 2 3 4 5 6 7 8 9 10 11 - hosts: cqm vars_files: - ./vars.yml tasks: - name: Install {{ web_package }} and {{ ftp_package }} Service yum: name: - "{{ web_package }} " - "{{ ftp_package }} " state: latest
5.3 通过inventory主机清单设置变量
创建两个变量目录
1 2 mkdir hosts_vars mkdir groups_vars
在groups_vars目录中针对某个组创建变量
1 2 3 4 5 cat group_vars/cqm web_package: httpd ftp_package: vsftpd # groups_vars目录中也可以新建all来设置变量,这样所有的主机组都可以调用
在hosts_vars目录中针对某个主机创建变量
1 2 3 cat hosts_vars/192.168.88.133 web_package: httpd ftp_package: vsftpd
5.4 在执行playbook时通过 -e 参数设置变量 1 2 3 4 5 6 7 - hosts: cqm tasks: - name: Install {{ web_package }} Service yum: name: - "{{ web_package }} " state: latest
1 ansible-playbook -i hosts -e 'web_package=httpd' test.yml
5.5 ansible变量的优先级 优先级由上至下递减
-e(外置传参)
vars_files
play中的vars
hosts_vars
groups_vars中的某个主机组
groups_vars中的all
5.6 register注册变量 1 2 3 4 5 6 7 8 9 10 11 12 13 14 15 16 17 18 19 20 - hosts: cqm tasks: - name: Install Apache Service yum: name: httpd state: latest - name: Start Apache Service service: name: httpd state: started - name: Check Apache Process shell: ps -ef | grep httpd register: check_apache - name: Output check_apache debug: msg: "{{ check_apache.stdout_lines }} "
5.7 facts变量 facts变量是ansible控制端采集被控端的变量,可以直接调用
为了方便可以将facts变量写到文本里
1 ansible -i hosts cqm -m setup > fasts.txt
六、Ansible语句 6.1 条件判断when centos安装apache是httpd,而ubuntu安装apache则是httpd2,所以这时候就需要条件判断了
例一:不同系统安装apache
1 2 3 4 5 6 7 8 9 10 11 12 13 14 15 16 - hosts: cqm tasks - name: Centos Install Apache Service yum: name: httpd state: latest when: - ( ansible_distribution == "CentOS" ) - name: Utunbu Install Apache2 Service yum: name: httpd2 state: latest when: - ( ansible_distribution == "Utunbu" )
例二:给主机名带有web的主机配置yum源
1 2 3 4 5 6 7 8 9 10 11 - hosts: cqm tasks: - name: Configure Cqm Yum Repo yum_repository: name: cqm description: cqm yum repo baseurl: http://www.cqmmmmm.com gpgcheck: no enabled: yes when: - ( ansible_fqdn is match ("web*") )
例三:判断nfs服务是否启动,没有则启动,否则重启
利用echo $?的返回值来查看是否启动
1 2 3 4 5 6 7 8 9 10 11 12 13 - hosts: cqm tasks: - name: Check NFS Service Status shell: systemctl is-active nfs ignore_errors: yes register: check_nfs - name: Restart NFS Service service: name: nfs state: restarted when: - ( check_nfs.rc == 0 )
6.2 循环语句with_items with_items可以实现循环,可以减少playbook中同样模块的使用次数
例一:利用with_items重启nginx和php服务
1 2 3 4 5 6 7 8 9 - hosts: cqm tasks: - name: Restart Nginx and PHP Service service: name: {{ item }} state: restarted with_items: - nginx - php-fpm
例二:利用变量循环安装多个服务
1 2 3 4 5 6 7 8 9 10 - hosts: cqm tasks: - name: Install Nginx and Mysql Service yum: name: {{ pack }} state: latest vars: pack: - nginx - mysql-server
例三:利用循环创建多个用户
1 2 3 4 5 6 7 8 9 10 - hosts: cqm tasks: - name: Create Multiple Users user: name: {{ item.name }} group: {{ item.group }} state: present with_items: - { name: 'aaa' , group: 'aaa' } - { name: 'bbb' , group: 'bbb' }
6.3 触发器handlers handlers是ansible的触发器,配合notify使用。
handlers只有在playbook执行到最后才会执行,简单来说可以将handlers看作一个特殊的tasks,只有在notify指定的某个模块运行了才会触发handlers中的模块。
例一:修改nginx.conf的话就重启nginx服务
1 2 3 4 5 6 7 8 9 10 11 12 13 14 15 16 17 - hosts: cqm tasks: - name: Configure Nginx File template: src: ./nginx.conf dest: /etc/nginx/nginx.conf mode: 0644 owner: www group: www backup: yes notify: Restart Nginx Service handlers: - name: Restart Nginx Service service: name: nginx state: restarted
对tasks指定标签,可以在执行playbook的时候指定执行哪个tags的任务。
例一:利用tags来执行开启nginx和php服务
1 2 3 4 5 6 7 8 9 10 11 12 - hosts: cqm tasks: - name: Start Nginx and PHP Service service: name: {{ item }} state: started enabled: yes with_items: - nginx - php-fpm tags: start_services ......
1 ansible-playbook -i hosts cqm -t 'start_services' test.yml
如果要指定不执行哪个标签的任务,添加参数–skip-tags
1 ansible-playbook -i hosts cqm --skip-tags 'start_services' test.yml
6.5 包含include 如果每个playbook都会用到重启某个服务的任务,那么每个playbook都要写一次,利用include就只用写一次,让每个playbook调用即可。
例一:准备一个重启nginx的yml文件来给各个playbook调用
1 2 3 4 - name: Restart Nginx Service service: name: nginx state: restarted
1 2 3 4 5 6 7 8 9 10 11 - hosts: cqm tasks: - name: Configure Nginx File template: src: ./nginx.conf dest: /etc/nginx/nginx.conf mode: 0644 owner: www group: www backup: yes include: ./restart_nginx.yml
6.6 错误忽略ignore_errors 就是字面意思- -,尽管某个任务出错了,也会继续执行下面的任务。
例一:忽略某个任务
1 2 3 4 5 6 - hosts: cqm tasks: - name: ignore errors test command: /bin/false ignore_errors: yes ......
6.7 错误模块fail fail模块是一个专门用来“执行失败”的模块,我们都知道在shell中只要添加exit就可以停止执行,而playbook只有在某个任务出错了才会停止执行,这时候就可以利用fail来停止playbook的执行。
例一:利用fail来实现exit的功能
1 2 3 4 5 6 7 8 9 10 11 12 13 14 15 16 17 18 19 20 - hosts: cqm tasks: - name: debug1 debug: msg: "1" - name: debug2 debug: msg: "2" - name: fail fail: msg: " this is fail module test " - name: debug3 debug: msg: "3" - name: debug4 debug: msg: "4"
6.8 错误改变failed_when failed_when的作用就是将条件成立的任务状态设置为失败。
例一:判断是否输出了error,是则设置为任务失败
1 2 3 4 5 6 7 8 9 10 11 12 13 14 15 16 - hosts: cqm tasks: - name: debug1 debug: msg: "i am debug1" - name: Output Error shell: echo 'this is error' register: output_error failed_when: - ( 'error' in output_error.stdout ) - name: debug2 debug: msg: "i am debug2"
6.9 错误处理changed_when changed_when的作用就是将条件成立的任务状态设置为changed。
我们在调用handlers的时候,只有任务状态为changed才会调用,这时候就可以用changed_when改变任务状态为changed,就可以实现调用handlers了。
例一:改变任务状态为changed而调用触发器
1 2 3 4 5 6 7 8 9 10 11 12 13 14 15 16 17 18 19 - hosts: cqm tasks: - name: Configure Nginx File template: src: ./nginx.conf dest: /etc/nginx/nginx.conf mode: 0644 owner: www group: www backup: yes notify: Restart Nginx Service changed_when: yes handlers: - name: Restart Nginx Service service: name: nginx state: restarted
changed_when也可以使任务永远不会是changed。
例二:使任务永远为ok
1 2 3 4 5 6 7 8 9 10 11 12 13 14 15 16 17 18 19 - hosts: cqm tasks: - name: Configure Nginx File template: src: ./nginx.conf dest: /etc/nginx/nginx.conf mode: 0644 owner: www group: www backup: yes notify: Restart Nginx Service changed_when: false handlers: - name: Restart Nginx Service service: name: nginx state: restarted
七、Ansible的roles roles就是通过分别将变量、文件、任务、模块及处理器放置于单独的目录中、并可以便捷地include它们的一种机制。
roles的目录结构:
files:存放普通文件,比如copy调用的文件
handlers:触发器
meta:依赖关系
tasks:任务
templates:存放含有变量的文件
vars:变量
在每个目录里的yml文件都必须命名为main.yml
一键生成roles目录
1 ansible-galaxy role init test
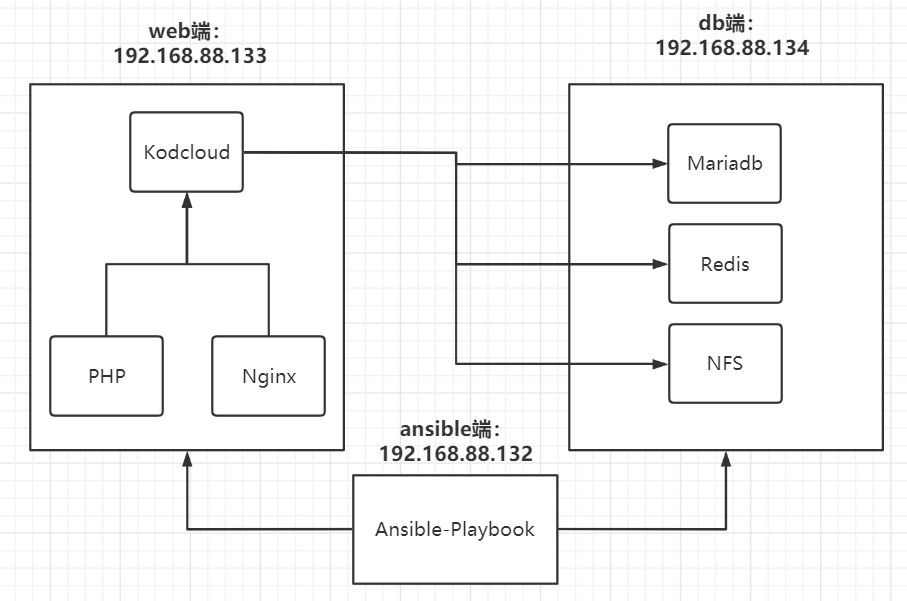
八、利用Ansible搭建Kodcloud 项目架构图
8.1 准备项目环境
基本配置
1 2 3 mkdir -p /root/project/{host_vars,group_vars} cd /root/project cp /etc/ansible/ansible.cfg .
配置inventory
1 2 3 4 5 vim hosts [web] 192.168.88.133 [db] 192.168.88.134
配置通用变量
1 2 3 4 5 6 vim group_vars/all nfs_server_ip: 192.168.88.134 redis_server_ip: 192.168.88.134 ip_address_range: 192.168.88.0/24 web_user: www web_group: www
创建各个role文件目录
1 mkdir -p {db_base,redis,mariadb,nfs_server,web_base,nginx,php,nfs_client,kodcloud}/{files,handlers,tasks,templates,vars}
8.2 配置roles文件 1 2 3 4 5 6 7 8 9 10 11 12 13 14 15 16 17 18 19 20 21 22 23 24 25 26 27 28 29 30 31 32 - hosts: db roles: - role: db_base tags: db_base - role: redis tags: redis - role: mariadb tags: mariadb - role: nfs_server tags: nfs_server - hosts: web roles: - role: web_base tags: web_base - role: nginx tags: nginx - role: php tags: php - role: nfs_client tags: nfs_client - role: kodcloud tags: kodcloud
8.3 配置db端基本环境
编写tasks
1 vim db_base/tasks/main.yml
1 2 3 4 - name: Stop Firewall Service service: name: firewalld state: stopped
8.4 配置db端redis服务
编写tasks
1 vim redis/tasks/main.yml
1 2 3 4 5 6 7 8 9 10 11 12 13 14 15 16 17 - name: Install Redis Service yum: name: redis state: latest - name: Configure Redis Service template: src: redis.conf.j2 dest: /etc/redis.conf backup: yes notify: Restart Redis Service - name: Start Redis Service service: name: redis state: started enabled: yes
编写templates
1 2 3 4 5 6 vim redis/temlpates/redis.conf.j2 egrep -v '^#|^$' redis/templates/redis.conf.j2 bind {{ ansible_default_ipv4.address }} protected-mode yes port 6379 ......
编写handlers
1 cat redis/handlers/main.yml
1 2 3 4 - name: Restart Redis Service service: name: redis state: restarted
8.5 配置db端mariadb服务
编写tasks
1 vim mariadb/tasks/main.yml
1 2 3 4 5 6 7 8 9 10 11 12 13 14 15 16 17 18 19 20 21 22 23 24 25 26 27 28 29 30 31 32 33 34 35 36 37 38 39 40 41 42 43 - name: Install Mariadb Service yum: name: '{{ item }} ' state: latest with_items: - mariadb - mariadb-server - MySQL-python - name: Configure Mariadb Service copy: src: my.cnf.j2 dest: /etc/my.cnf backup: yes - name: Start Mariadb Service service: name: mariadb state: started - name: Configure Mariadb Root User mysql_user: user: root password: toortoor - name: Create {{ website }} Databases mysql_db: login_user: root login_password: toortoor name: '{{ website }} ' state: present collation: utf8_bin encoding: utf8 - name: Create {{ website }} DB User mysql_user: login_user: root login_password: toortoor name: '{{ web_db_user }} ' password: '{{ web_db_pass }} ' host: '192.168.88.%' priv: '*.*:ALL,GRANT' state: present
编写files
1 vim mariadb/files/my.cnf.j2
1 2 3 4 5 6 7 8 9 10 11 12 13 14 15 16 17 18 [mysqld ] datadir=/var/lib/mysql socket=/var/lib/mysql/mysql.sock symbolic-links=0 [mysqld_safe ] log-error=/var/log/mariadb/mariadb.log pid-file=/var/run/mariadb/mariadb.pid !includedir /etc/my.cnf.d
编写vars
1 vim mariadb/vars/main.yml
1 2 3 website: kodcloud web_db_user: kodcloud web_db_pass: toortoor
8.6 配置db端nfs服务
编写tasks
1 vim nfs_server/tasks/main.yml
1 2 3 4 5 6 7 8 9 10 11 12 13 14 15 16 17 18 19 20 21 22 23 24 - name: Create NFS Share Directory file: path: '{{ nfs_share_directory }} ' mode: 0757 recurse: yes state: directory - name: Install NFS Service yum: name: nfs-utils state: latest - name: Configure NFS template: src: exports.j2 dest: /etc/exports backup: yes notify: Restarted NFS Service - name: Start NFS Service service: name: nfs state: started enabled: yes
编写handlers
1 vim nfs_server/handlers/main.yml
1 2 3 4 - name: Restarted NFS Service service: name: nfs state: restarted
编写vars
1 vim nfs_server/vars/main.yml
1 nfs_share_directory: /root/nfs_share
编写temlpates
1 2 vim nfs_server/templates/exports.j2 {{ nfs_share_directory }} {{ ip_address_range }}(rw)
8.7 配置web端基本环境
编写tasks
1 vim web_base/tasks/main.yml
1 2 3 4 5 6 7 8 9 10 11 12 - name: Create {{ web_group }} Group group: name: '{{ web_group }} ' state: present - name: Create {{ web_user }} User user: name: '{{ web_user }} ' group: '{{ web_group }} ' state: present create_home: no shell: /sbin/nologin
8.8 配置web端nginx服务
编写tasks
1 vim nginx/tasks/main.yml
1 2 3 4 5 6 7 8 9 10 11 12 13 14 15 16 17 18 19 20 21 22 23 24 25 26 27 28 29 30 31 32 33 34 35 36 37 38 - name: Configure Firewall firewalld: zone: public port: 80 /tcp permanent: yes immediate: yes state: enabled - name: Configure Nginx YUM Repo yum_repository: name: nginx description: Nginx YUM Repo file: nginx baseurl: http://nginx.org/packages/centos/7/$basearch/ gpgcheck: no enabled: yes state: present - name: Install Nginx Service yum: name: nginx state: latest - name: Configure Nginx template: src: '{{ item.src }} ' dest: '{{ item.dest }} ' backup: yes notify: Restart Nginx Service with_items: - { src: 'nginx.conf.j2' , dest: '/etc/nginx/nginx.conf' } - { src: 'default.conf.j2' , dest: '/etc/nginx/conf.d/default.conf' } - name: Started Nginx Service service: name: nginx state: started enabled: yes
编写handlers
1 vim nginx/handlers/main.yml
1 2 3 4 - name: Restart Nginx Service service: name: nginx state: restarted
编写templates
1 2 3 4 5 6 7 8 9 10 11 12 13 14 15 16 17 18 19 20 21 22 23 24 25 26 27 28 29 30 31 32 vim nginx/templates/nginx.conf.j2 user {{ web_user }}; worker_processes {{ ansible_processor_count * 1 }}; error_log /var/log/nginx/error.log warn; pid /var/run/nginx.pid; events { worker_connections {{ ansible_processor_count * 1024 }}; } http { include /etc/nginx/mime.types; default_type application/octet-stream; log_format main '$remote_addr - $remote_user [$time_local] "$request" ' '$status $body_bytes_sent "$http_referer" ' '"$http_user_agent" "$http_x_forwarded_for"'; access_log /var/log/nginx/access.log main; sendfile on; #tcp_nopush on; keepalive_timeout 65; #gzip on; include /etc/nginx/conf.d/*.conf; }
1 2 3 4 5 6 7 8 9 10 11 12 13 14 15 16 17 18 19 20 21 22 23 24 25 26 27 28 29 30 31 32 33 34 35 36 37 38 39 40 41 42 43 44 45 46 vim nginx/templates/default.conf.j2 server { listen {{ nginx_port }}; server_name localhost; #charset koi8-r; #access_log /var/log/nginx/host.access.log main; location / { root /usr/share/nginx/html; index index.php index.html index.htm; } #error_page 404 /404.html; # redirect server error pages to the static page /50x.html # error_page 500 502 503 504 /50x.html; location = /50x.html { root /usr/share/nginx/html; } # proxy the PHP scripts to Apache listening on 127.0.0.1:80 # #location ~ \.php$ { # proxy_pass http://127.0.0.1; #} # pass the PHP scripts to FastCGI server listening on 127.0.0.1:9000 # location ~ \.php$ { root /usr/share/nginx/html; # fastcgi_pass 127.0.0.1:9000; fastcgi_pass unix:/etc/nginx/php-fpm.sock; fastcgi_index index.php; fastcgi_param SCRIPT_FILENAME $document_root$fastcgi_script_name; include fastcgi_params; } # deny access to .htaccess files, if Apache's document root # concurs with nginx's one # #location ~ /\.ht { # deny all; #} }
编写vars
8.9 配置web端php服务
编写tasks
1 2 3 4 5 6 7 8 9 10 11 12 13 14 15 16 17 18 19 20 21 22 23 24 25 26 27 28 29 30 31 32 33 34 35 36 37 38 39 - name: Configure PHP YUM Repo yum: name: http://rpms.remirepo.net/enterprise/remi-release-7.rpm state: present - name: Install PHP Service yum: name: '{{ item }} ' state: present with_items: - '{{ php }} ' - "{{ php_version }} -cli" - "{{ php_version }} -common" - "{{ php_version }} -devel" - "{{ php_version }} -embedded" - "{{ php_version }} -gd" - "{{ php_version }} -mcrypt" - "{{ php_version }} -mbstring" - "{{ php_version }} -pdo" - "{{ php_version }} -xml" - "{{ php_version }} -fpm" - "{{ php_version }} -mysqlnd" - "{{ php_version }} -opcache" - "{{ php_version }} -pecl-memcached" - "{{ php_version }} -pecl-redis" - "{{ php_version }} -pecl-mongodb" - name: Configure PHP Service copy: src: www.conf.j2 dest: "{{ php_route }} /php-fpm.d/www.conf" backup: yes notify: Restart Nginx and PHP Service - name: Start PHP Service service: name: "{{ php_version }} -fpm" state: started enabled: yes
编写handlers
1 vim php/handlers/main.yml
1 2 3 4 5 6 7 - name: Restart Nginx and PHP Service service: name: '{{ item }} ' state: restarted with_items: - "{{ php_version }} -fpm" - nginx
编写files
1 2 3 4 5 6 7 8 9 vim php/files/www.conf.j2 [www] user = www group = www listen = /etc/nginx/php-fpm.sock listen.owner = www listen.group = www listen.mode = 0660 ......
编写vars
1 2 3 php: php74 php_version: php74-php php_route: /etc/opt/remi/php74
8.10 配置web端nfs服务
编写tasks
1 vim nfs_client/tasks/main.yml
1 2 3 4 5 6 7 8 9 10 11 12 13 14 15 16 17 18 19 20 21 22 23 - name: Create NFS Share Directory file: path: '{{ nfs_share_directory }} ' state: directory - name: Install NFS Service yum: name: nfs-utils state: latest - name: Start NFS Service service: name: nfs state: started enabled: yes - name: Mount NFS Share Directory mount: path: '{{ nfs_share_directory }} ' src: "{{ nfs_server_ip }} :{{ nfs_share_directory }} " fstype: nfs opts: defaults state: mounted
编写vars
1 vim nfs_client/tasks/main.yml
1 nfs_share_directory: /root/nfs_share
8.11 配置web端kodcloud
编写tasks
1 vim kodcloud/tasks/main.yml
1 2 3 4 5 6 7 8 9 10 11 12 13 14 15 16 17 18 19 20 21 - name: Create Kodcloud Directory file: path: /usr/share/nginx/html/kodcloud owner: www group: www mode: 0777 state: directory - name: Input Kodcloud File unarchive: src: '{{ kod_version }} ' dest: /usr/share/nginx/html/kodcloud owner: www group: www mode: 0777 - name: Configure Nginx Virtual Host copy: src: kodcloud.conf.j2 dest: /etc/nginx/conf.d/kodcloud.conf notify: Restart Nginx and PHP Service
编写handlers
1 vim kodcloud/handlers/main.yml
1 2 3 4 5 6 7 - name: Restart Nginx and PHP Service service: name: '{{ item }} ' state: restarted with_items: - nginx - "{{ php_version }} -fpm"
编写vars
1 vim kodcloud/vars/main.yml
1 2 kod_version: kodbox.1.15.zip php_version: php74-php
编写files
1 wget http://static.kodcloud.com/update/download/kodbox.1.15.zip kodcloud/files/kodbox.1.15.zip
1 2 3 4 5 6 7 8 9 10 vim kodcloud/files/kodcloud.conf.j2 server { listen 80; server_name localhost; location / { root /usr/share/nginx/html/kodcloud; index index.php index.html index.htm; } }
8.12 执行playbook 1 ansible-playbook -i hosts kod.yml
8.13 测试
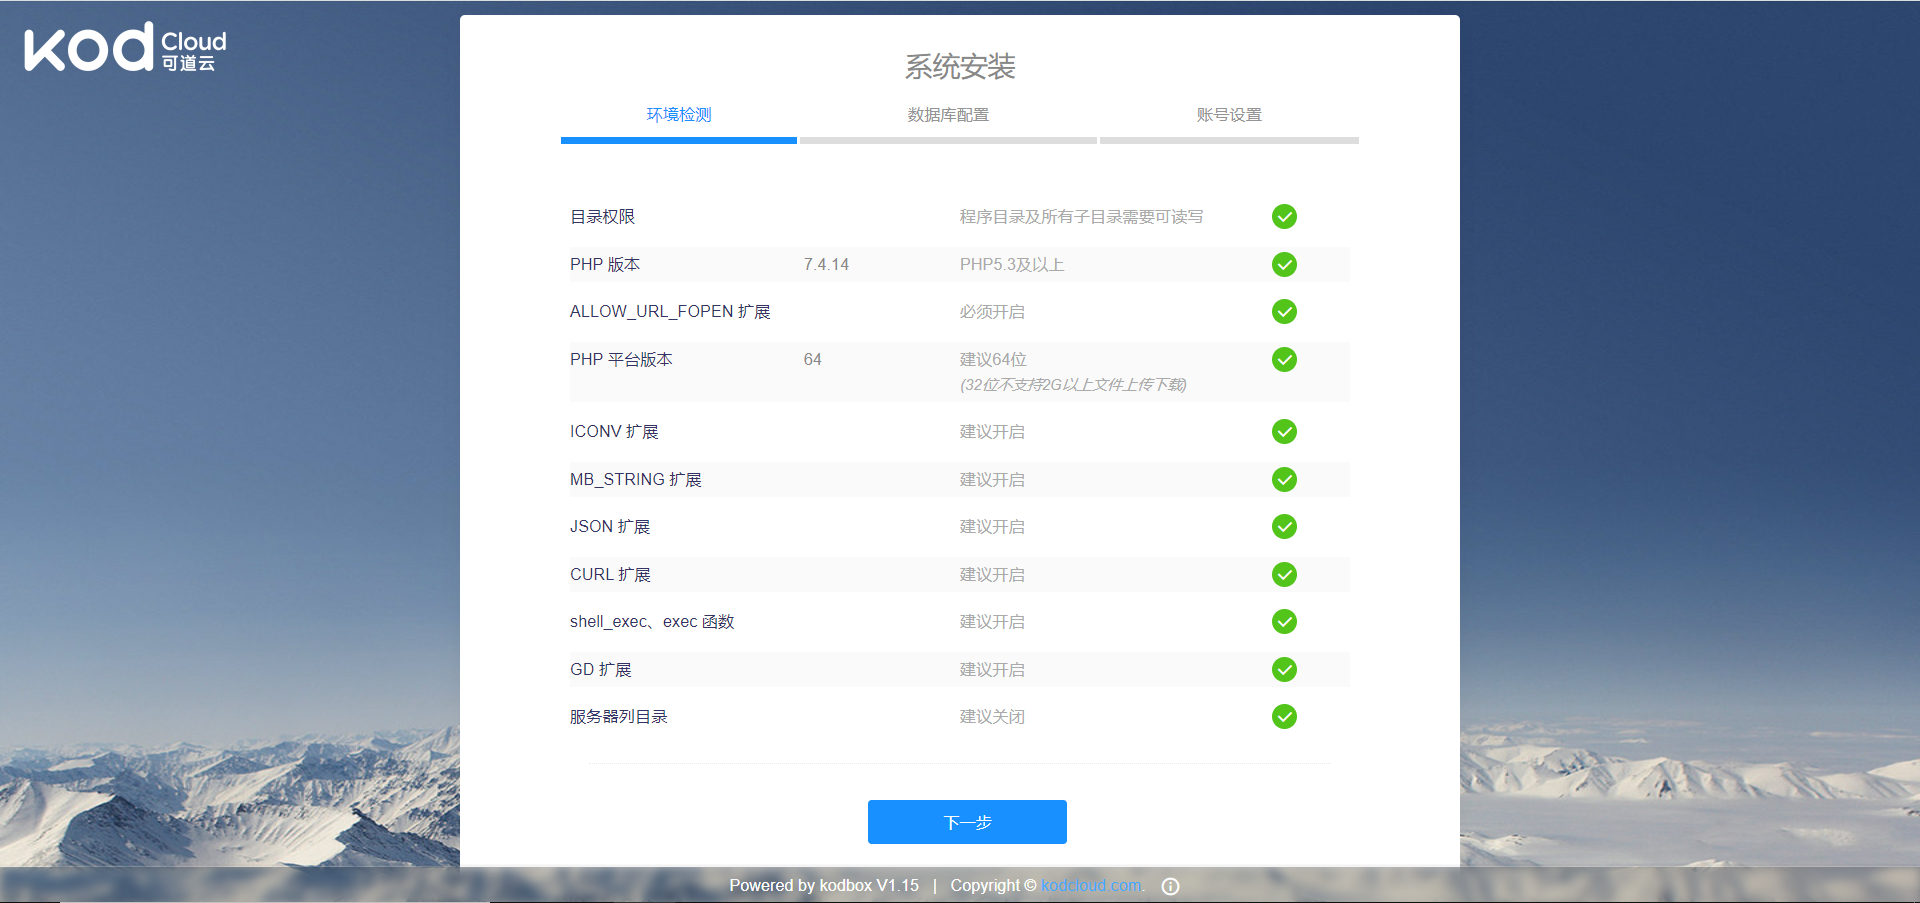
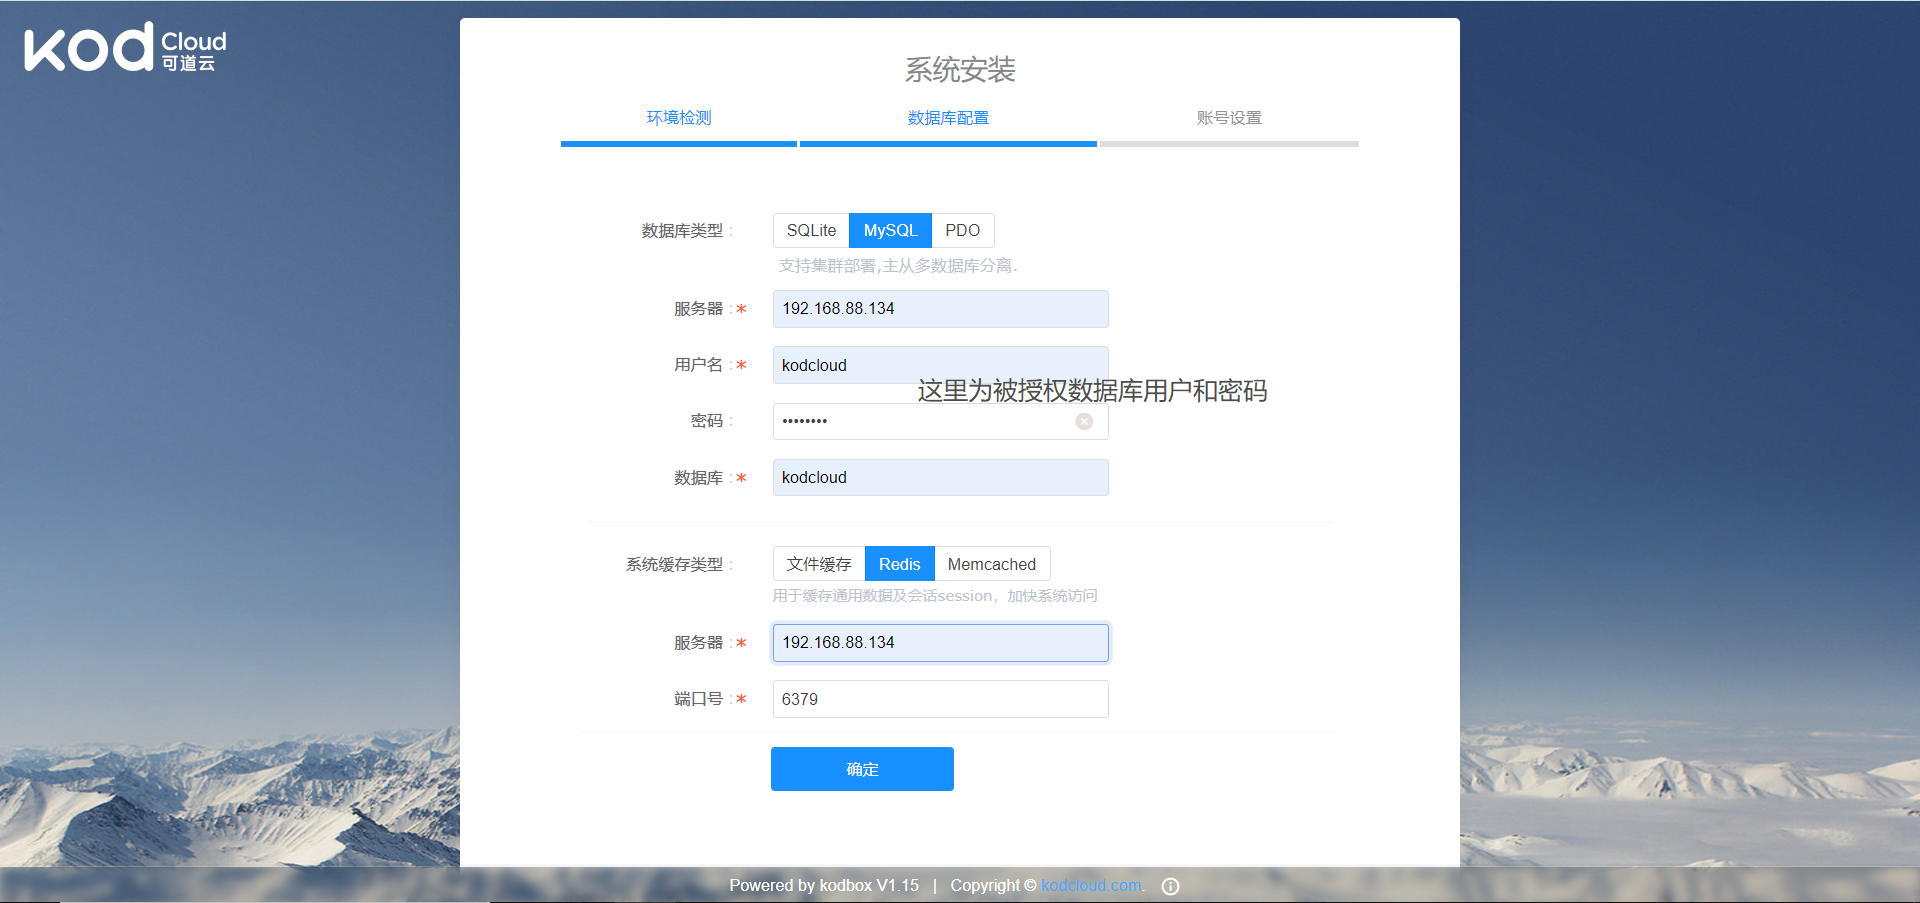
登录到web安装kodcloud
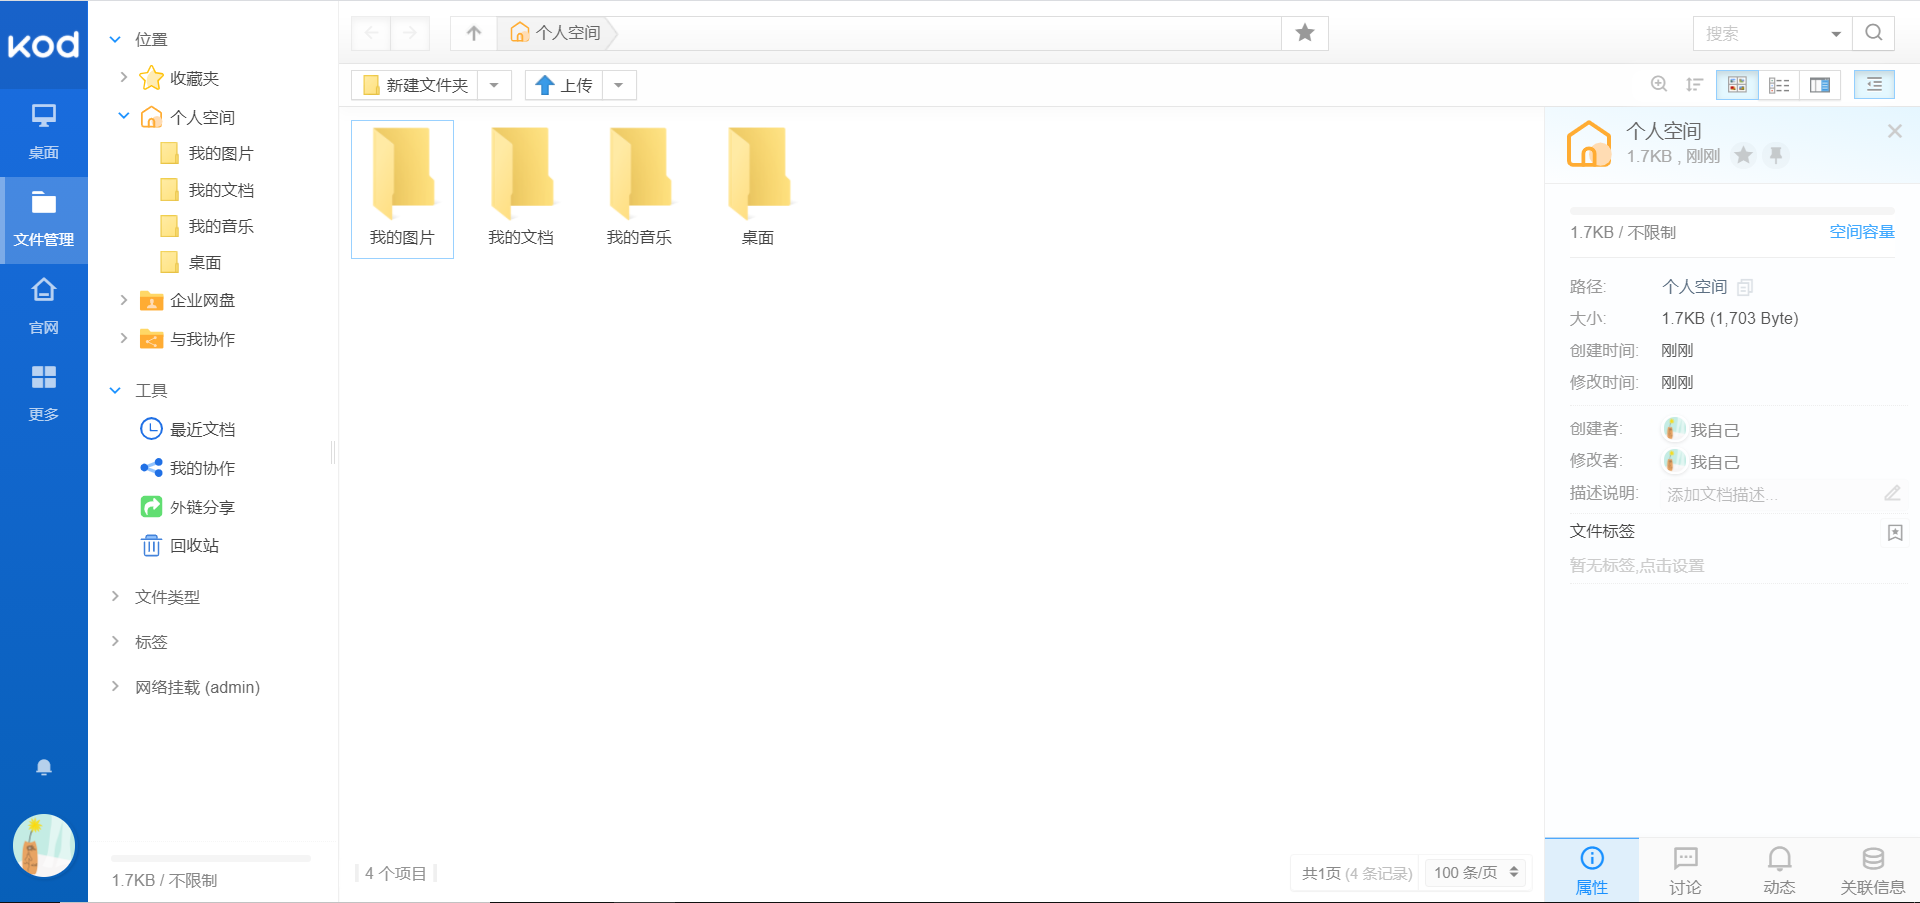
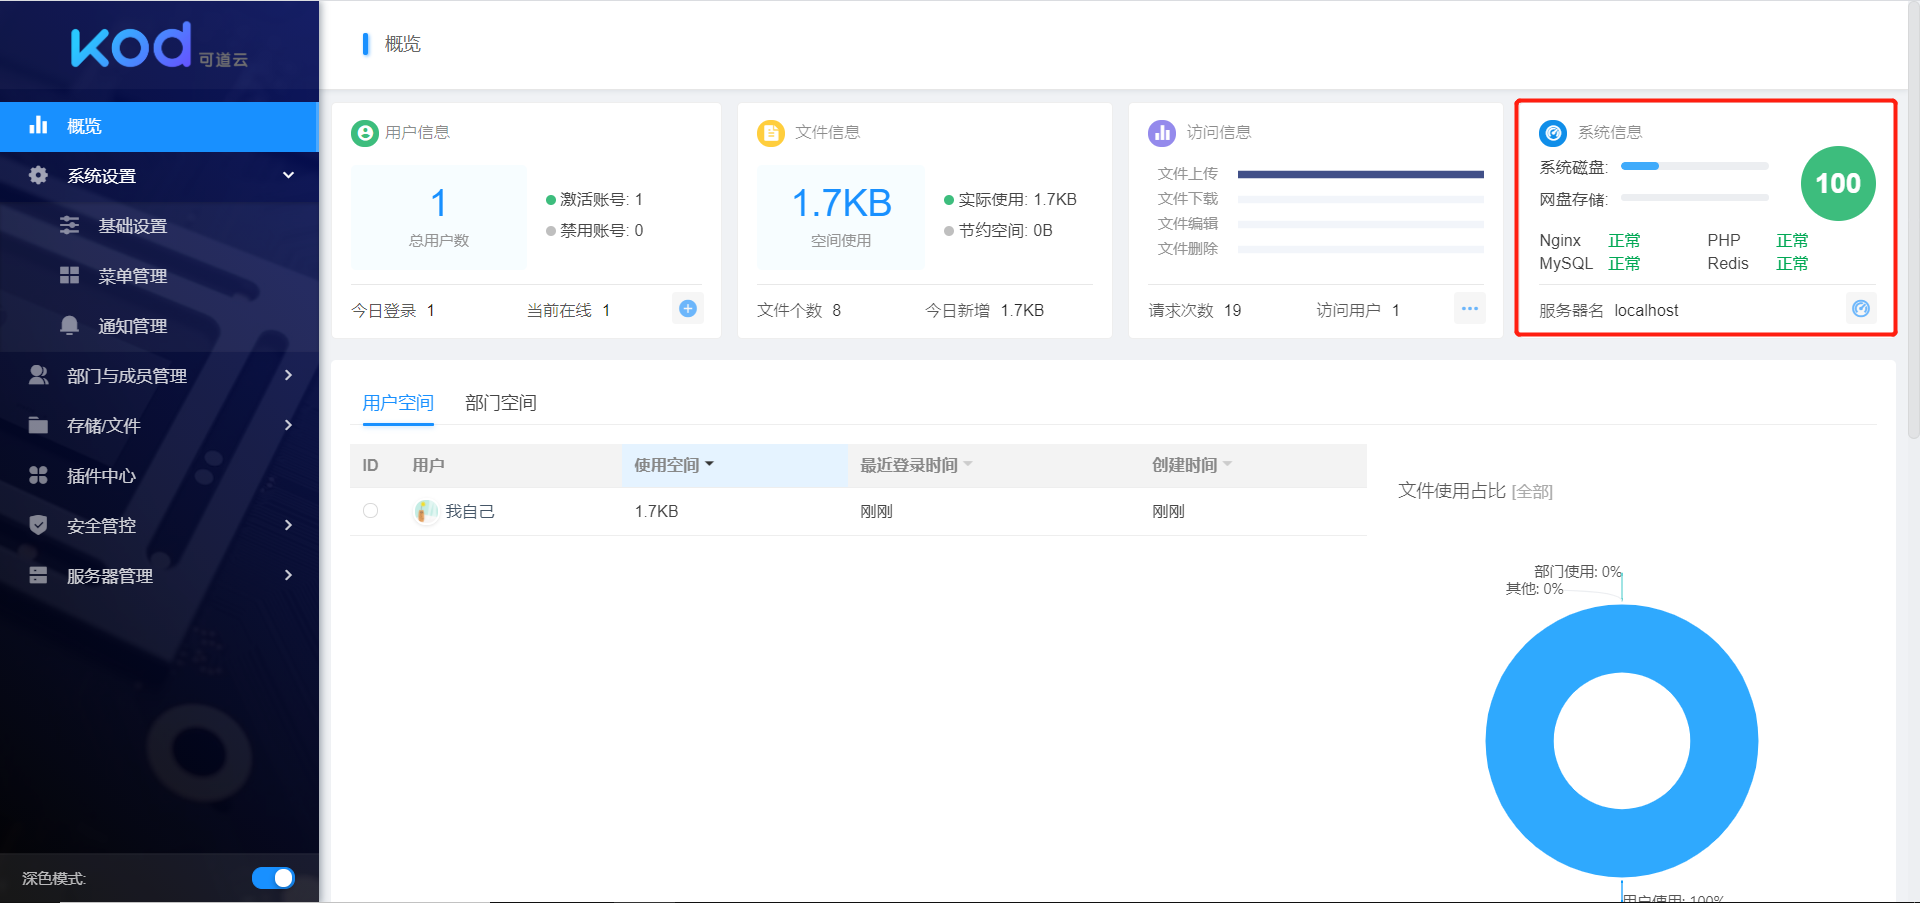
登录kodcloud

