Kafka

一、kafka架构

kafka 是一个分布式的基于发布和订阅模式消息队列(message queue),主要用于大数据实时处理领域。

kafka图标

1.1 消息队列

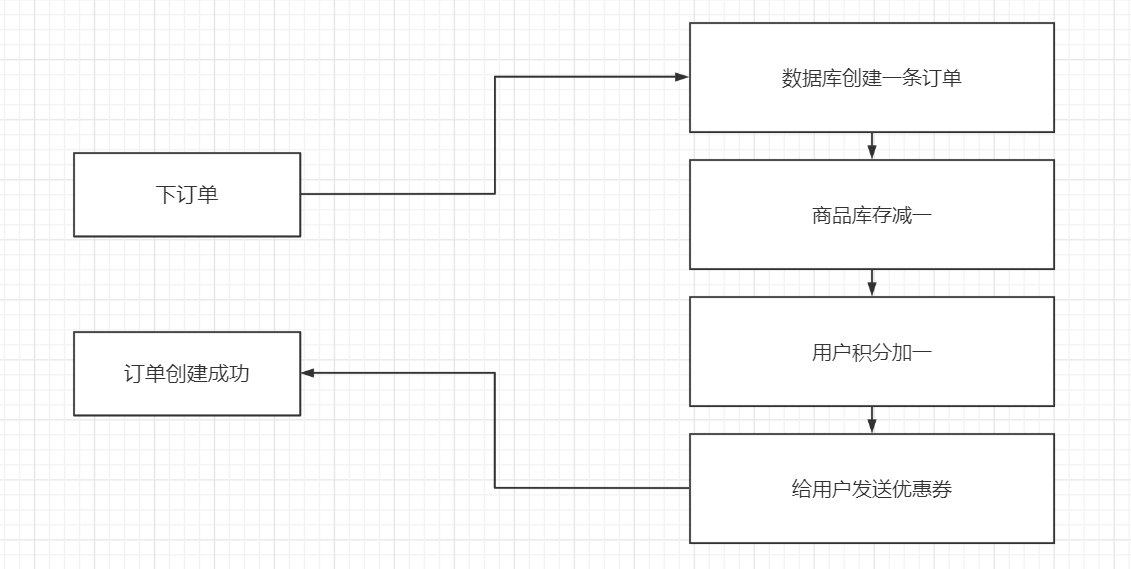
同步通信

同步通信

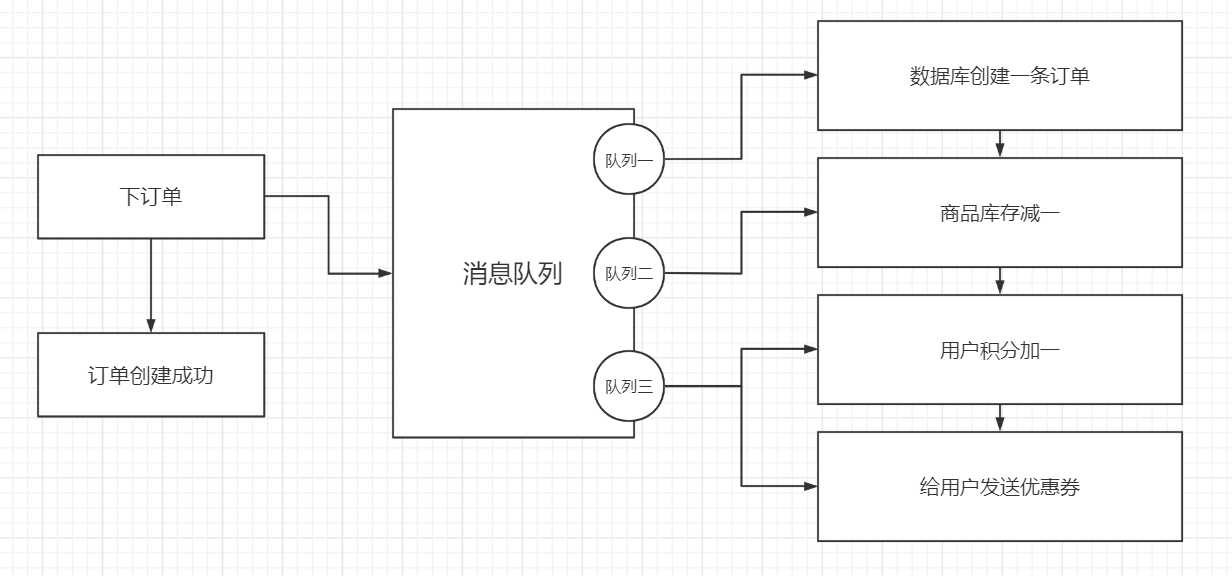
异步通信

异步通信

使用消息队列的好处如下:

  • 解耦:允许独立的扩展或修改两边的处理过程
  • 可恢复性:系统的一部分组件失效时,不会影响到整个系统
  • 缓冲:控制和优化数据经过系统的速度
  • 灵活性和峰值处理能力:在特殊情况下,通信中的请求量会急剧增大(如双十一等活动),但这种情况并不常见,如果投入资源来待命是很浪费的,使用消息队列就可以顶住突发的访问压力,而保护集群不会因为请求量过多而崩溃
  • 异步通信:有时候用户不想也不需要立即处理消息,这种时候就允许用户把消息放在队列中,等待处理

消息队列分为点对点模式发布/订阅模式

点对点模式

消息生产者生产消息发送到 queue 中,消费者再从 queue 拉取消息并消费,消息被消费之后就不再存在于 queue 中,queue 可以有多个消费者,但对于消息而言只能有一个消费者。
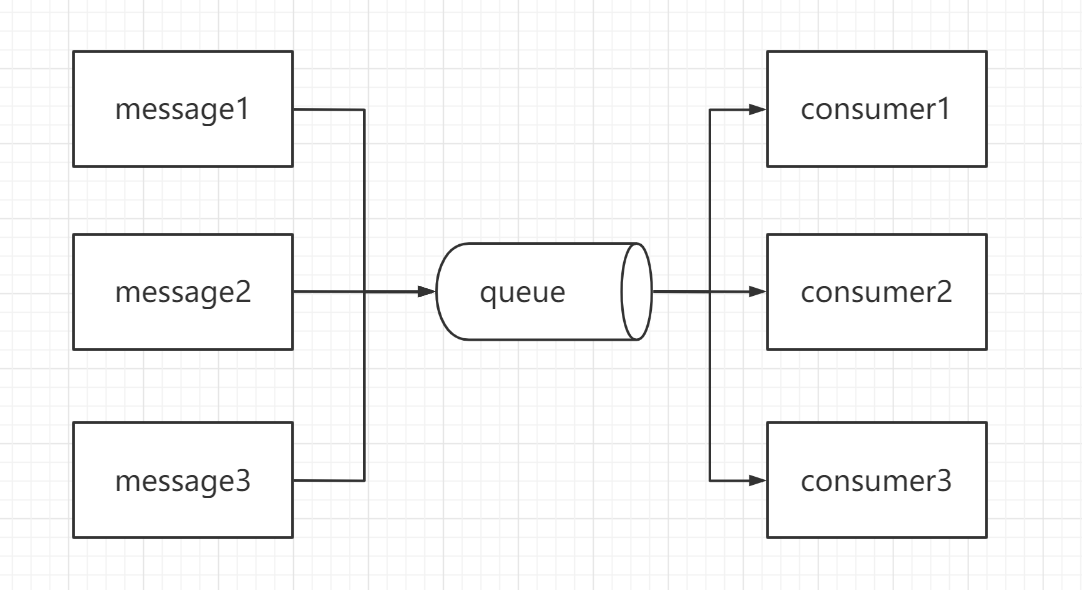
点对点模式

发布/订阅模式

消息生产者将消息发送到 topic 中,可以同时有多个消费者订阅该消息,发布到 topic 的消息可以被所有消费者订阅。
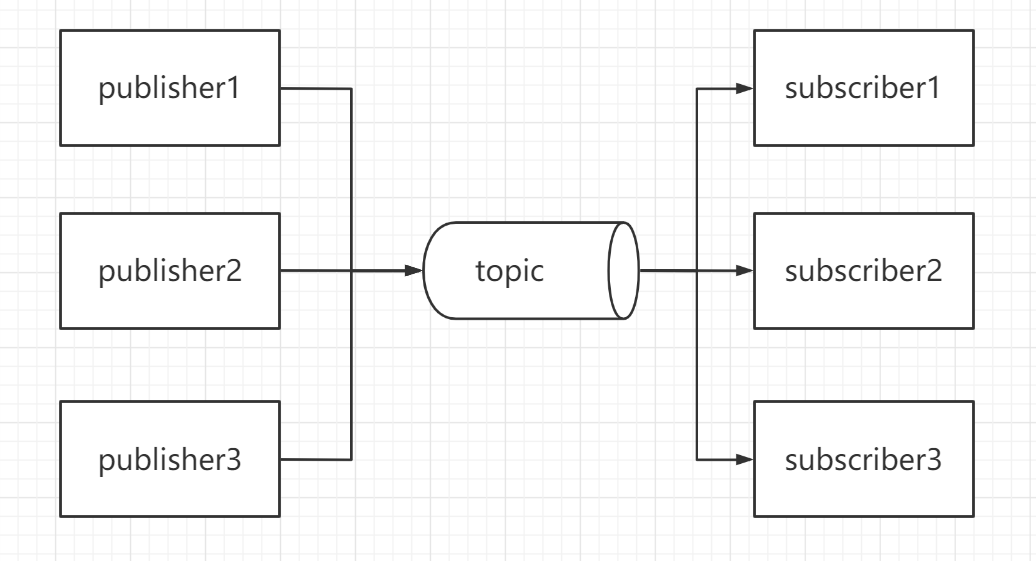
发布订阅模式

1.2 kafka基础架构

kafka 有四个核心的 API:

  • The Producer API:允许一个应用程序发布一串流式的数据到一个或者多个 topic
  • The Consumer API:允许一个应用程序订阅一个或多个 topic ,并且对发布给他们的流式数据进行处理
  • The Streams API:允许一个应用程序作为一个流处理器,消费一个或者多个 topic 产生的输入流,然后生产一个输出流到一个或多个 topic 中去,在输入输出流中进行有效的转换
  • The Connector API:允许构建并运行可重用的生产者或者消费者,将 topics 连接到已存在的应用程序或者数据系统
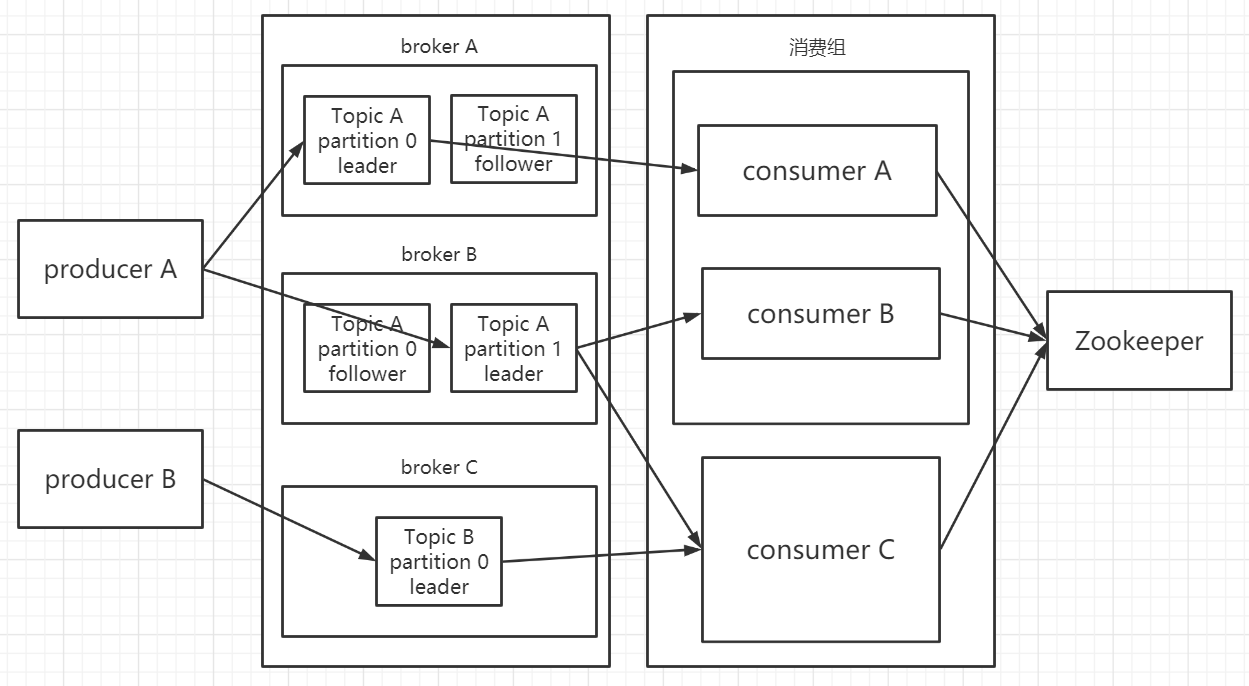
kafka架构

  • producer:消息生产者
  • consumer:消息消费者
  • topic:数据主题,是数据订阅/发布的地方,可以被多个消费者订阅
  • partition:分区,每个 topic 包含一个或多个分区,分区是一个有序的队列,分区中的消息都会被分配一个 offset,kafka 保证按每一个分区中的顺序将消息发送给消费者,但不保证按每一个 topic 中的顺序将消息发送给消费者;且 partition 是消费者和生产者操作的最小单元
  • offset(偏移量):kafka 的存储文件都是按照 offset.kafka 来命名,方便查找数据
  • leader 副本:消息的订阅/发布都由 leader 来完成
  • follower 副本:进行消息数据的备份,当 leader 挂了之后,就成为新的 leader 来代替旧的 leader
  • broker:一个 kafka 就是一个 broker,一个集群由多个 broker 组成
  • consumer group:消费者组,组中有多个消费者,组中的消费者都只能够接收一个分区的消息
  • zookeeper:保存 kafka 集群状态的信息,2.8.0版本开始支持 kraft 模式,可不依赖 zk 运行 kafka 集群
  • replicas:副本数

1.3 kafka 存储机制

kafka 内部会自己创建一个 _consumer_offsets 并包含 50 个分区,这些主题用来保存消费者消费某个 topic 的偏移量。

每个 partitions 都被切割成相同大小的 segment,segment 由四个部分构成,具体如下:

kafka存储机制

  • log:数据文件
  • index:索引文件,用来保存消息的索引,能够使查找数据更加高效
  • timeindex:具体时间日志
  • leader-epoch-checkpoint:保存了每一任 leader 开始写入消息时的 offset,会定时更新

1.4 生产者分区策略

kafka 允许为每条消息定义消息 key,可以根据 key 来为消息选择分区。

分区策略即决定生产者将消息发送到哪个分区的算法,主要有以下几种:

  • 轮询策略(没给定分区号和 key 值):可以提供优秀的负载均衡能力,保证消息被平均的分配到各个分区上,但不能保证消息的有序性。
  • 随即策略:瞎分,基本不用。
  • hash 策略(没给定分区号,但给了 key 值):将 key 的 hash 值与 topic 的 partition 数进行取余得到
    partition值
  • 自定义分区

1.5 生产者ISR

ISR 即同步副本,leader 维护了一个动态的 ISR,为 leader 保持同步的 follower 集合,当 ISR 中的 follower 完成数据的同步之后,leader 就会给 follower 发送 acks,如果 follower 长时间没有向 leader 同步数据,则该 follower 将被踢出 ISR。leader 发生故障之后就会在 ISR 中选取出新的 leader。

1.6 生产者ACKS

kafka 发送确认参数 acks 的几种模式:

  • acks = 0:意味着生产者能够通过网络把消息发送出去,broker 接收到数据还没写入就发送,容易丢数据
  • acks = 1:等待 leader 写入数据(不等待 follower 同步),就可以发送数据,可能会丢数据
  • acks = all/-1:等待 leader 和 follower(ISR 中的)写入数据,就可以发送数据,数据不容易丢,但效率底

1.7 kafka数据一致性原理

  • HW:所有副本中的最小 LEO
  • LEO:每个副本的最后一个(最大的) offset

假设分区的副本为3,副本0为 leader,副本1、2为 follower,并且都在 ISR 列表中。虽然 leader 已经写入了 message3,但消费者只能读到 message1,因为所有的 ISR 都同步了 message1,只有在 HW 之上的消息才支持被消费,而 HW 取决于 LEO,原理类似于木桶原理。

这么做的原因是如果 leader 崩溃了,一个 follower 成为新的 leader 后,由于该新的 leader 没有做好数据的同步,如果允许消费者读取 HW 之下的数据的话,那么就会出现数据不一致的问题。

kafka数据一致性原理

1.7 Exactly-once

当生产者发送消息到 topic 时,很可能会出现宕机的情况,或者出现了网络故障,导致生产者消息发送失败,而生产者要如何处理这样的错误,就产生了如下几种不同的语义:

  • At least once:至少一次,如果生产者收到了 broker 发送过来的 acks,且 acks 设置为了 all/-1,这就代表消息已经被写入 topic 且同步好了。如果生产者在时间内没受到 acks 或收到的 acks 有误,那么就会重新发送消息。如果 broker 恰好在消息已经写入 topic 时,发送 acks 前出了故障,那么就会导致生产者发送同样的消息两次,消费者消费两次。
  • At more once:最多一次,如果生产者在接收 acks 超时或返回有问题的时候不重新发送消息,那么消息很可能没写入 topic 中,因此消费者也不会消费该条消息,不会出现数据重复的现象,但很容易缺数据。
  • Exactly once:精确一次,即使生产者重新发送消息,也只会被消费者消费一次,实际上就是在 kafka 集群中做一次去重的操作。kafka 集群会给生产者分配一个 PID,生产者每次发送消息到 broker 时都会附带 PID、分区以及序列号,broker 就会对数据做一个保存,如果生产者再发送同样消息,那么 broker 就会对数据进行去重,但如果生产者宕机重启了,就会被分配一个新的 PID,所以去重无法做到精准的数据写入。要开启 exactly-once,需要在 broker 中配置 enable.idempotence = true ,这时候 acks 默认被设置为 -1。

1.8 消费者分区分配策略

消费者是采用 pull 的方式在 kafka 集群中获取消息的。

push 模式很难适应消费速率不同的消费者,因为消息的发送速率是由 broker 决定的;而 pull 方式当 kafka 集群没有数据的时候,消费者可能会陷入循环之中,一直取到空数据。

一个消费者组里由多个消费者,一个 topic 里由多个分区,那么数据在消费的时候就会涉及到分配的问题,即确定那些分区由消费者组里的哪些消费者来消费。

kakfa 有三种分配策略,如下:

  • RangeAssignor(默认):RangeAssignor 是针对 topic 而言的,首先会对 topic 中的分区按照序号进行排列,并对消费者根据字典序排列,然后用分区个数除以消费者线程的总数来决定分区的分配,但如果除不尽,那么前面的消费者就会多分配一些分区。
  • RoundRobin:将消费组内所有消费者以及消费者所订阅的所有 topic 的 partition 按照字典序排序,然后通过轮询的方式逐个分配给组内的消费者。如果同时消费多个 topic,那么消费者会将这些 topic 视为一个。但如果同一个消费组内的消费者所订阅的信息是不相同的,那么在执行分区分配的时候就不是完全的轮询分配,有可能会导致分区分配的不均匀。
  • StickyAssignor:StickyAssignor 要实现的是分区的分配要尽可能的均匀,分配给消费者者的主题分区数最多相差一个,假设一个消费者组有三个消费者,都订阅了四个 topic,且每个 topic 中有二个分区,那么这时候分配的结果与 RoundRobin 会很相似,即消费者A三个分区、消费者B三个分区、消费者C两个分区,假设消费者C退出了消费者组,这时候 StickyAssignor 会保留之前消费者A和B分配到的分区,然后再将消费者C之前分配到的分区再分配给消费者A和B,即体现了粘性,不需要消费者将之前处理过的数据送到新的消费者再处理一次。

1.9 offset存储

kafka 在0.9版本之前,offset 是存储在 zk 中,在之后的版本则是存储在 kafka 内置的一个 topic 中,即 _consumer_offsets,一个 offset 提交的信息包括以下:

Fields Content
Key Consumer Group、Topic、Partition
Payload Offset、Metadata、Timestamp

offset 的提交会根据消费者组的 key(GTP) 进行分区,对于一个给定的消费者,它所有的消息都会发送到唯一的 broker,这样消费者就不需要对多个 broker 拉取数据,但如果消费者组消费很多数量的分区,会对 broker 造成性能瓶颈。

1.10 kafka写机制

  • 顺序写入磁盘
  • 零拷贝

1.11 kafka-controller

kafka 集群中会有一个 broker 被选举为 controller,用来负责管理 broker 的上下线,所有 topic 的分区、副本分配和 leader 选举等。

1.12 kafka事务

事务可以保证在 Exactly-Once 的基础上,生产和消费可以跨分区跨会话,即生产者在同一个事务内提交到多个分区的消息,要么同时提交成功,要么同时失败,这样就保证了生产者在运行时出现异常或宕机之后仍然成立。

生产者事务

为了实现跨分区跨会话的事务,需要引入全局唯一的 Transaction ID(由客户端给定),并将生产者的 PID 与之绑定,这样以来生产者即使宕机重启也可以与原来的 PID 进行绑定。

为了管理 Transaction ID,kafka 中引入了一个新的组件 Transaction Coordinator,生产者就是与 Transaction Coordinator 交互来获得 Transaction ID 对应的任务状态。Transaction Coordinator 还负责将事务写入 topic,这样即使服务重启,也可以得到恢复。

消费者事务

事务主要是为生产者作保证,无法保证消费者的精准消费,是因为消费者可以根据 offset 来访问消息。

二、kafka基础

2.1 kafka安装

通过二进制包部署

  1. 下载 kafka
1
2
curl -O https://mirrors.tuna.tsinghua.edu.cn/apache/kafka/2.8.0/kafka_2.13-2.8.0.tgz
tar -xf kafka_2.13-2.8.0.tgz
  1. 修改 server.properties
1
2
3
4
# broker的id必须为唯一的整数,设置为-1时随机生成
broker.id=-1
# 修改为实际zookeeper节点地址+2181端口
zookeeper.connect=...
  1. 开启 zookeeper 和 kafka
1
2
3
# daemon参数:不输出启动日志信息
./bin/zookeeper-server-start.sh -daemon ../config/zookeeper.properties
./bin/kafka-server-start.sh -daemon ./config/server.properties

通过 docker-compose 部署

  1. docker-compose.yaml
1
2
3
4
5
6
7
8
9
10
11
12
13
14
15
16
17
18
19
20
21
22
23
24
25
26
27
28
29
30
31
32
33
34
35
36
37
38
39
40
41
42
43
44
45
46
47
version: "3.8"
services:
zookeeper:
container_name: zookeeper
image: docker.io/bitnami/zookeeper:3.7
ports:
- "12181:2181"
volumes:
- "./data/zookeeper_data:/zookeeper_data"
environment:
- ALLOW_ANONYMOUS_LOGIN=yes
kafka1:
container_name: kafka1
image: docker.io/bitnami/kafka:2.8.0
ports:
- "19092:9092"
volumes:
- "./data/kafka1_data:/data"
environment:
- KAFKA_CFG_ZOOKEEPER_CONNECT=zookeeper:2181
- ALLOW_PLAINTEXT_LISTENER=yes
depends_on:
- zookeeper
kafka2:
container_name: kafka2
image: docker.io/bitnami/kafka:2.8.0
ports:
- "19093:9092"
volumes:
- "./data/kafka2_data:/data"
environment:
- KAFKA_CFG_ZOOKEEPER_CONNECT=zookeeper:2181
- ALLOW_PLAINTEXT_LISTENER=yes
depends_on:
- zookeeper
kafka3:
container_name: kafka3
image: docker.io/bitnami/kafka:2.8.0
ports:
- "19094:9092"
volumes:
- "./data/kafka3_data:/data"
environment:
- KAFKA_CFG_ZOOKEEPER_CONNECT=zookeeper:2181
- ALLOW_PLAINTEXT_LISTENER=yes
depends_on:
- zookeeper
  1. 进入 zookeeper 内部查看 brokers 是否存在
1
2
3
zkCli.sh
ls /brokers/ids
...

kraft 模式部署

  1. kraft/server.properties
1
2
3
4
# 根据节点数改
node.id=1
# 控制节点
controller.quorum.voters=1@master:9093,2@slave1:9093,3@slave2:9093
  1. 生成集群ID
1
./bin/kafka-storage.sh random-uuid
  1. 生成 /tmp/kraft-combined-logs 目录
1
./bin/kafka-storage.sh format -t <uuid> -c ./config/kraft/server.properties
  1. 各节点启动 kafka
1
./bin/kafka-server-start.sh -daemon ./config/kraft/server.properties

kraft 模式 docker-compose 部署

1
2
3
4
5
6
7
8
9
10
11
12
13
14
15
16
17
18
19
20
21
22
23
24
25
26
27
28
29
30
31
32
33
34
35
36
37
38
39
40
41
42
43
44
45
46
47
version: "3.8"
services:
kafka1:
container_name: kafka1
image: docker.io/bitnami/kafka:2.8.0
command:
- /bin/bash
- -c
- |
kafka-storage.sh format -t <uuid> -c /opt/bitnami/kafka/config/kraft/server.properties
kafka-server-start.sh /opt/bitnami/kafka/config/kraft/server.properties
ports:
- "19092:9092"
volumes:
- "./conf/kafka1:/opt/bitnami/kafka/config/kraft"
environment:
- ALLOW_PLAINTEXT_LISTENER=yes
kafka2:
container_name: kafka2
image: docker.io/bitnami/kafka:2.8.0
command:
- /bin/bash
- -c
- |
kafka-storage.sh format -t <uuid> -c /opt/bitnami/kafka/config/kraft/server.properties
kafka-server-start.sh /opt/bitnami/kafka/config/kraft/server.properties
ports:
- "19093:9092"
volumes:
- "./conf/kafka2:/opt/bitnami/kafka/config/kraft"
environment:
- ALLOW_PLAINTEXT_LISTENER=yes
kafka3:
container_name: kafka3
image: docker.io/bitnami/kafka:2.8.0
command:
- /bin/bash
- -c
- |
kafka-storage.sh format -t <uuid> -c /opt/bitnami/kafka/config/kraft/server.properties
kafka-server-start.sh /opt/bitnami/kafka/config/kraft/server.properties
ports:
- "19094:9092"
volumes:
- "./conf/kafka3:/opt/bitnami/kafka/config/kraft"
environment:
- ALLOW_PLAINTEXT_LISTENER=yes

2.2 kafka基本使用

  1. 列出某个 zookeeper 中的 topic
1
./kafka-topics.sh --list --zookeeper zookeeper_ip:2181
  1. 创建 topic
1
2
3
# --replication-factor:副本数,总副本数为(分区数 * 副本数参数),下面的例子总副本数为4
# --partitions:分区数
./kafka-topics.sh --create --zookeeper zookeeper_ip:2181 --replication-factor 2 --partitions 2 --topic test
  1. 删除 topic
1
2
# delete.topic.enable为true时才会真正删除
./kafka-topics.sh --delete --zookeeper zookeeper_ip:2181 --topic test
  1. 查看 topic
1
./kafka-topics.sh --describe --zookeeper zookeeper_ip:2181 --topic test
  1. 启动 producer
1
2
# --broker-list:针对生产者使用,指定集群中的一个或者多个kafka服务器
./kafka-console-producer.sh --broker-list kafka_id:9092 --topic test
  1. 启动 consumer
1
2
3
# --bootstrap-server:针对消费者使用,指定集群中的一个或者多个kafka服务器
# --from-beginning:查看所有消息数据
./kafka-console-consumer.sh --bootstrap-server kafka_id:9092 --topic test --from-beginning

2.3 单播消息

如果多个消费者在同一个消费者组,只有一个消费者可以收到同一个订阅的 topic 的消息。

如果 topic 进行了分区,那么一个 partition 只能被消费者组内的一个消费者消费,但消费者可以消费多个不同的 partition,而这些 partition 也可以被不同消费者组的消费者消费。

1
2
# --consumer-property group.id:指定该消费者从属于哪个消费者组
./kafka-console-consumer.sh --bootstrap-server kafka_id:9092 --consumer-property group.id=testgroup --topic test

2.4 多播消息

如果多个不同消费者组中的消费者消费同一个订阅的 topic 的消息,那么这些消费者都可以消费同样的消息。

2.5 查看消费者组信息

  1. 查看指定节点有哪些消费者组
1
./kafka-consumer-groups.sh --bootstrap-server kafka_id:9092 --list
  1. 查看消费者组详细信息
1
2
3
4
./kafka-consumer-groups.sh --bootstrap-server kafka_id:9092 --describe --group testgroup
# CURRENT-OFFSET:上次消费消息偏移量
# LOG-END-OFFSET:当前topic最后消息偏移量
# LAG:未消费信息的数量

2.6 kafka集群操作

  1. 消息发送
1
./kafka-console-producer.sh --broker-list kafka_01:9092 kafka_02:9092 kafka_03:9092 --topic test
  1. 消息消费
1
./kafka-console-consumer.sh --bootstrap-server kafka_01:9092 kafka_02:9092 kafka_03:9092 --from-beginning --topic test
  1. 消费者组消费信息
1
./kafka-consumer-groups.sh --bootstrap-server kafka_01:9092 kafka_02:9092 kafka_03:9092 --from-beginning --consumer-property group.id=testgroup --topic test

三、kafka优化

3.1 如何防止消息丢失

  • 发送方:设置 ack 的值为 1 或 -1/all
  • 消费方:设置 offset 为手动提交

3.2 如何防止消息的重复消费

如果 broker 收到了消息并发送了 ack 给生产者,因为网络原因生产者在一定时间内没有收到 ack 就会进行消息的重新发送,这样 broker 就会有两条一样的消息,就可能会造成消费者重复消费。

在消费者端进行非幂等性(多次访问的结果是一样的)消费问题,就可以解决。

  • 方法一:在数据库中创建一个联合主键(id,uuid),这样只有联合主键匹配成功才能写入数据
  • 方法二:使用分布式锁,例如 Redission.lock(uuid)

3.3 如何做到顺序消费

顺序消费的使用场景并不多,因为会牺牲较多的性能。

  • 发送方:ack 不能设置为 0(否则可能会丢失消息),关闭重试并使用同步发送(重试可能会导致消息重复,异步发送会导致消息发送顺序不一致),消息发送成功后才会发送下一条,以保证消息的顺序发送
  • 消费方:消息都是发送到一个 partition 中,只能有一个消费者来消费该 partition 的消息

3.4 消息积压

当消费者的消费速度远远跟不上生产者的消息生产速度,那么 kafka 中就会有大量的消息没有被消费,消费者寻址的性能也会越来越差,最后导致服务雪崩。

  • 方法一:使用多线程
  • 方法二:创建多个消费者组和多个消费者,一起消费
  • 方法三:创建一个消费者,该消费者新建一个 topic,并划分多个分区,多个分区再划分给多个消费者,这时候该消费者将消息拉取下来但不进行消费,而是放在新的 topic 上让多个消费者进行消费。

3.5 延时队列

如果在订单创建成功后 30 分钟内没有付款,则自动取消订单,在这就可以通过延时队列来实现。

方法:

  • kafka 创建相应 topic
  • 消费者轮询消费该 topic 的消息
  • 消费者判断该 topic 的创建时间与当前时间是否超过 30 分钟(前提是订单未支付)
    • 如果是:在数据库中修改订单状态为取消
    • 如果不是:记录当前消息的 offset,并不再继续消费

四、kafka-eagle监控平台

  1. 下载 kafka-eagle
1
curl -O https://github.com/smartloli/kafka-eagle-bin/archive/v2.0.8.tar.gz
  1. 修改 system-config.properties
1
2
3
4
5
6
7
8
# zk地址
efak.zk.cluster.alias=cluster1
cluster1.zk.list=localhost:12181
# mysql地址
efak.driver=com.mysql.cj.jdbc.Driver
efak.url=jdbc:mysql://127.0.0.1:3306/ke?useUnicode=true&characterEncoding=UTF-8&zeroDateTimeBehavior=convertToNull
efak.username=root
efak.password=toortoor
  1. 修改环境变量
1
2
3
4
5
6
7
vim /etc/profile
export JAVA_HOME=/usr/lib/jvm/java-1.8.0-openjdk-1.8.0.302.b08-0.el7_9.x86_64
export CLASSPATH=.:$JAVA_HOME/jre/lib/rt.jar.:$JAVA_HOME/lib/dt.jar.:$JAVA_HOME/lib/tools.jar
export PATH=$PATH:$JAVA_HOME/bin
export KE_HOME=/root/kafka/kafka-eagle/efak-web-2.0.8
export PATH=$PATH:$KE_HOME/bin
source /etc/profile
  1. 访问
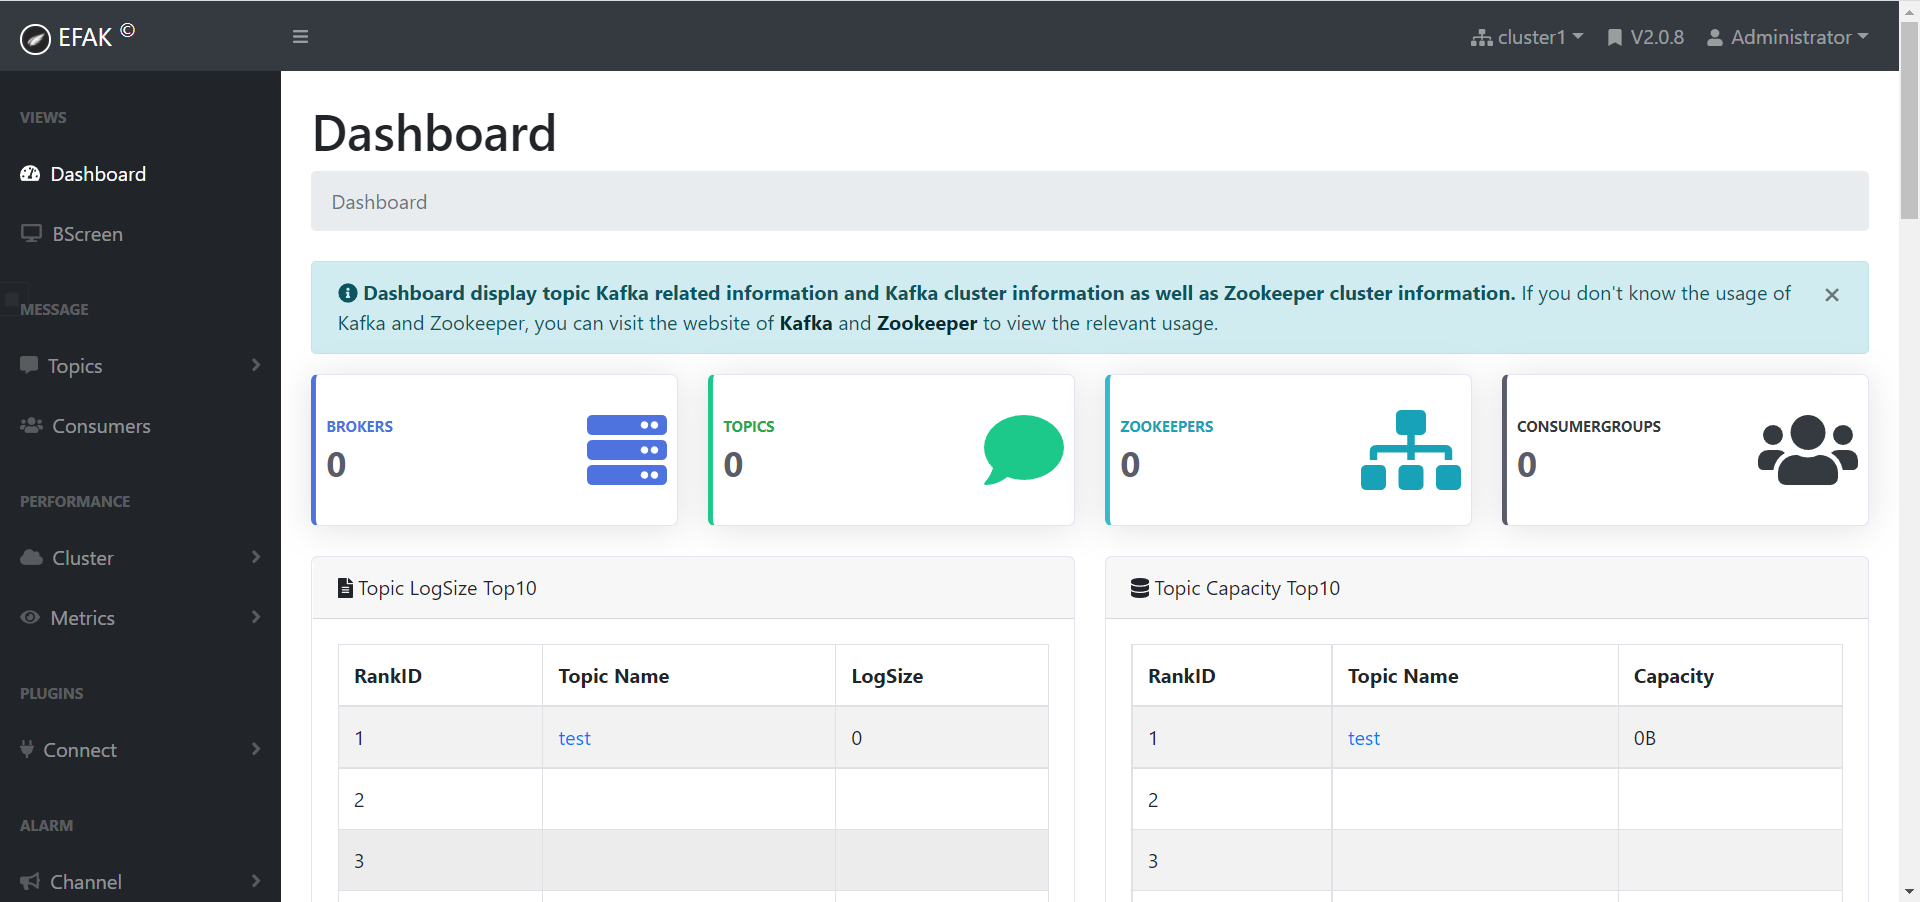
kafka-eagle

Nexus

Nexus 是一个用于专门搭建 Maven 仓库的软件,除了作为 Maven 仓库,它还能够作为 Docker 镜像仓库、Yum 仓库等等。

Nexus 部署

deploy.yaml

1
2
3
4
5
6
7
8
9
10
11
12
13
14
15
16
17
18
19
20
21
22
23
24
25
26
27
28
29
30
31
32
33
34
35
36
37
38
39
40
41
42
43
44
45
46
47
48
49
50
51
52
53
54
55
56
57
58
59
60
61
62
63
64
65
66
67
68
69
apiVersion: apps/v1
kind: Deployment
metadata:
creationTimestamp: null
labels:
app: nexus
name: nexus
spec:
replicas: 1
selector:
matchLabels:
app: nexus
strategy: {}
template:
metadata:
creationTimestamp: null
labels:
app: nexus
spec:
initContainers:
- name: volume-mount-hack
image: busybox:latest
command:
- sh
- '-c'
- 'chown -R 200:200 /nexus-data'
volumeMounts:
- name: nexus-data
mountPath: /nexus-data
containers:
- image: sonatype/nexus3:3.37.3
name: nexus
ports:
- containerPort: 8081
env:
- name: INSTALL4J_ADD_VM_PARAMS
value: "-Xms2703m -Xmx2703m -XX:MaxDirectMemorySize=2703m -Djava.util.prefs.userRoot=${NEXUS_DATA}/javaprefs"
resources:
limits:
cpu: 2000m
memory: 2048Mi
requests:
cpu: 2000m
memory: 2048Mi
volumeMounts:
- name: nexus-data
mountPath: /nexus-data
volumes:
- name: nexus-data
# 自行修改挂载类型,不修改则需创建对应PV和PVC👇
persistentVolumeClaim:
claimName: nexus-data

---
apiVersion: v1
kind: Service
metadata:
name: nexus
labels:
app: nexus
spec:
type: NodePort
ports:
- name: nexus
port: 8081
targetPort: 8081
protocol: TCP
selector:
app: nexus

部署后,在容器内部获取 admin 密码

1
echo $(cat /nexus-data/admin.password)

默认仓库说明

  • maven-central:中央仓库,默认从 https://repo1.maven.org/maven2/ 拉取 jar 包
  • maven-releases:私库发行 jar,建议将设置改为 Allow redeploy
  • maven-snapshots:私库快照 jar,即库中的 jar 均为调试版本
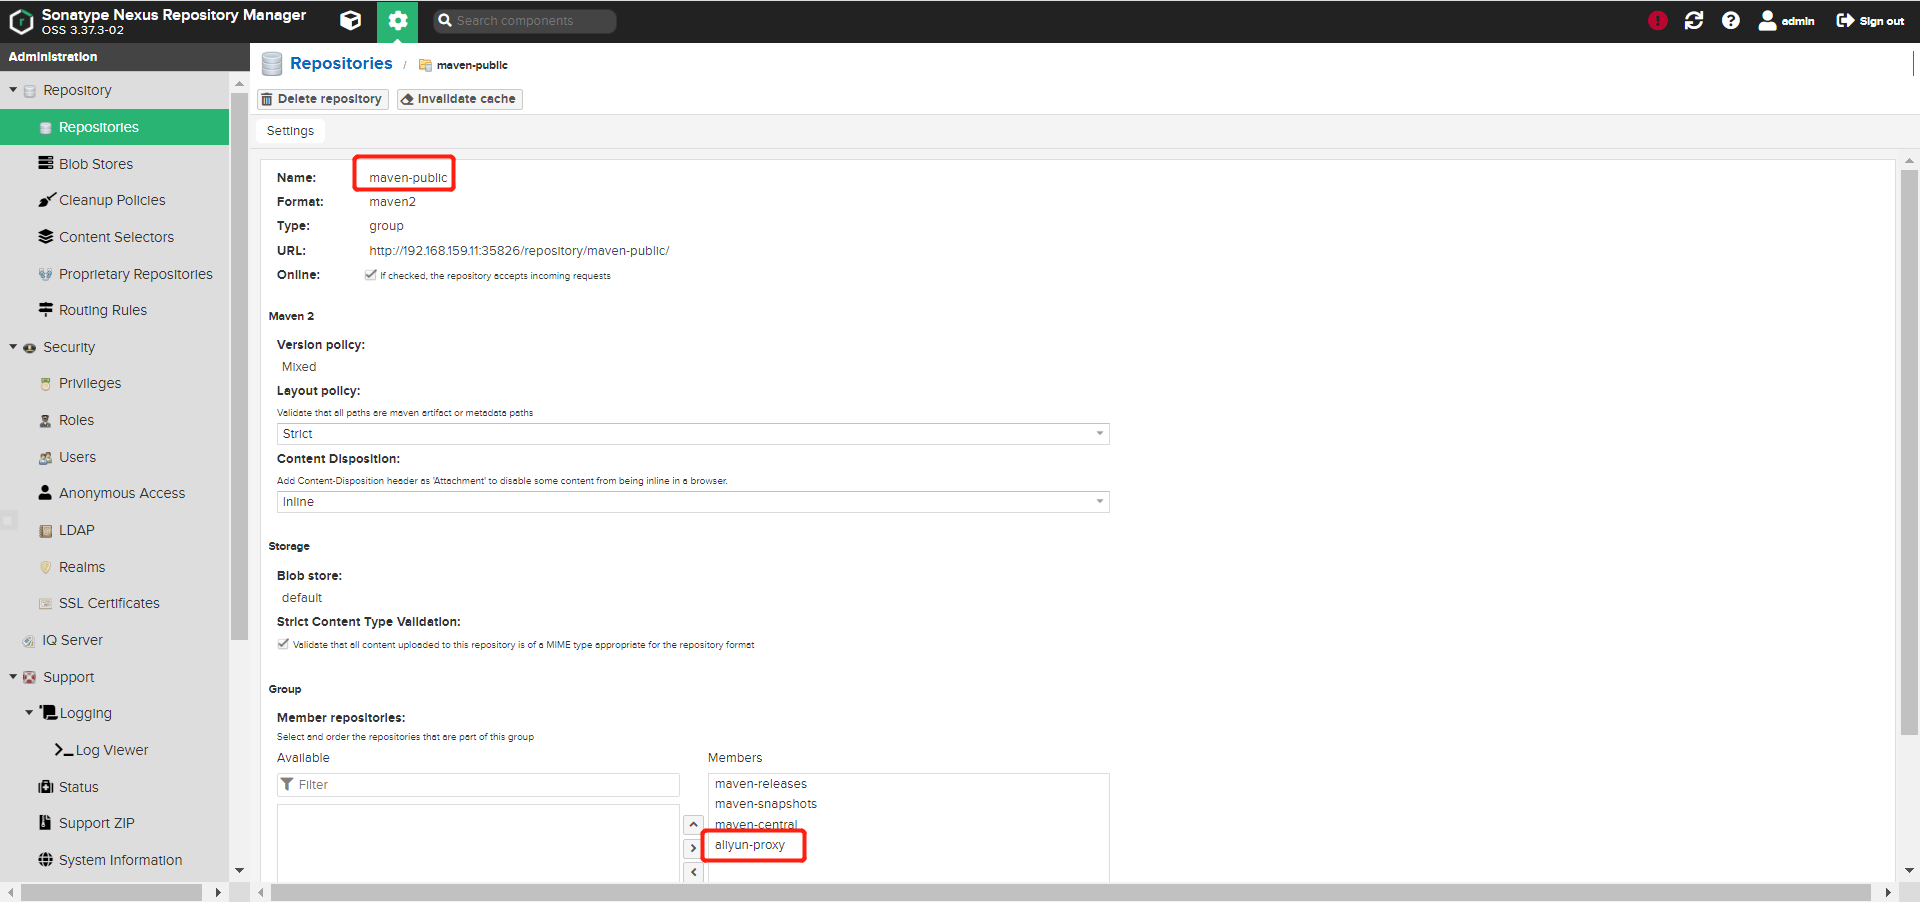
  • maven-public:仓库分组,把上面三个仓库组合在一起对外提供服务,在本地 maven 的 settings.xml 文件或项目的 pom.xml 文件设置为该仓库地址,即可调用

仓库类型说明

  • group:仓库组,起到了聚合的作用,在该组中的仓库都可以通过该组的 URL 进行访问
  • hosted:私有仓库,顾名思义,用来存储自己的 jar 包
  • snapshot:快照仓库
  • release:本地项目的正式版本仓库
  • proxy:代理,Nexus 的 maven-central 就是这种类型,代理地址为 https://repo1.maven.org/maven2/ ,默认会去该地址下拉取 jar 包
  • central:中央仓库

新增代理仓库

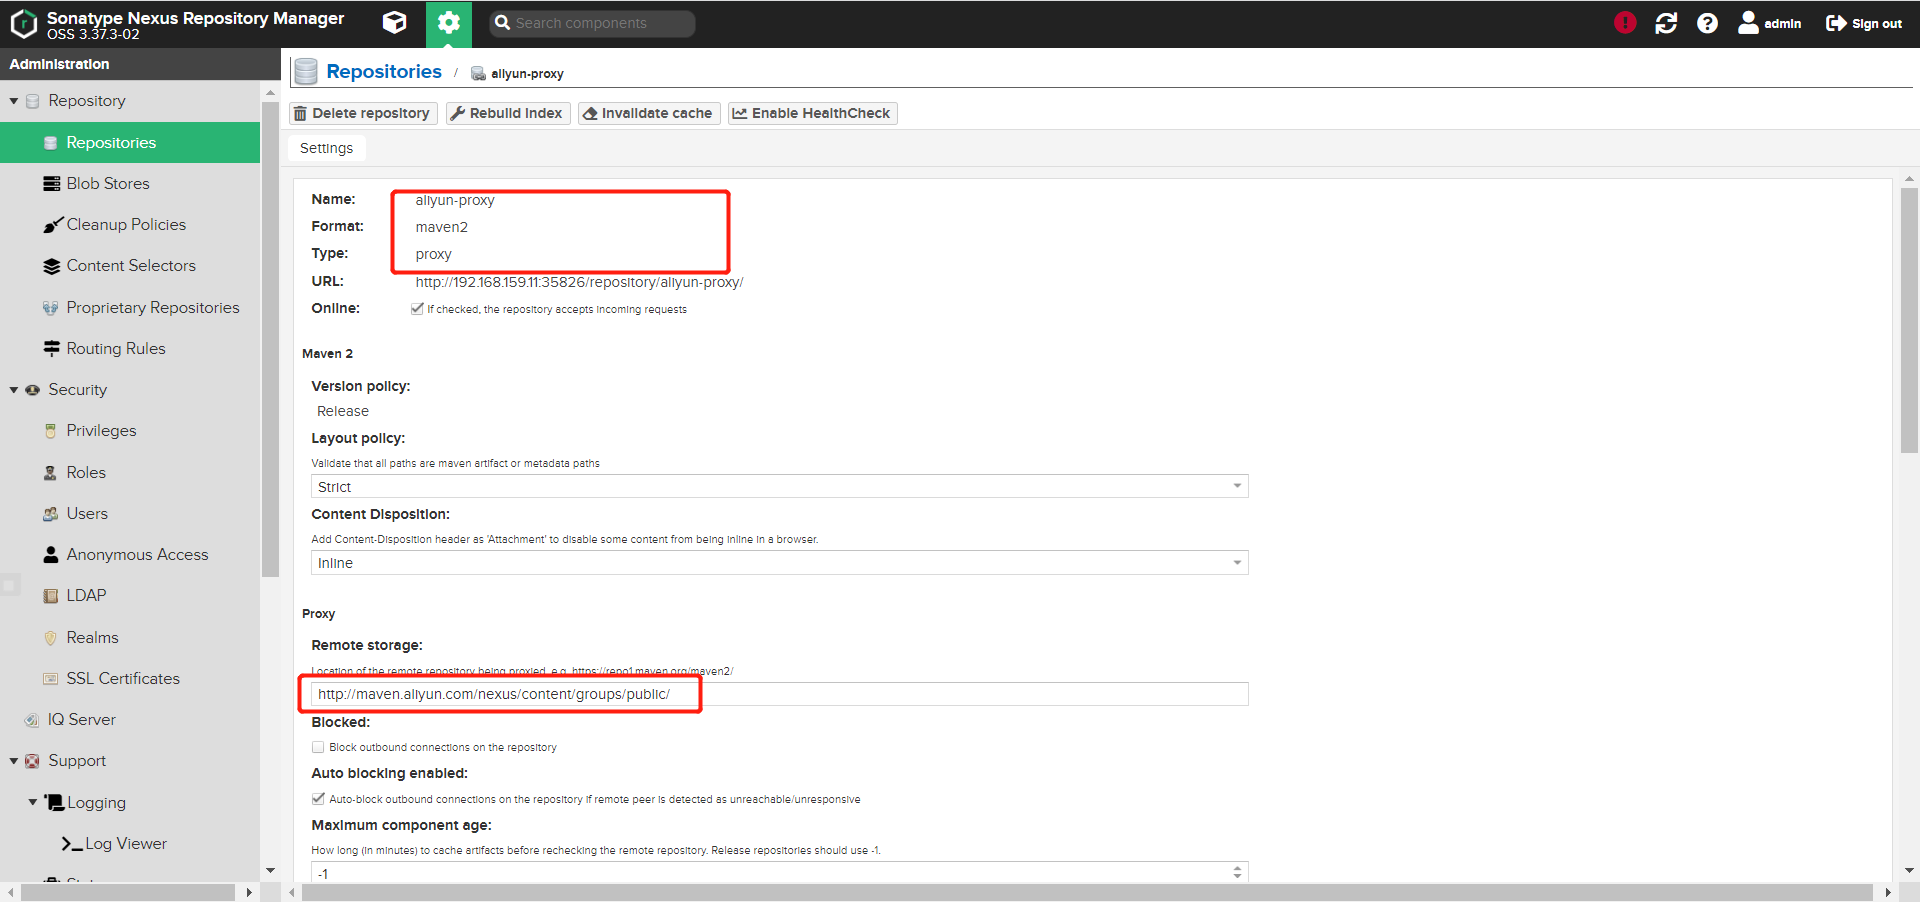
创建仓库选择 maven2(proxy) 类型

新增代理仓库

添加到 maven-public

添加到组

Maven 配置使用私服

要在本地 Maven 在私服拉取 jar 的方式有两种:

  • settings.xml:全局配置模式
  • pom.xml:项目独享模式

如果两种方式都配置了,那么以 pom.xml 文件配置为准。

当我们通过 Maven 使用 Nexus 的 maven-public 的时候,会按照以下方式顺序访问:

  1. 本地仓库

  2. 私服 maven-releases

  3. 私服 maven-snapshots

  4. 远程阿里 maven 仓库

  5. 远程中央仓库

通过 settings.xml 文件配置

1
2
3
4
5
6
7
8
9
10
11
12
13
14
15
16
17
<!-- servers块中添加用户认证信息 -->
<server>
<id>nexus</id>
<username>admin</username>
<password>changeme</password>
</server>
<!-- mirrors块中添加maven-public信息 -->
<mirror>
<!-- 唯一标识符 -->
<id>nexus</id>
<!-- 名称 -->
<name>cqm maven</name>
<!-- maven-public地址 -->
<url>http://192.168.159.11:35826/repository/maven-public/</url>
<!-- *指的是访问任何仓库都使用我们的私服,可设置为central等等 -->
<mirrorOf>*</mirrorOf>
</mirror>

也可以设置为阿里的

1
2
3
4
5
6
<mirror>
<id>alimaven</id>
<name>aliyun maven</name>
<url>http://maven.aliyun.com/nexus/content/groups/public/</url>
<mirrorOf>central</mirrorOf>
</mirror>

通过 pom.xml 文件配置

1
2
3
4
5
6
7
8
9
10
11
12
13
<repositories>
<repository>
<id>mnexus</id>
<name>cqm nexus</name>
<url>http://192.168.159.11:35826/repository/maven-public/</url>
<releases>
<enabled>true</enabled>
</releases>
<snapshots>
<enabled>true</enabled>
</snapshots>
</repository>
</repositories>

同样也可以设置为阿里的

1
2
3
4
5
6
7
8
9
10
11
12
13
14
<repositories>
<repository>
<id>alimaven</id>
<url>http://maven.aliyun.com/nexus/content/groups/public/</url>
<releases>
<enabled>true</enabled>
</releases>
<snapshots>
<enabled>true</enabled>
<updatePolicy>always</updatePolicy>
<checksumPolicy>fail</checksumPolicy>
</snapshots>
</repository>
</repositories>

使用 Maven 批量向 Nexus 上传

首先需要将 .m2/repository 下的相应 jar 包和 pom 文件 cp 出来,再进行 deploy。

1
2
# -DrepositoryId 参数调用了 settings.xml 中 servers 块的账号密码进行认证
find . -name "*.jar" | awk '{ gsub("\.jar$","",$0); print "mvn deploy:deploy-file -Dfile="$0".jar -DpomFile="$0".pom -Dpackaging=jar -DrepositoryId=nexus -Durl=\"http://nexus-path\""}'

Jenkins

Jenkins图标

Jenkins是一个开源的持续集成的服务器,Jenkins开源帮助我们自动构建各类项目。Jenkins强大的插件式,使得Jenkins可以集成很多软件,可能帮助我们持续集成我们的工程项目。

一、什么是CI、CD

devops

Devops也就是开发运维一体化,而随着Devops的兴起,出现了持续集成持续交付以及持续部署的新方法,传统的软件开发和交付方法正在迅速变得过时。从历史上看,在敏捷时代,大多数公司会每月、每季度、每两年甚至每年发布部署或发布软件。然而,在DevOps时代,每周、每天、甚至每天多次。当SaaS正在占领世界时,我们可以轻松地动态更新应用程序,而无需强迫客户下载新组件。很多时候,他们甚至都不会意识到正在发生变化。开发团队通过软件交付流水线(Pipeline)实现自动化,以缩短交付周期,大多数团队都有自动化流程来检查代码并部署到新环境。

持续集成的重点是将各个开发人员的工作集合到一个代码仓库中。通常,每天都要进行几次,主要目的是尽早发现集成错误,使团队更加紧密结合,更好地协作。

持续交付的目的是最小化部署或释放过程中固有的摩擦。它的实现通常能够将构建部署的每个步骤自动化,以便任何时刻能够安全地完成代码发布(理想情况下)。

持续部署是一种更高程度的自动化,无论何时对代码进行重大更改,都会自动进行构建/部署。

Jenkins就是来实现以上持续集成工作的服务器。

二、持续集成环境搭建

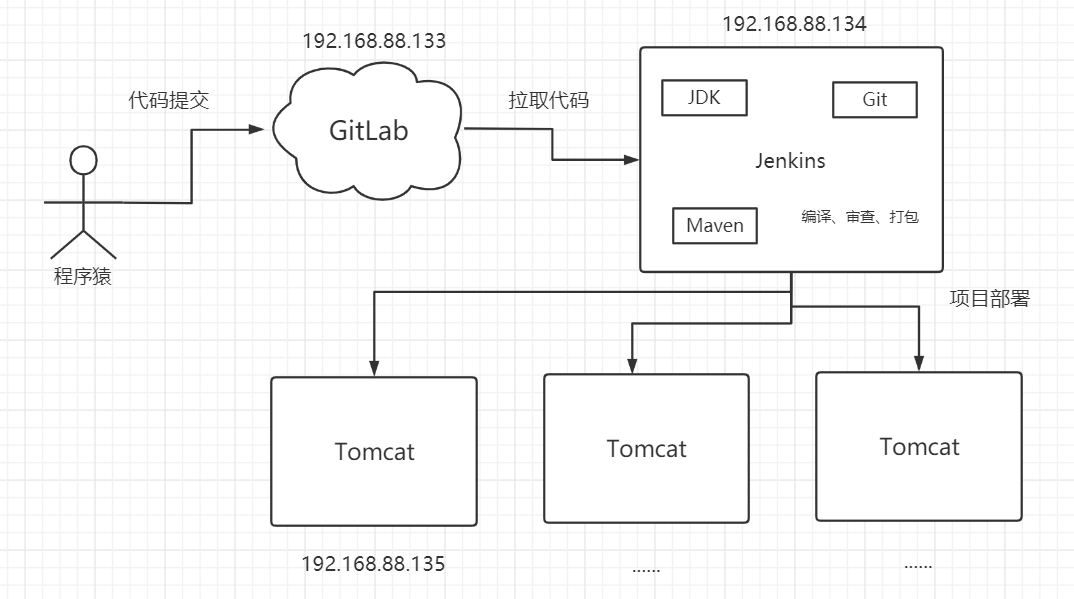
Jenkins流程图:

Jenkins流程图

2.1 Gitlab代码托管服务器安装

Gitlab 是一个用于仓库管理系统的开源项目,使用Git作为代码管理工具,并在此基础上搭建起来的Web服务。

gitlab图标

  1. 开启postfix服务(支持gitlab发信功能)
1
2
systemctl start postfix
systemctl enable postfix
  1. 配置gitlab的yum源
1
2
3
4
5
6
7
8
9
vim /etc/yum.repos.d/gitlab-cd.repo
[gitlab-ce]
name=Gitlab CE Repository
baseurl=https://mirrors.tuna.tsinghua.edu.cn/gitlab-ce/yum/el$releasever/
gpgcheck=0
enabled=1

yum clean all
yum makecache
  1. 安装gitlab
1
yum -y install gitlab-ce
  1. 修改gitlab配置文件
1
2
3
4
5
6
7
8
9
vim /etc/gitlab/gitlab.rb
#用户访问所使用的URL,域名或者IP地址
external_url 'http://192.168.88.133'
#时区
gitlab_rails['time_zone'] = 'Asia/Shanghai'
#启用SMTP邮箱功能
gitlab_rails['smtp_enable'] = 'ture'
#使用SSH协议拉取代码所使用的连接端口
gitlab_rails['gitlab_shell_ssh_port'] = '22'
  1. 刷新配置
1
gitlab-ctl reconfigure
  1. 启动服务
1
2
3
gitlab-ctl restart
gitlab-ctl status
......
  1. docker-compose.yaml
1
2
3
4
5
6
7
8
9
10
11
12
13
14
15
16
17
18
version: '3.8'
services:
gitlab:
container_name: gitlab
image: gitlab/gitlab-ce:latest
restart: always
environment:
GITLAB_OMNIBUS_CONFIG: |
external_url 'http://192.168.88.30'
gitlab_rails['time_zone'] = 'Asia/Shanghai'
gitlab_rails['gitlab_shell_ssh_port'] = '22'
ports:
- '80:80'
- '23:22'
volumes:
- '/root/cicd/gitlab/config:/etc/gitlab'
- '/root/cicd/gitlab/logs:/var/log/gitlab'
- '/root/cicd/gitlab/data:/var/opt/gitlab'
  1. 进入容器查看默认用户名和修改密码
1
2
3
4
5
6
7
8
9
gitlab-rails console
# 查找root用户
u=User.where(id:1).first
# 修改密码
u.password='toortoor'
# 确认修改密码
u.password_confirmation='toortoor'
# 保存修改
u.save

2.2 Gitlab创建组、用户、项目

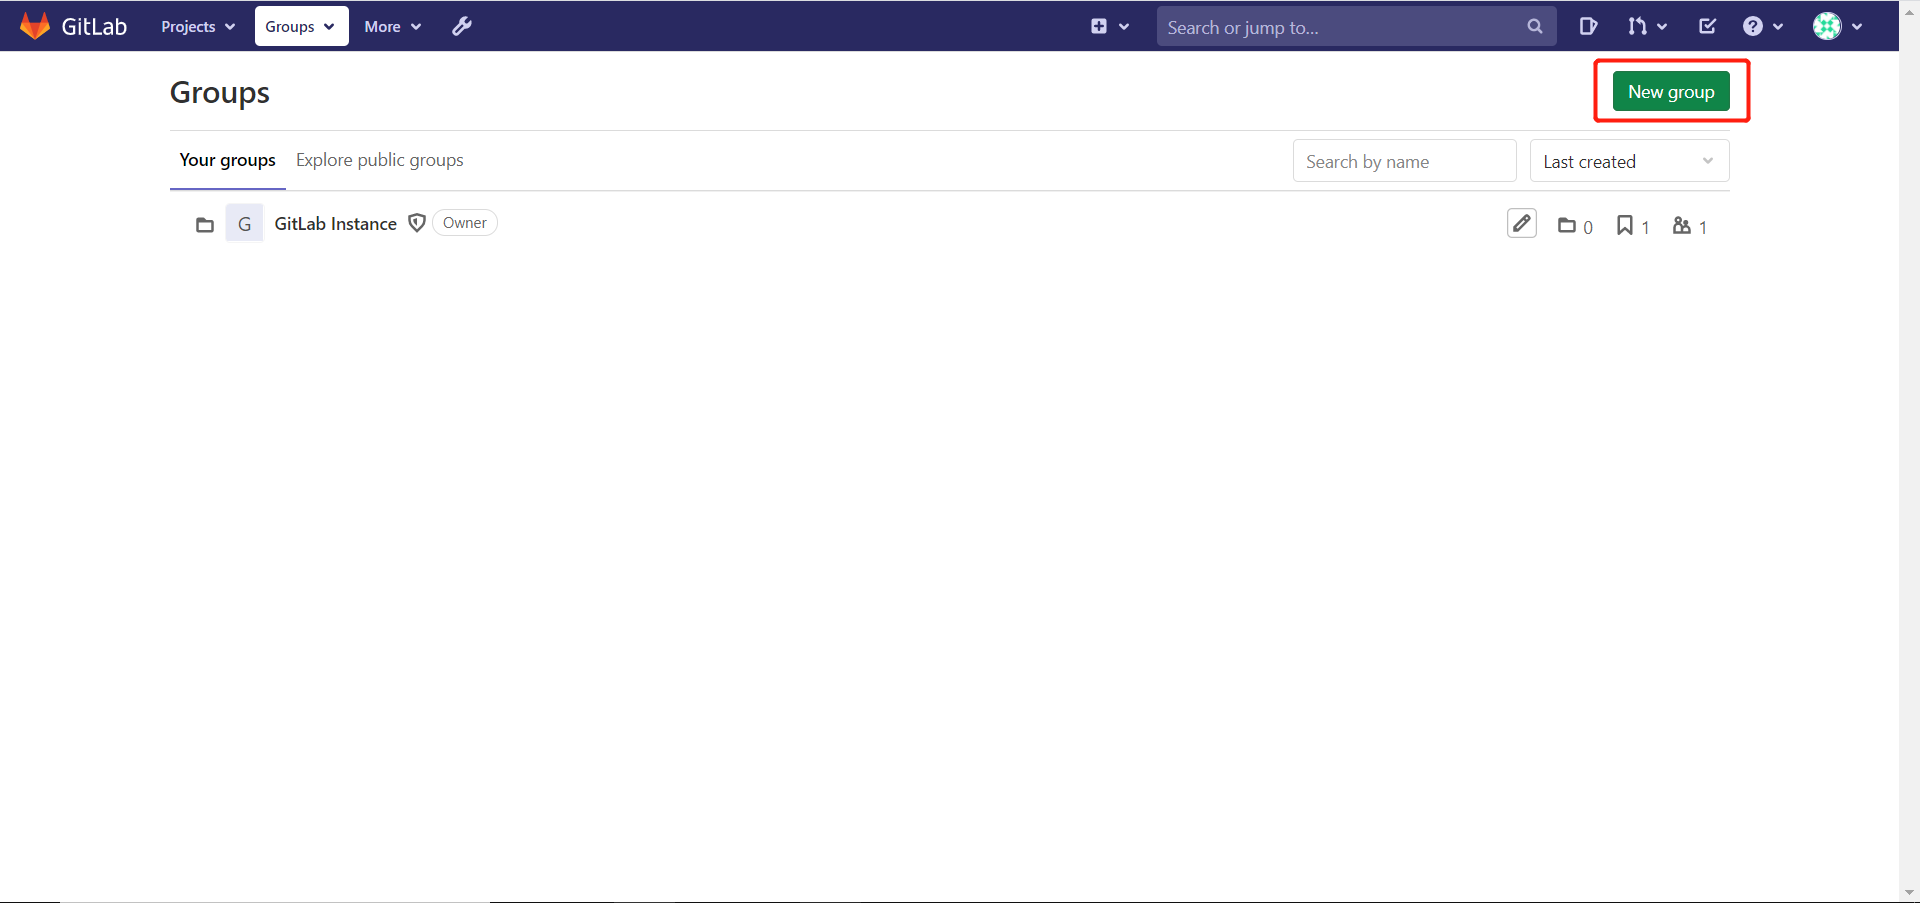
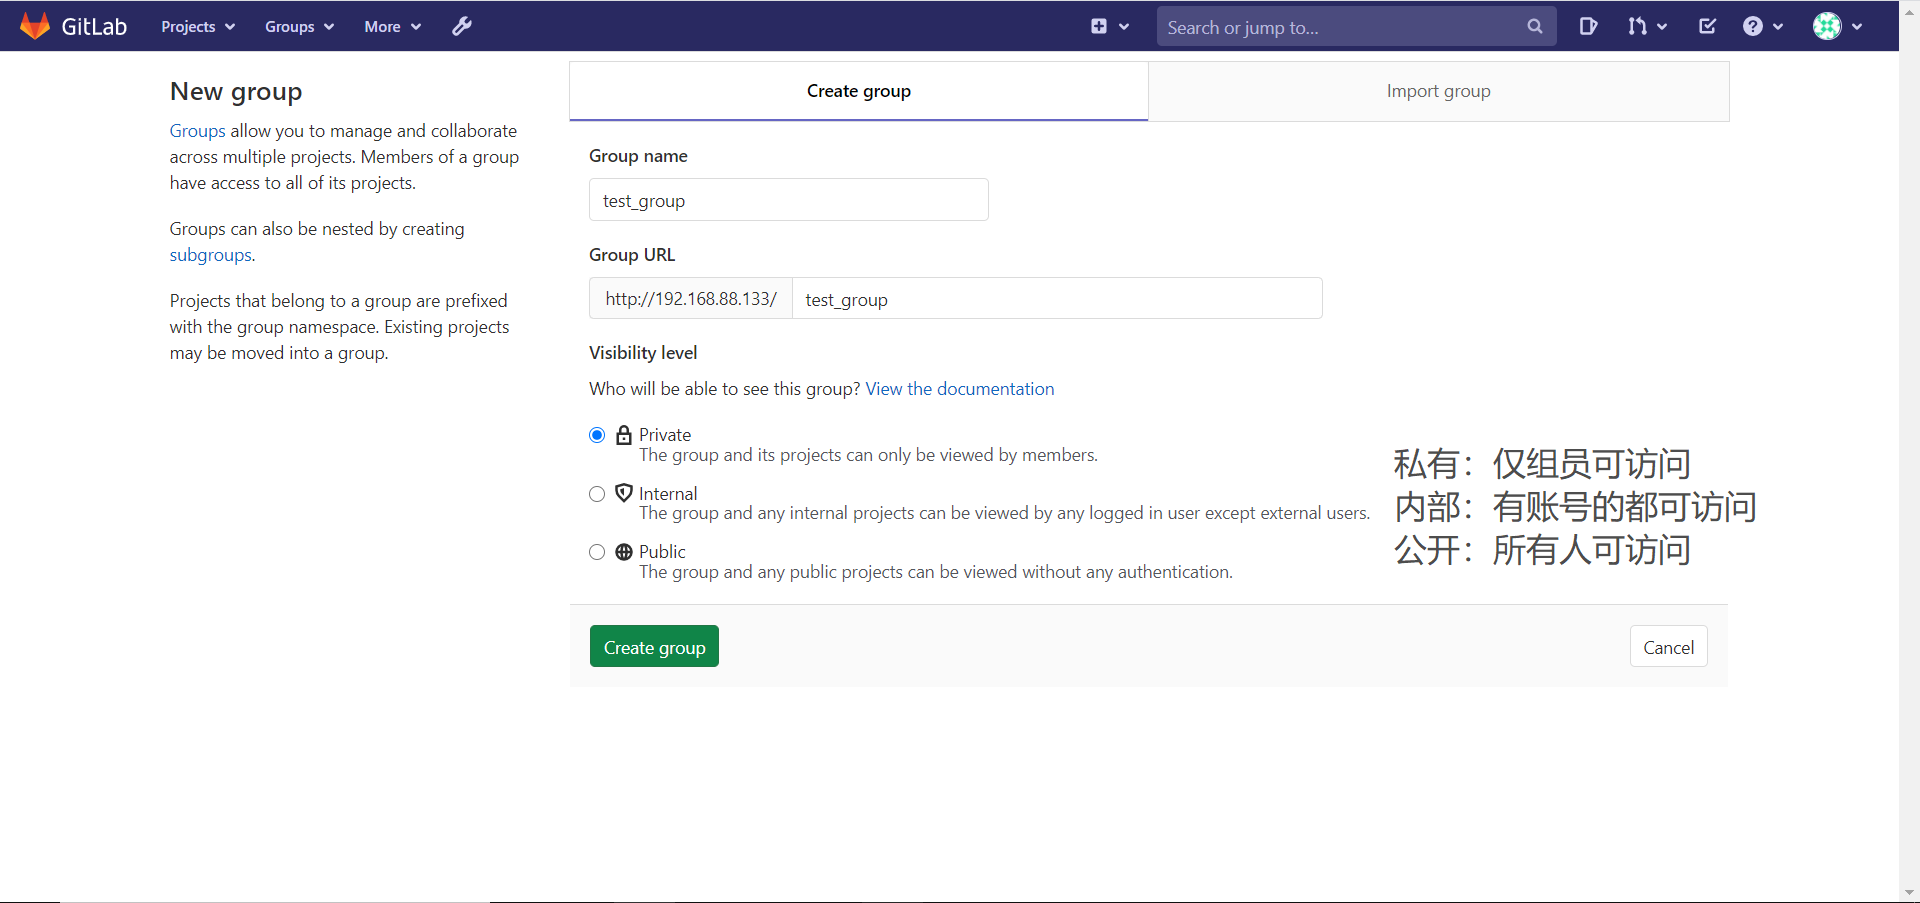
Gitlab创建组:

  1. 添加组

gitlab创建组一

  1. 设置组名和权限

gitlab创建组二

Gitlab创建用户:

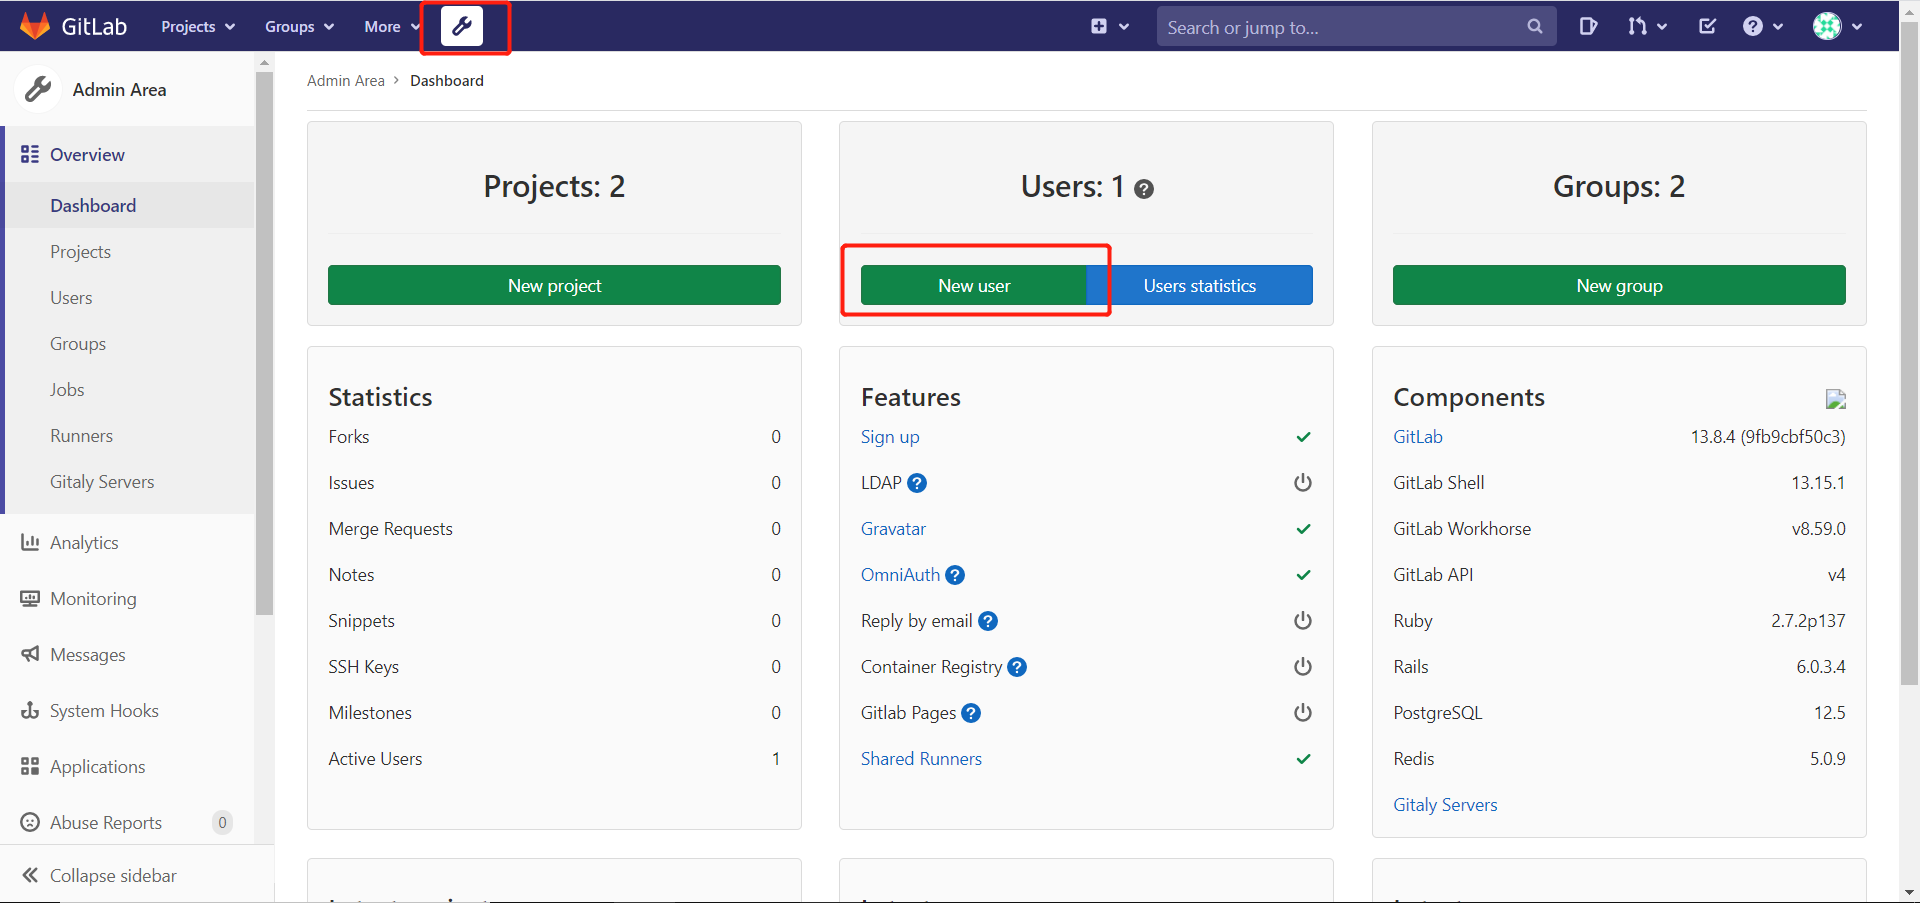
  1. 添加用户

gitlab创建用户一

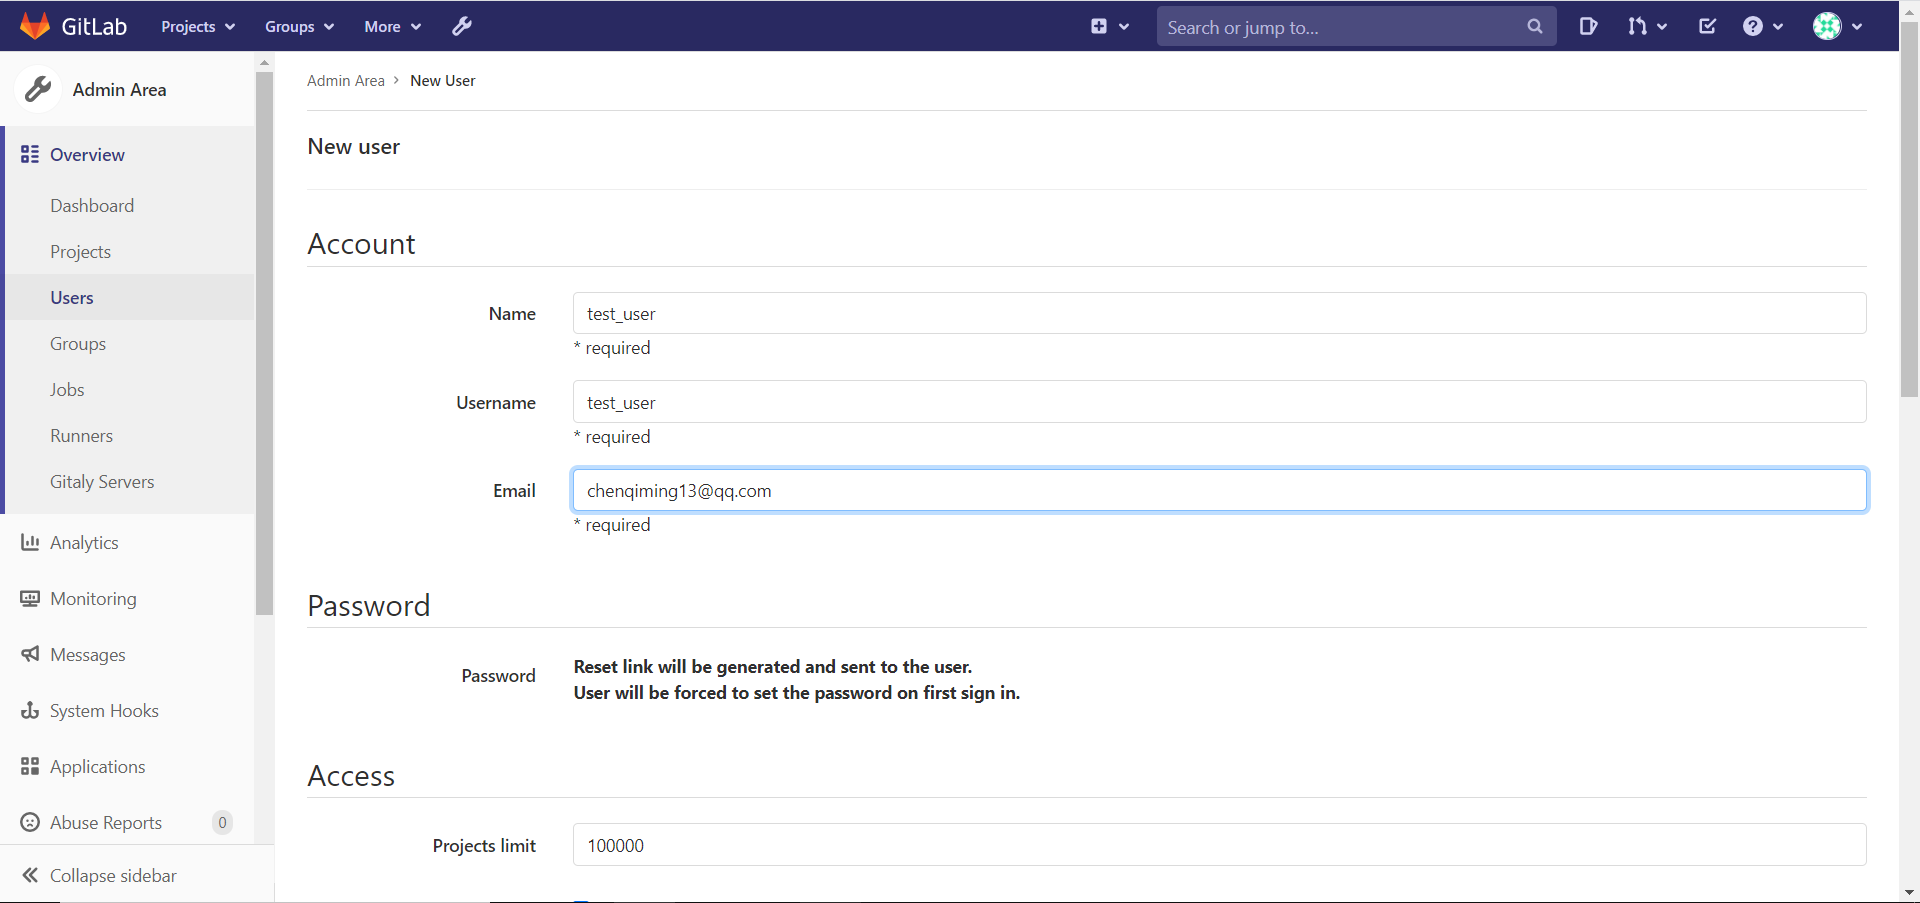
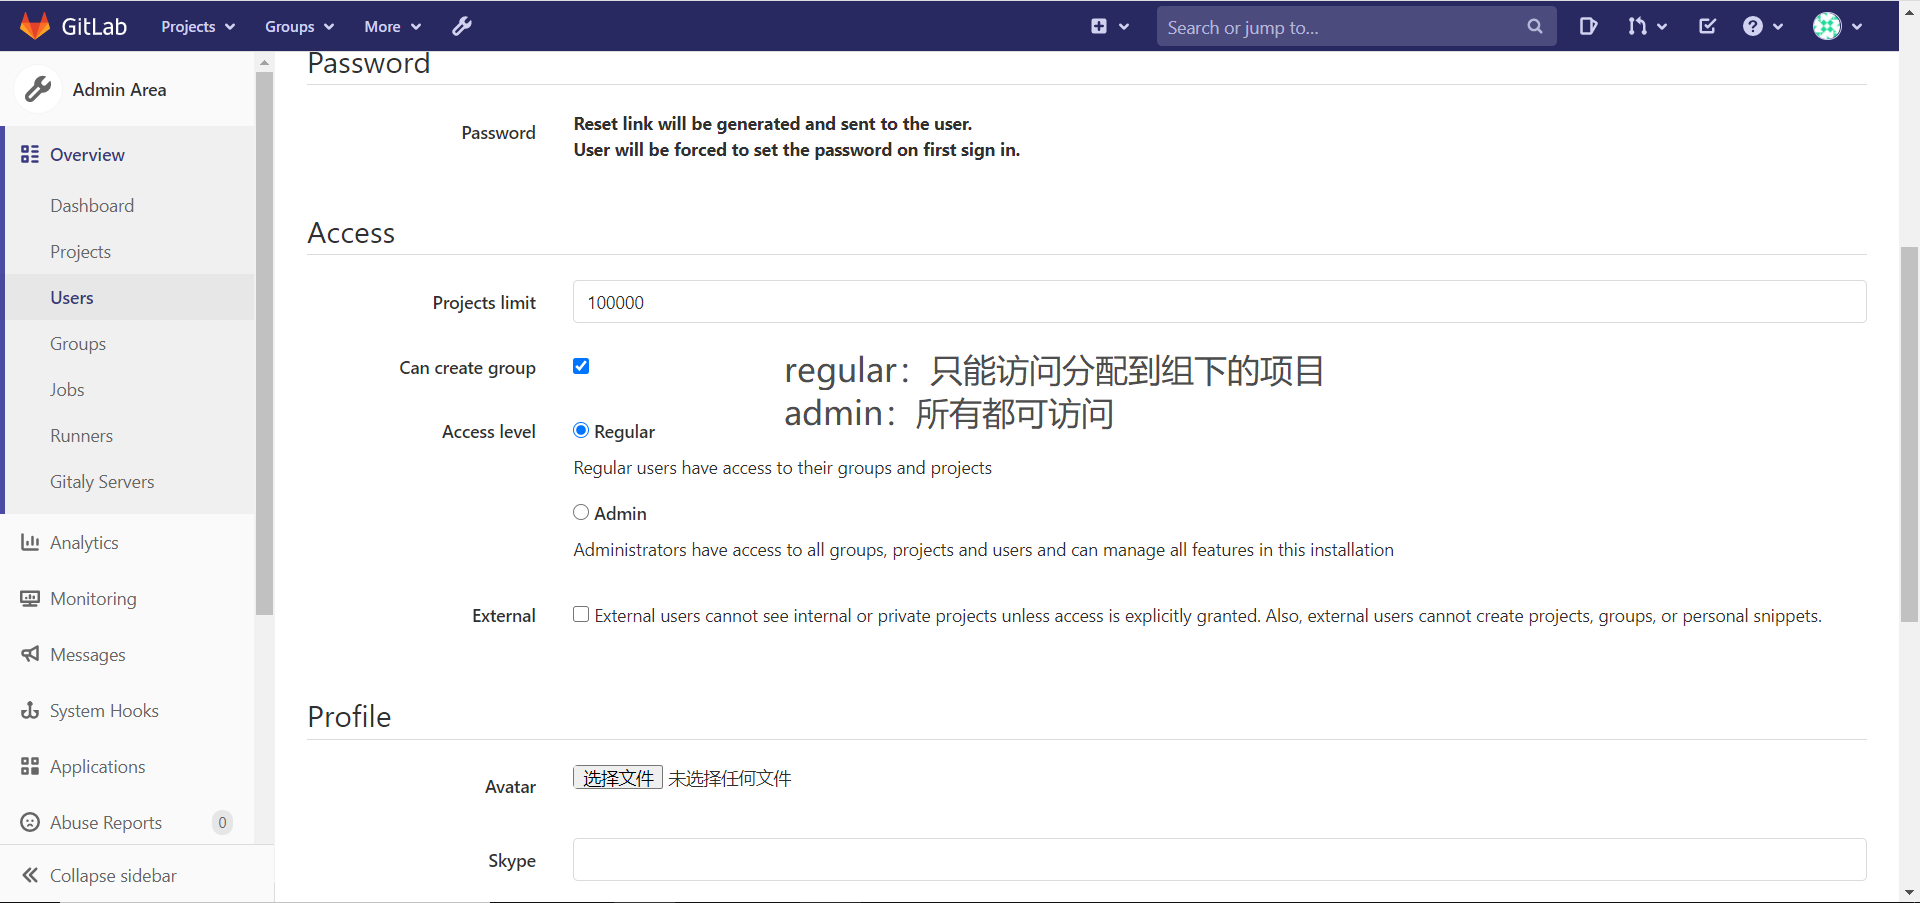
  1. 配置选项

gitlab创建用户二gitlab创建用户三

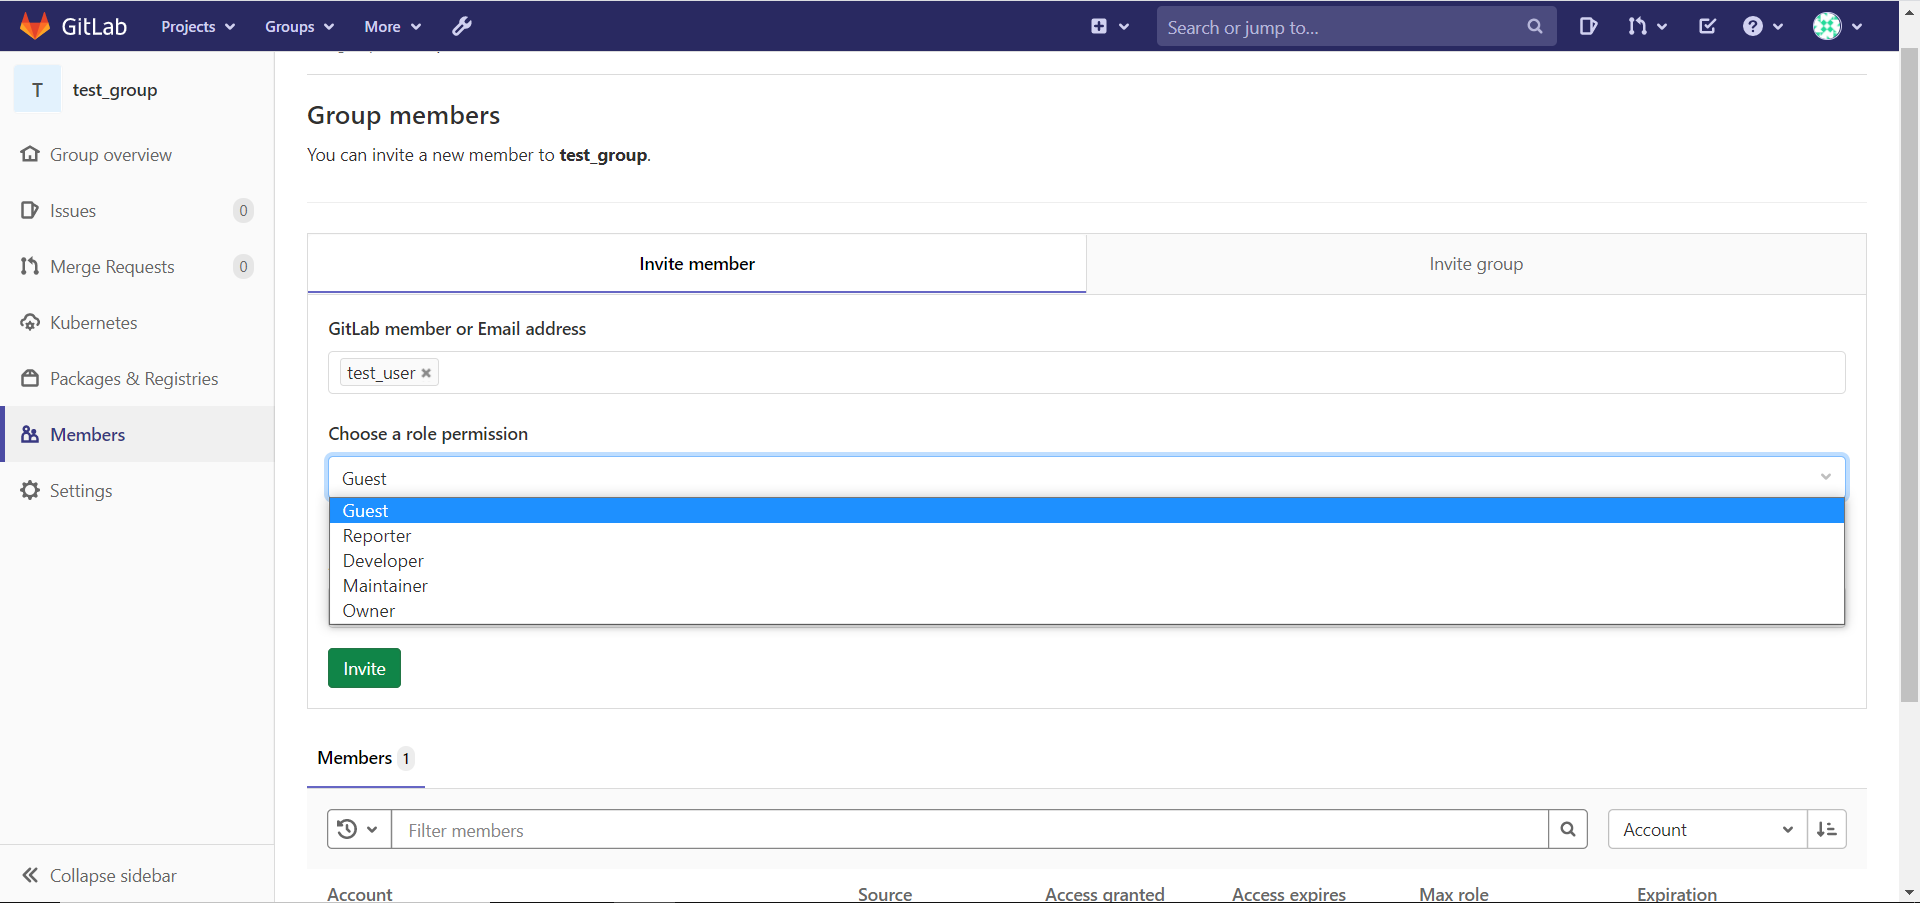
  1. 将用户添加到项目组

gitlab创建用户四

Gitlab创建项目:

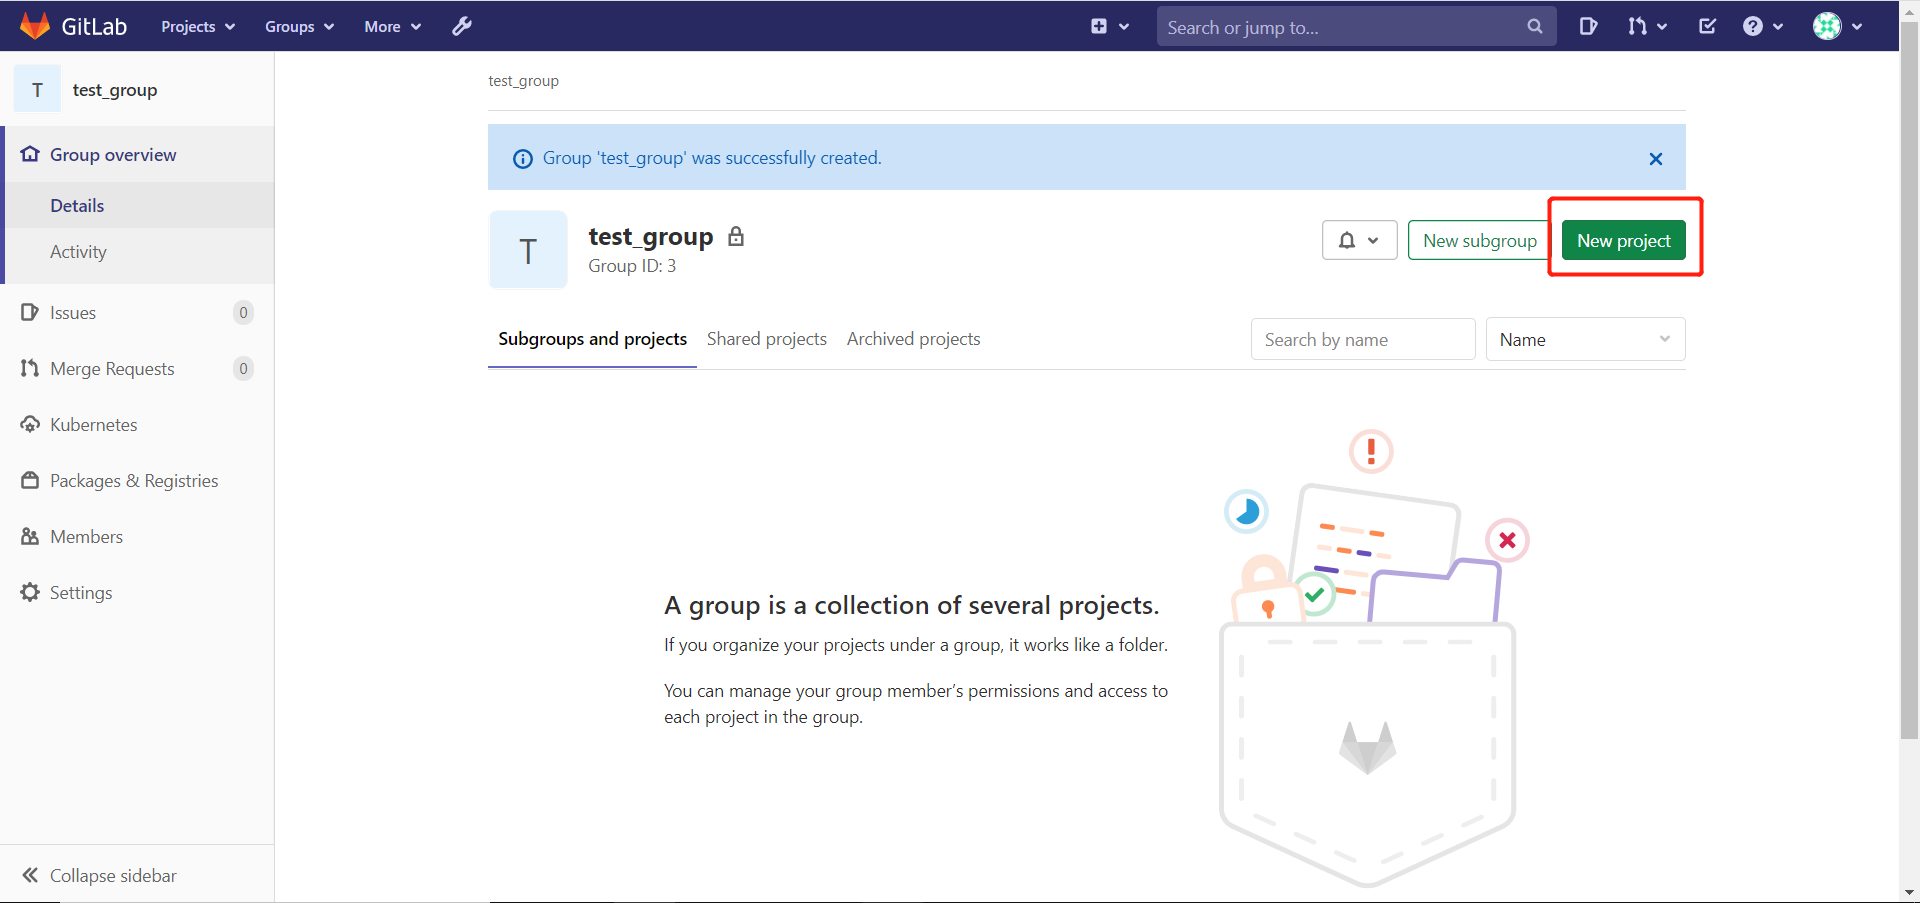
  1. 在指定组中添加项目

gitlab创建项目一

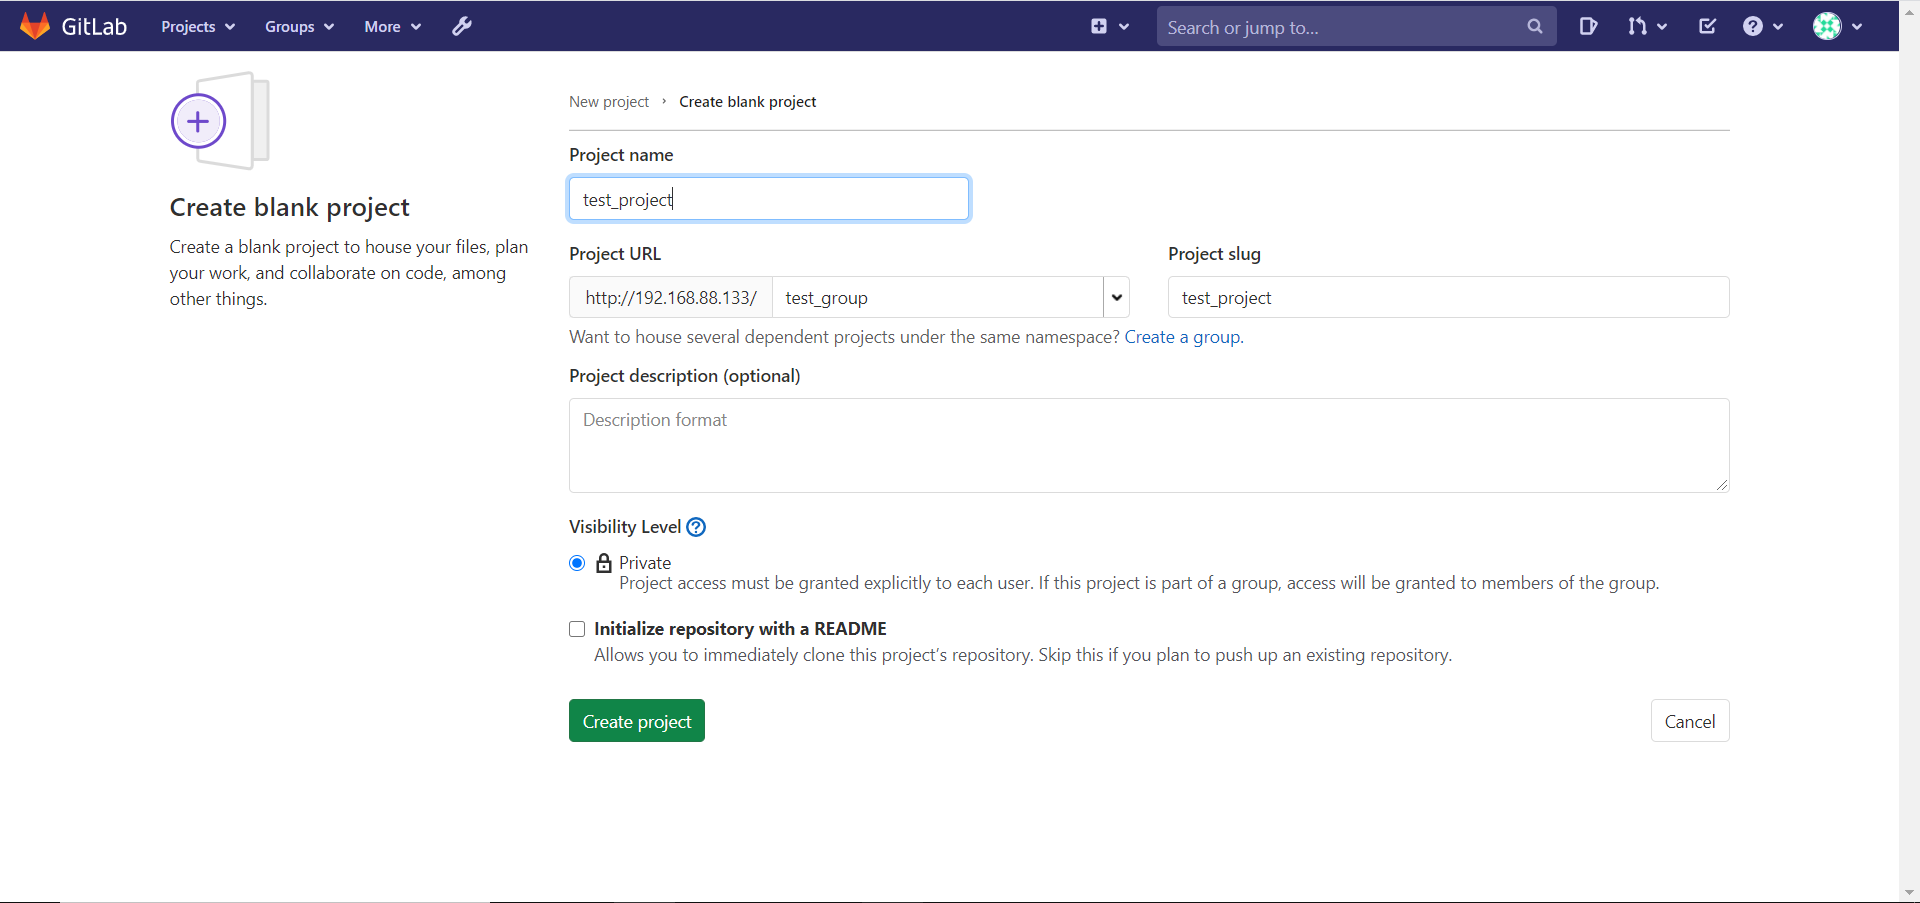
  1. 设置项目名称

gitlab创建项目二

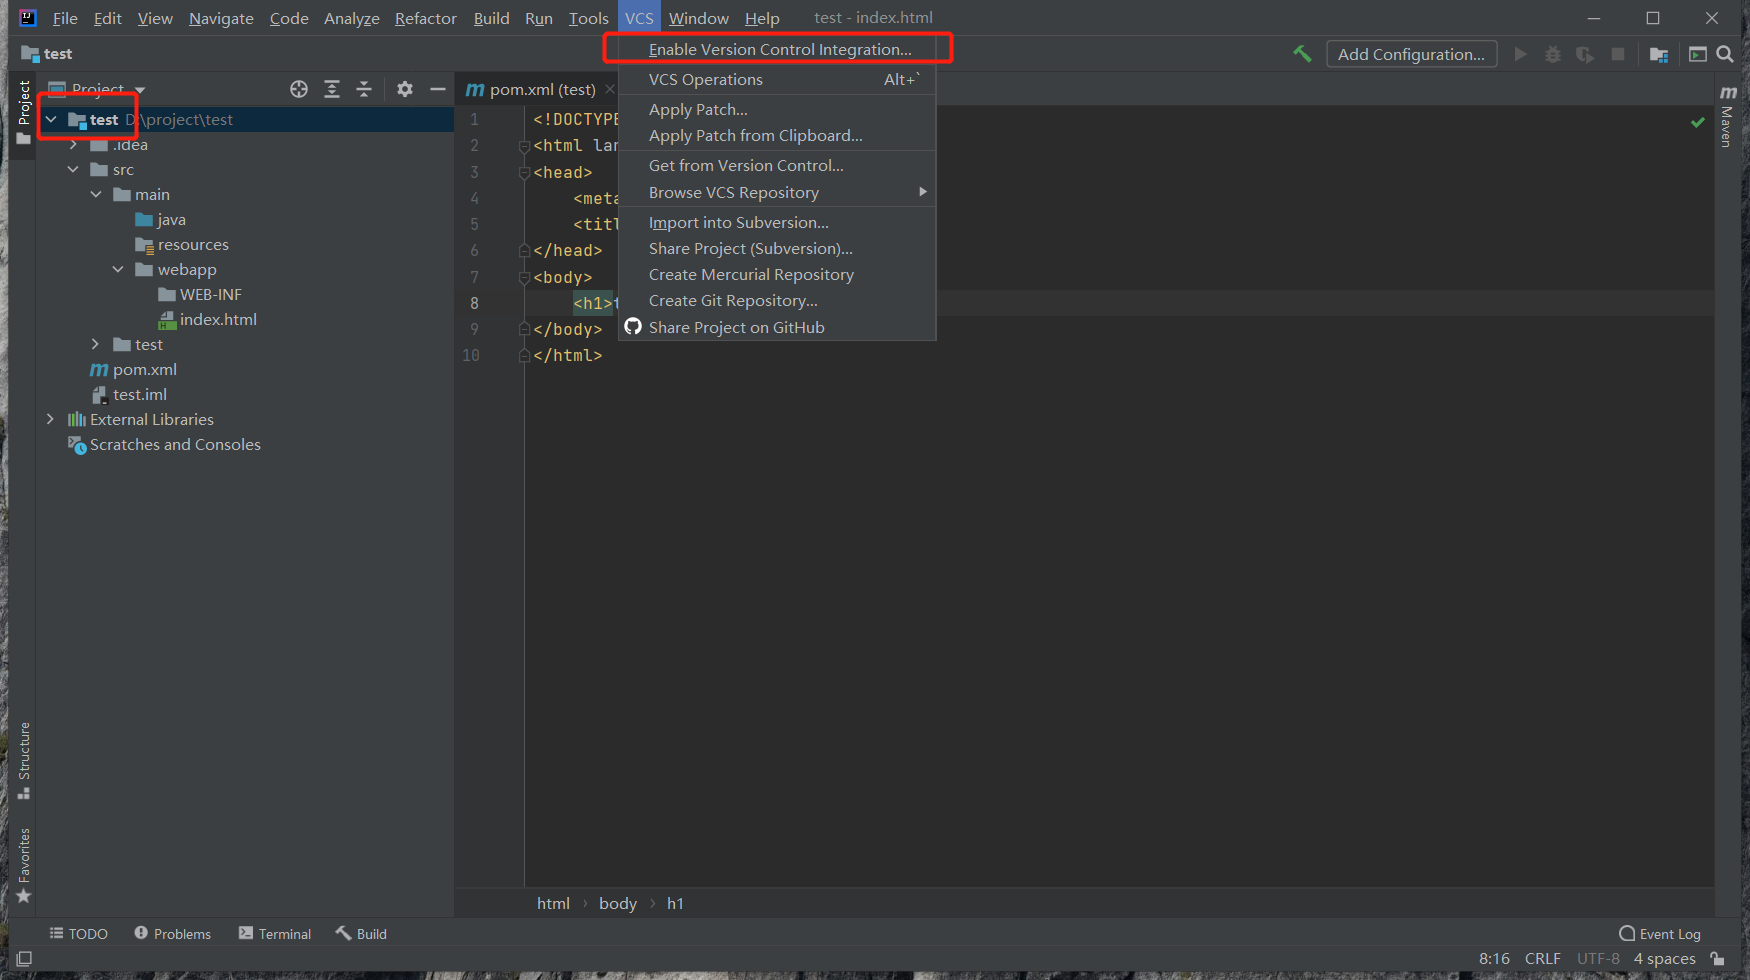
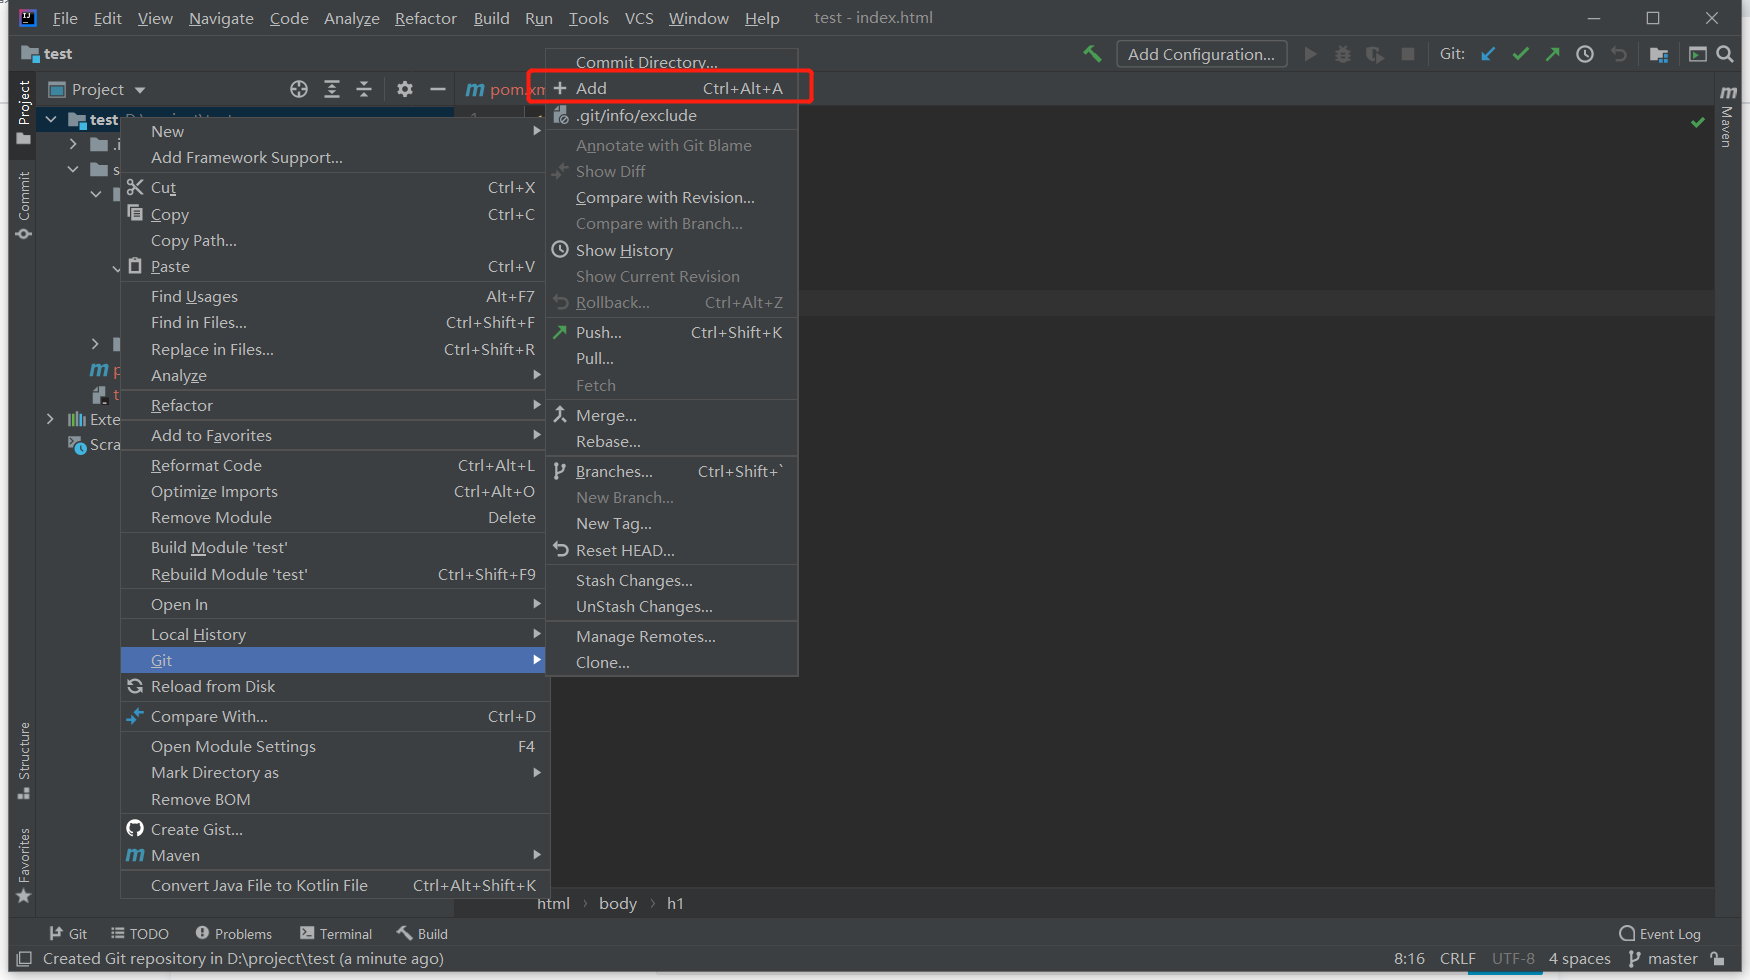
2.5 项目上传到Gitlab

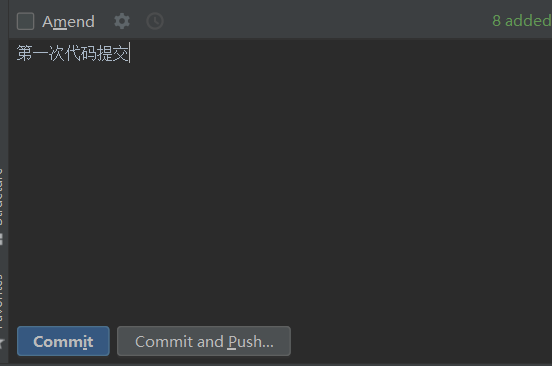
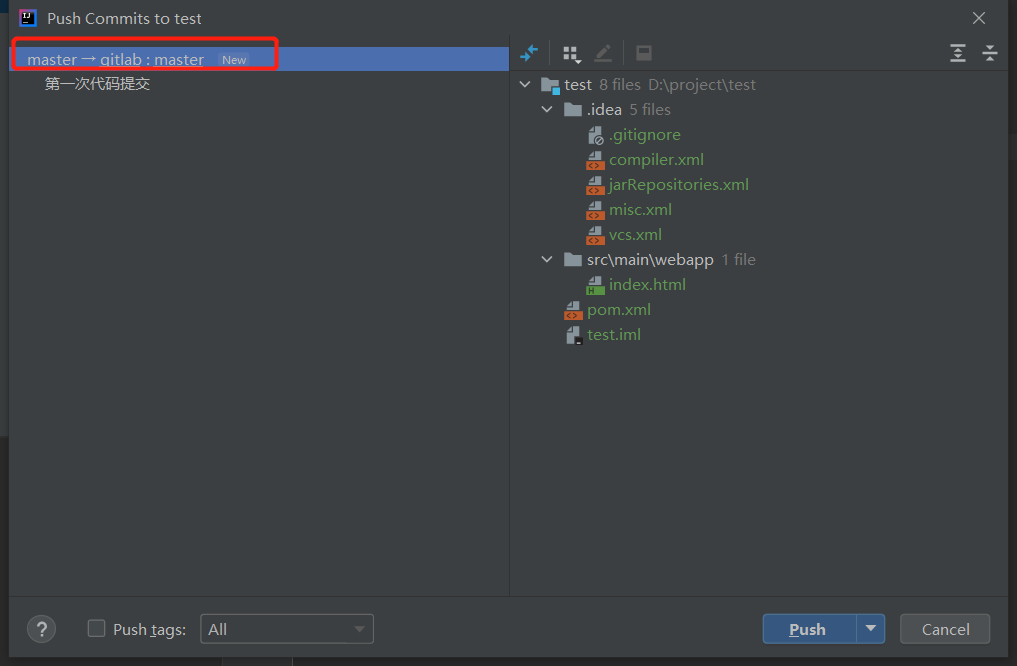
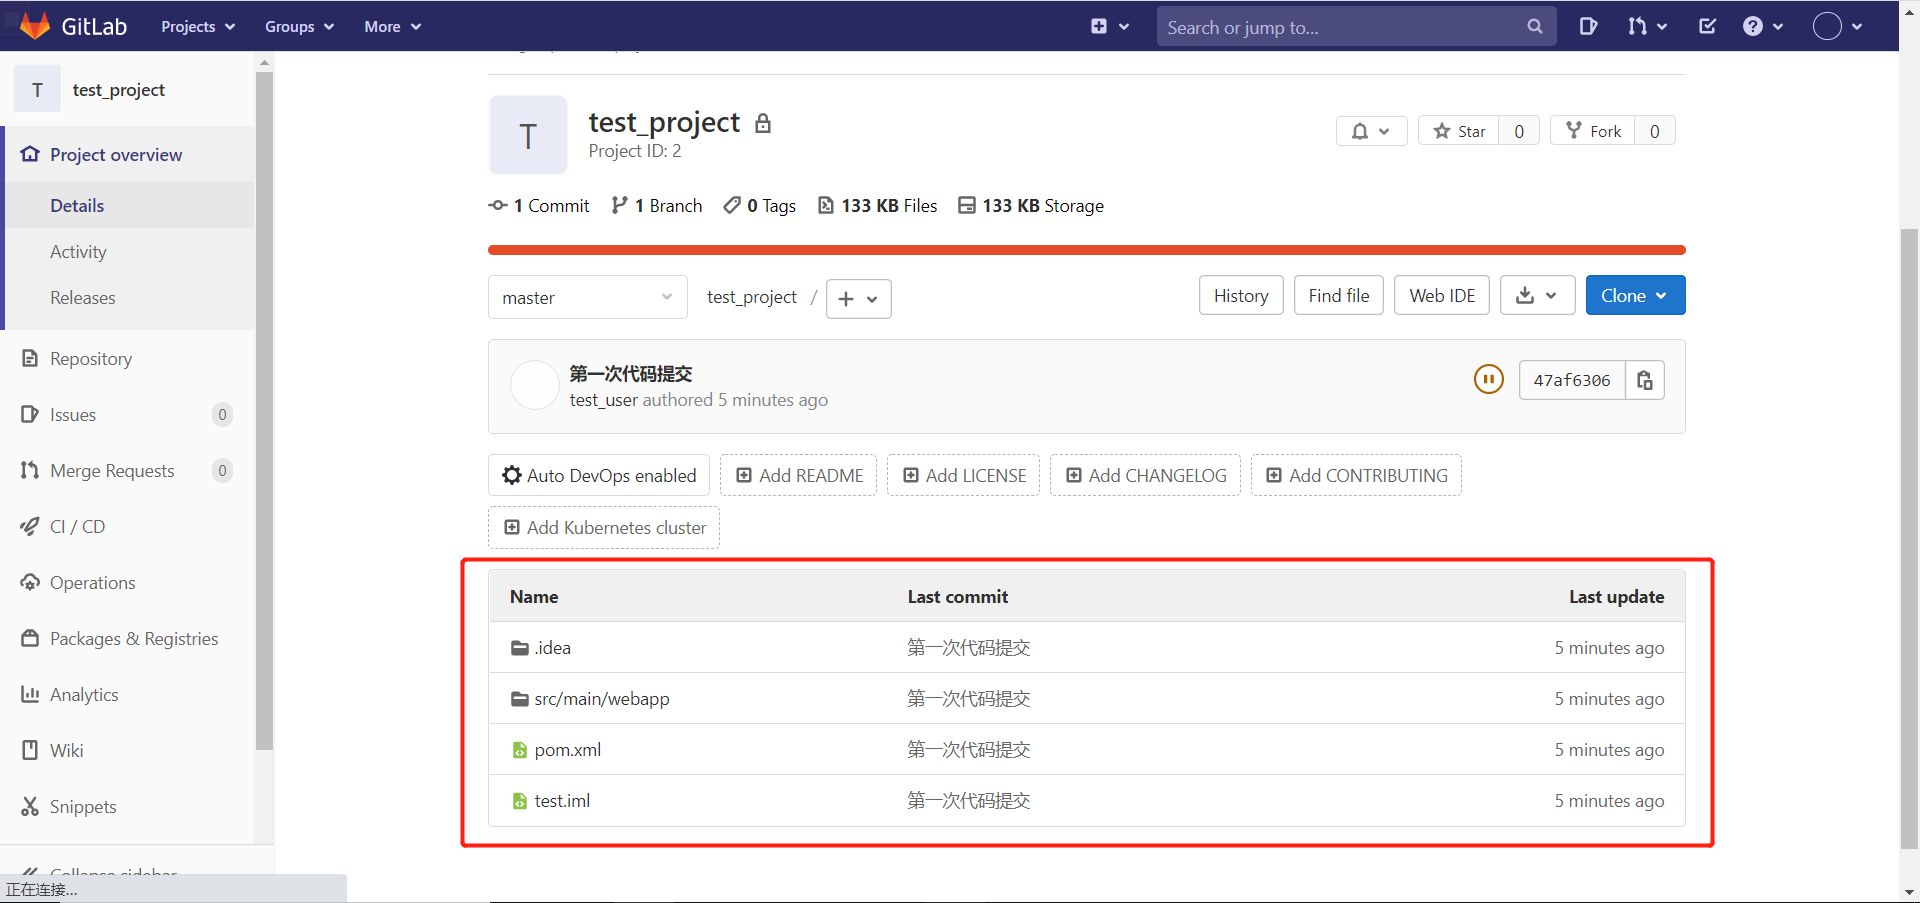
  1. 上传代码一
  2. 上传代码二
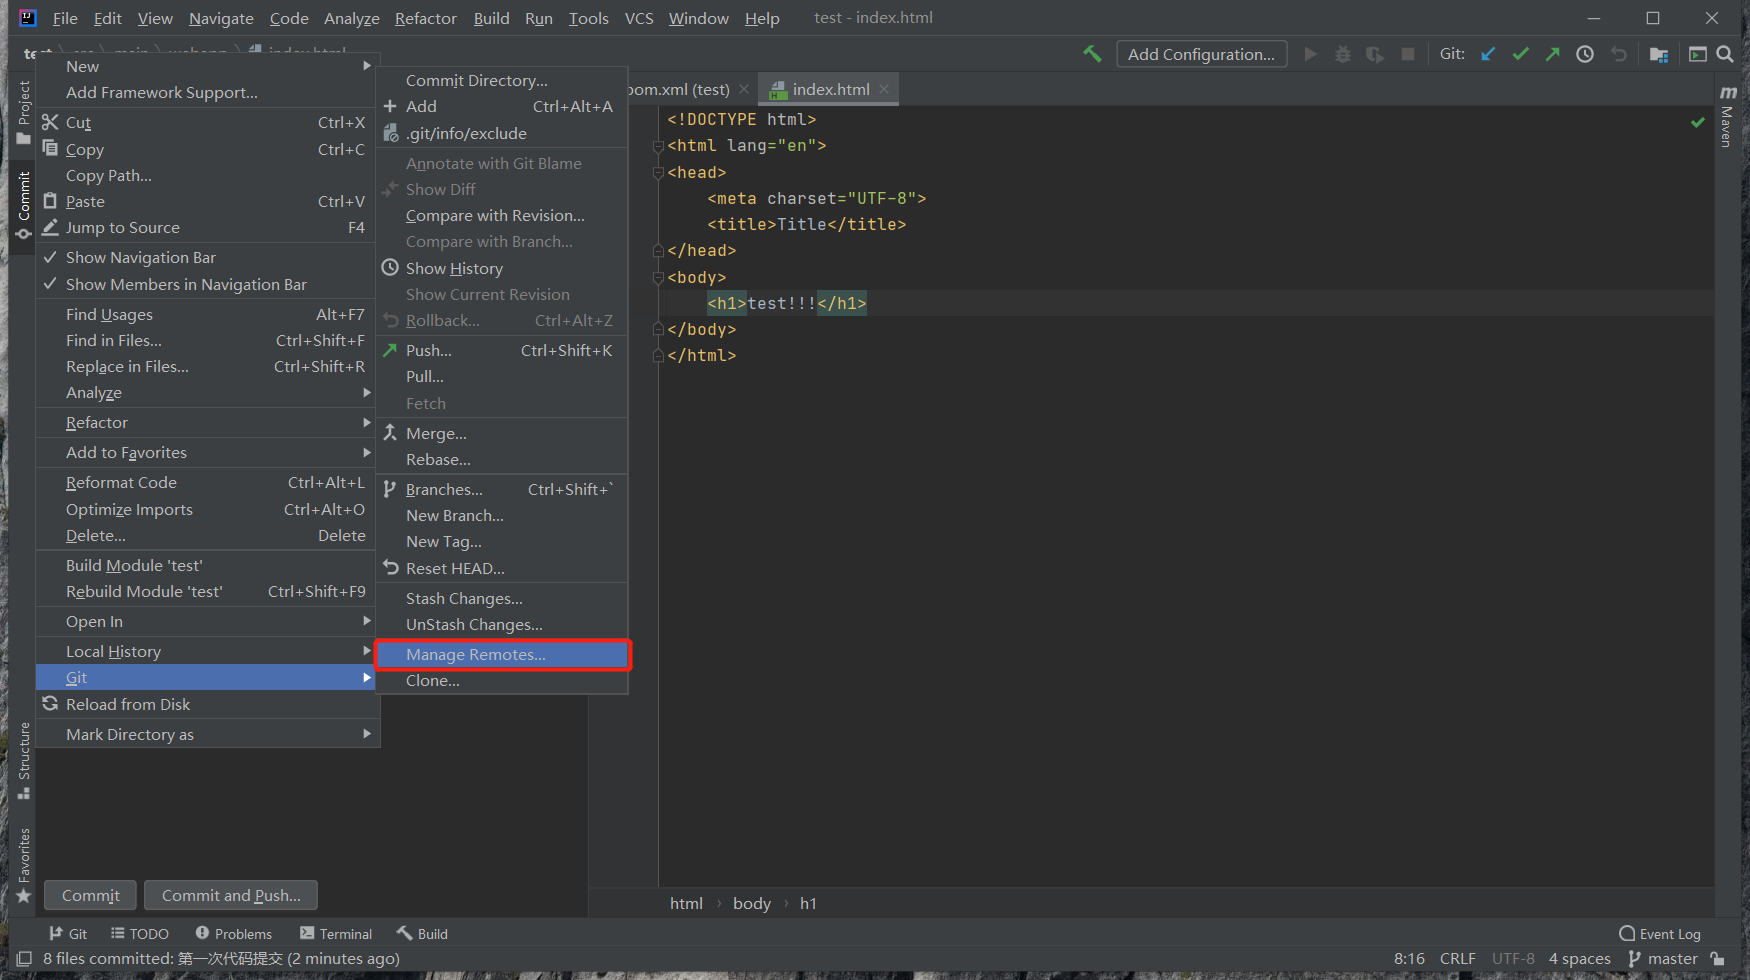
  3. 上传代码三
  4. 上传代码四
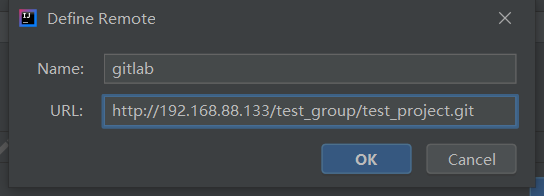
  5. 上传代码四
  6. 上传代码六
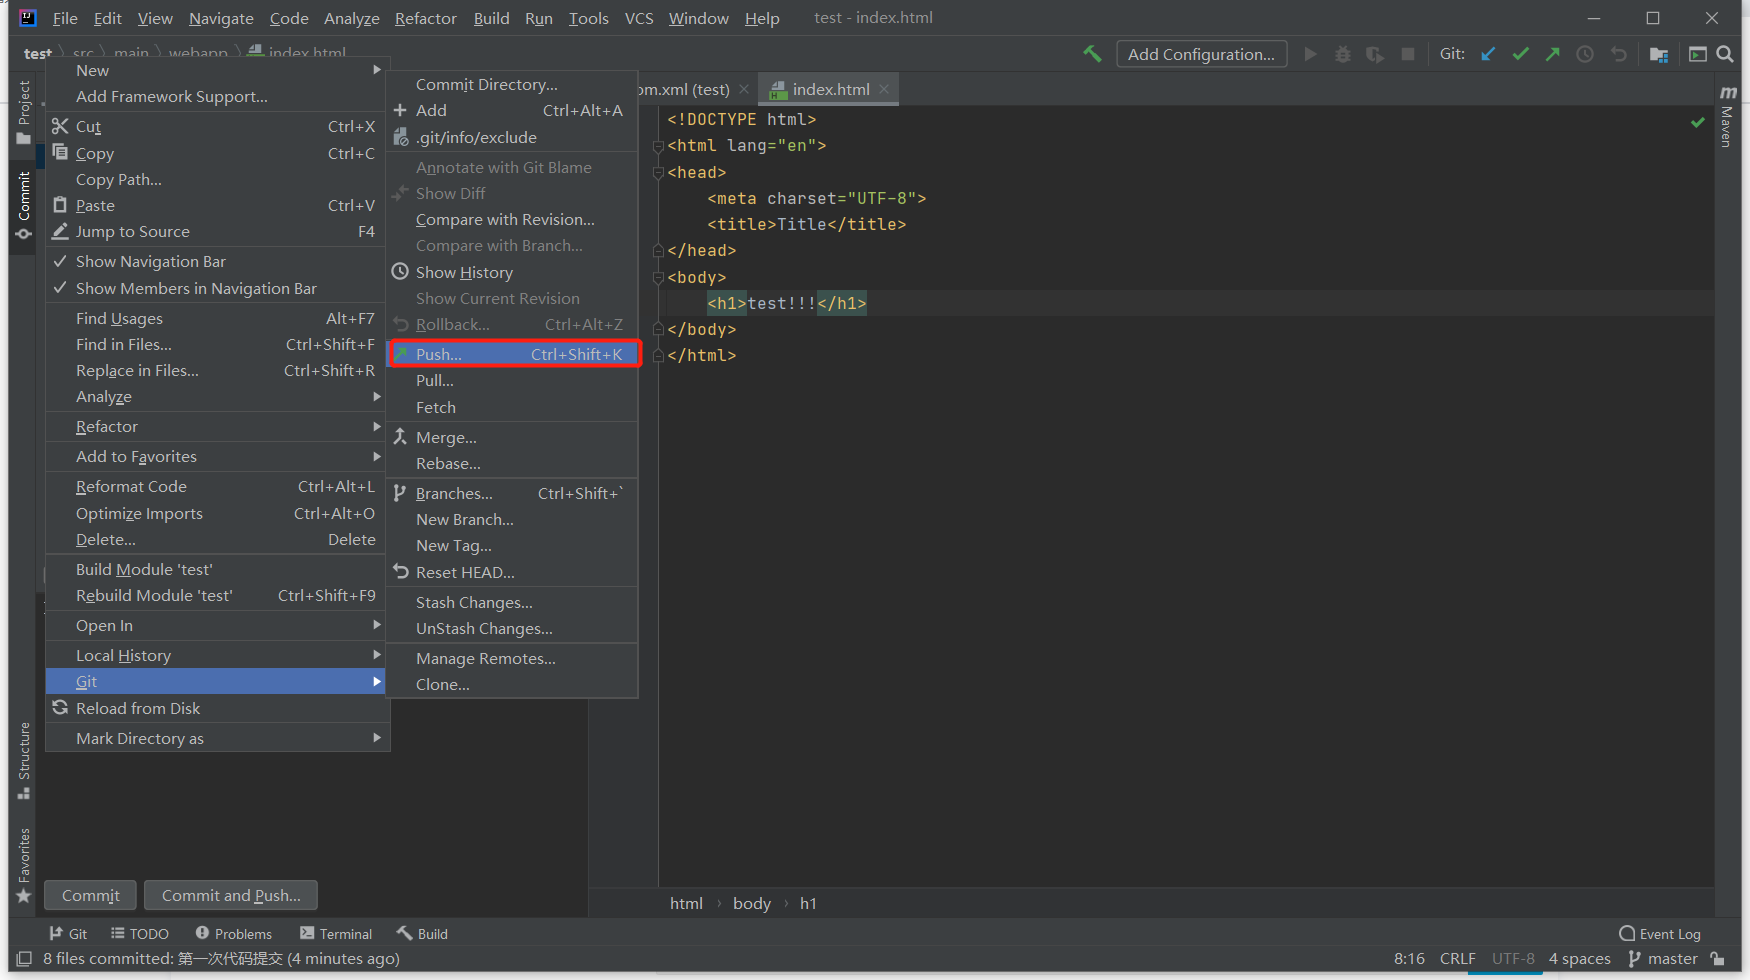
  7. 上传代码四
  8. 上传代码八
  9. 上传代码九
  10. 上传代码十

2.4 Jenkins安装

  1. 安装JDK
1
yum -y install java-1.8.0-openjdk*
  1. 放行端口
1
2
firewall-cmd --zone=public --add-port=8888/tcp --permanent
firewall-cmd --reload
  1. 添加Jenkins官方源并安装
1
2
3
wget -O /etc/yum.repos.d/jenkins.repo https://pkg.jenkins.io/redhat-stable/jenkins.repo
rpm --import https://pkg.jenkins.io/redhat-stable/jenkins.io.key
yum -y install jenkins
  1. 修改配置文件
1
2
3
vim /etc/sysconfig/jenkins
JENKINS_USER="root"
JENKINS_PORT="8888"
  1. 查看初始密码
1
2
cat /var/lib/jenkins/secrets/initialAdminPassword
......
  1. docker-compose.yaml
1
2
3
4
5
6
7
8
9
10
11
version: '3.8'
services:
jenkins:
container_name: jenkins
image: jenkins:2.60.3
restart: always
ports:
- '8080:8080'
- '50000:50000'
volumes:
- '/root/cicd/jenkins/home:/var/jenkins_home'

2.5 Jenkins中文插件安装

  1. 由于Jenkins官方下载插件很慢,我们修改为国内Jenkins插件地址,jenkins -> Manage jenkins -> Manage Plugins

更换清华插件地址

  1. 更换配置文件中的地址
1
2
3
4
5
cp /var/lib/jenkins/updates/default.json /var/lib/jenkins/updates/default.json.backup

sed -i 's/https:\/\/updates.jenkins.io\/download/https:\/\/mirrors.tuna.tsinghua.edu.cn\/jenkins/g' /var/lib/jenkins/updates/default.json && sed -i 's/http:\/\/www.google.com/https:\/\/www.baidu.com/g' /var/lib/jenkins/updates/default.json

systemctl restart jenkins
  1. 安装中文插件

安装中文插件

2.6 Jenkins用户权限管理

  1. 由于Jenkins功能较为简介,都要靠安装插件来丰富体验,所以用户管理需要安装role-based插件

role-based插件

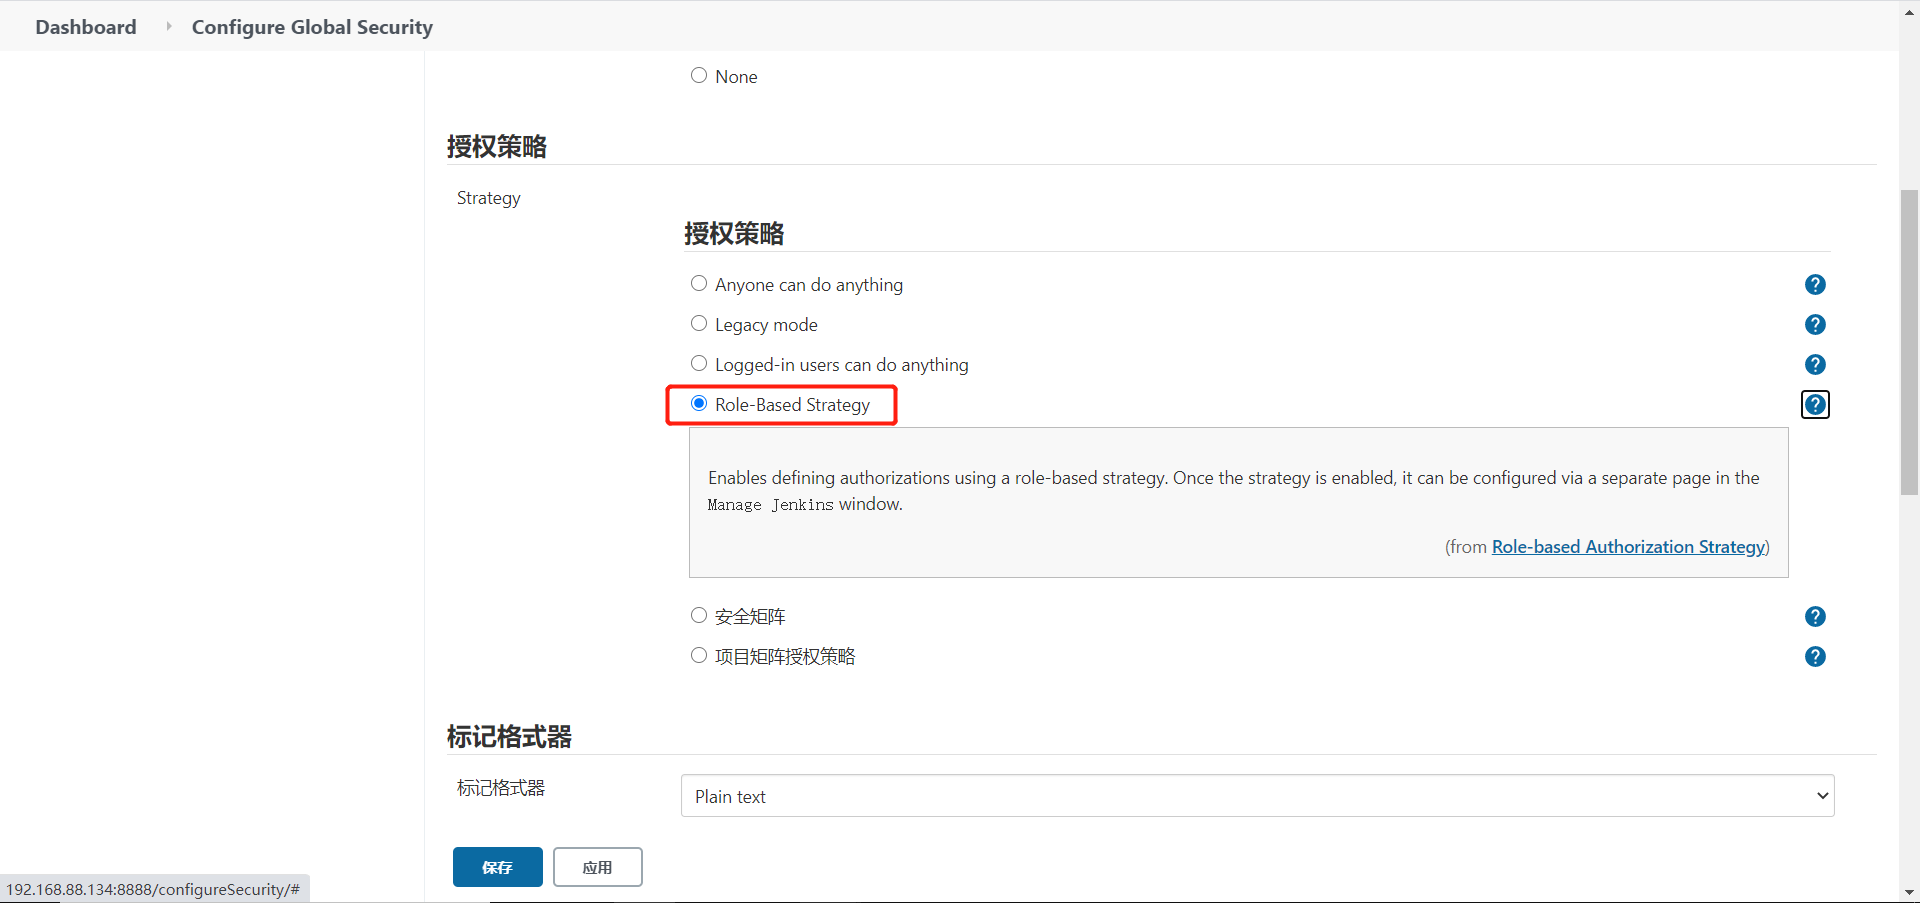
  1. 在Configure Global Security开启刚刚安装的插件

role-based插件二

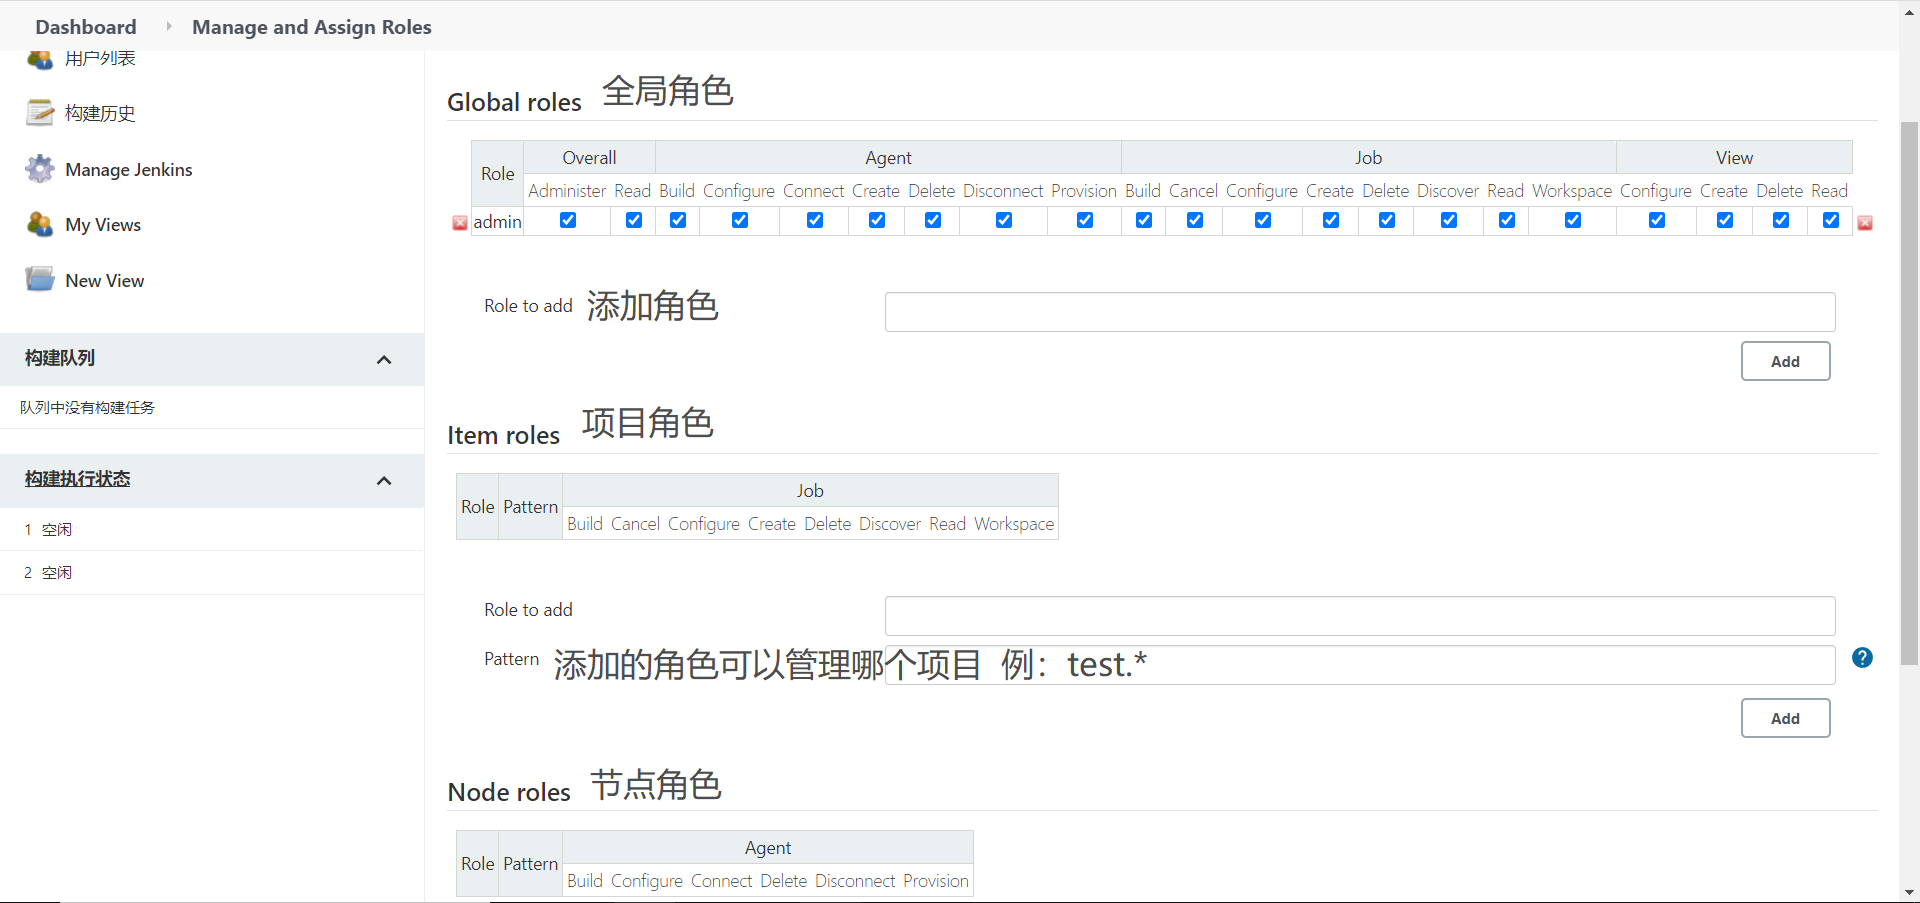
  1. 在Manage and Assign Roles中创建角色baserole并分配具体权限

role-based插件三

role-based插件三

role-based插件五

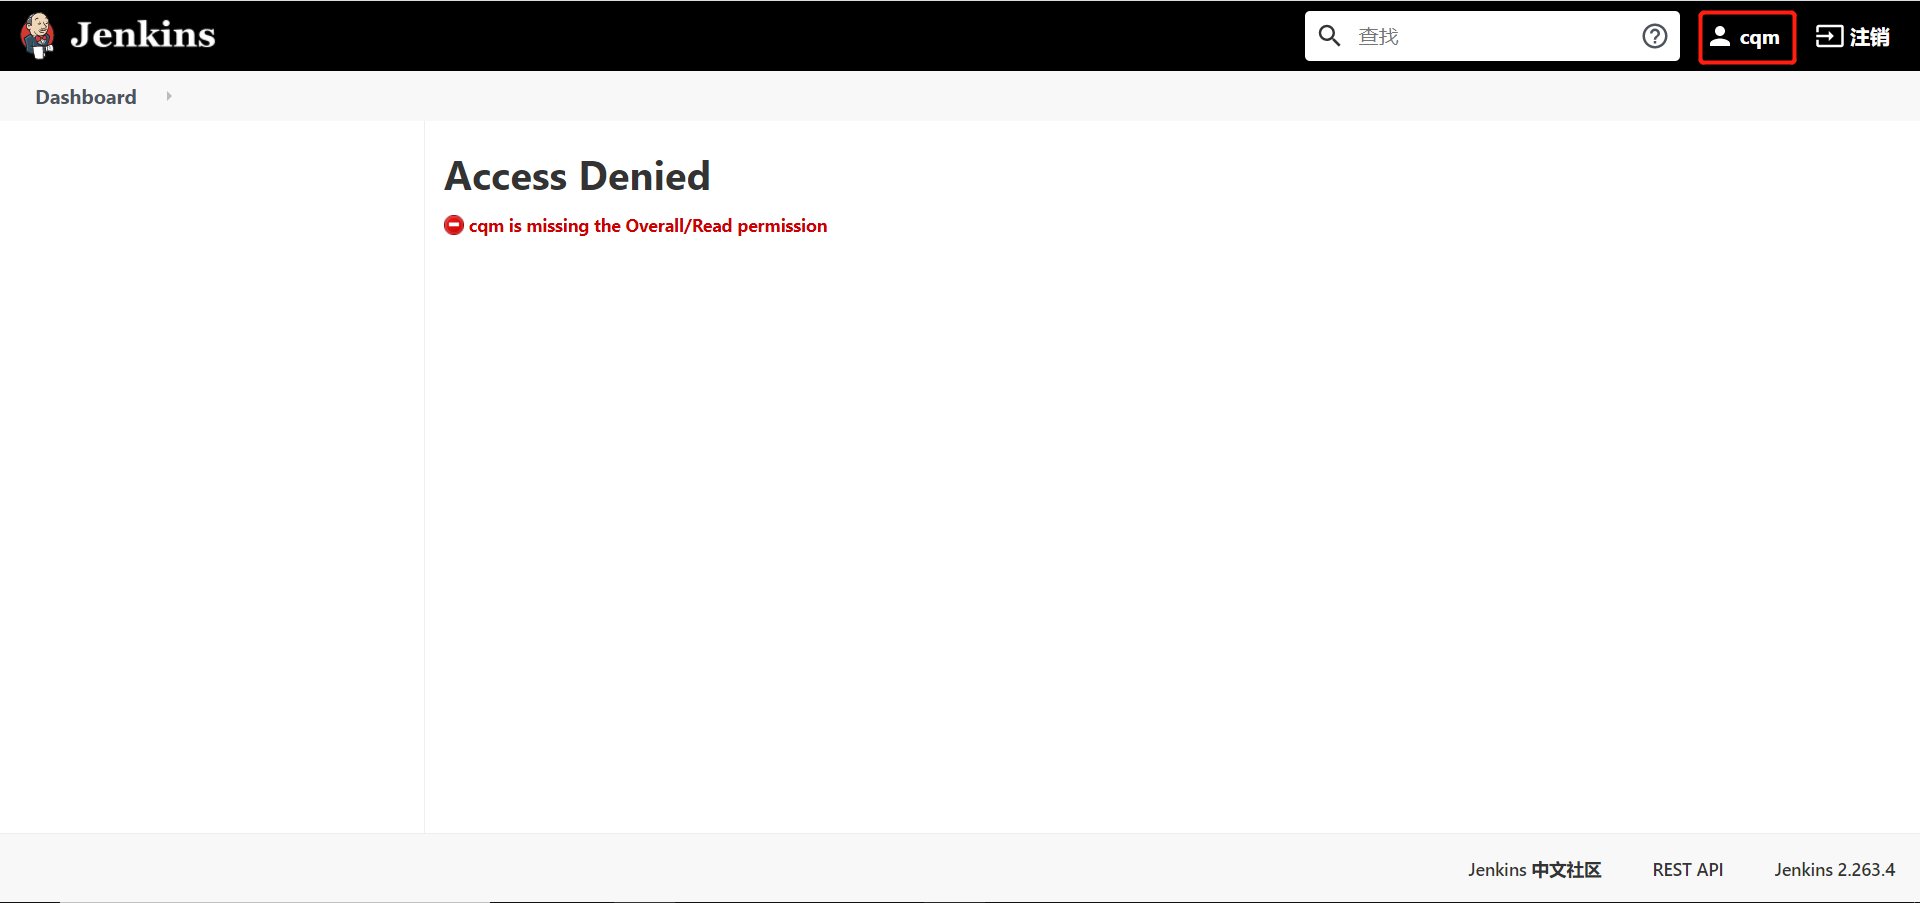
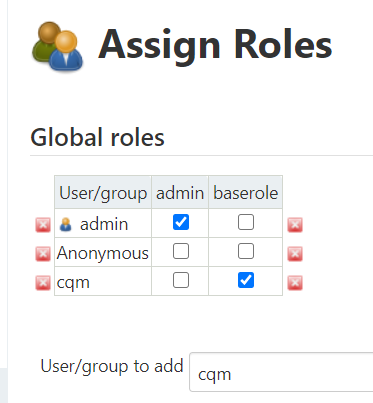
  1. 用户没加入角色前是没有访问权限的,将用户加入到角色baserole即可,但只有部分权限

role-based插件五

role-based插件五

2.7 Jenkins安装凭证管理插件

  1. 安装Credential Binding插件,安装完就可以看到多了凭据的功能

Credential-Binding插件一

Credential-Binding插件二

2.8 Jenkins普通用户密码认证

  1. 为了Jenkins能够拉取gitlab的代码,需要安装git插件

安装git插件

1
yum -y install git
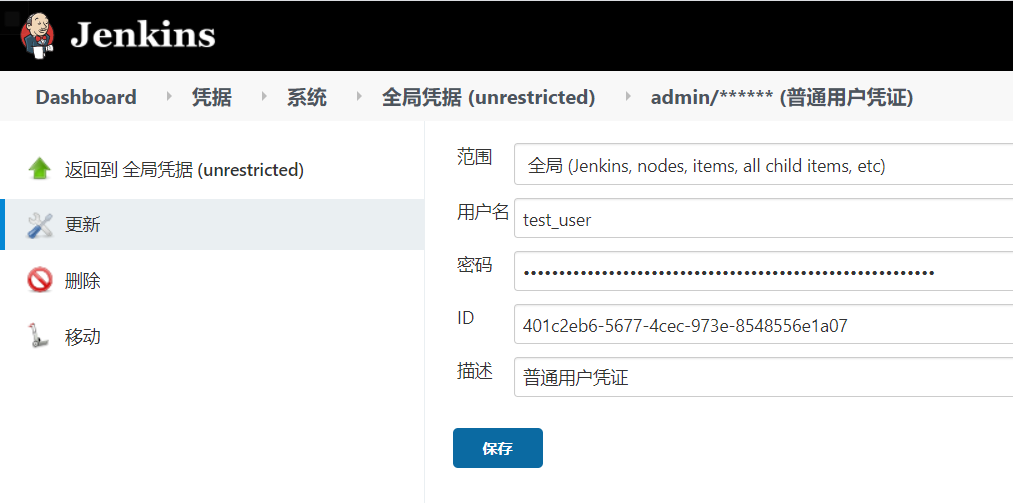
  1. 创建普通用户凭证,注意这里的用户是gitlab创建好的用户

创建普通用户凭证

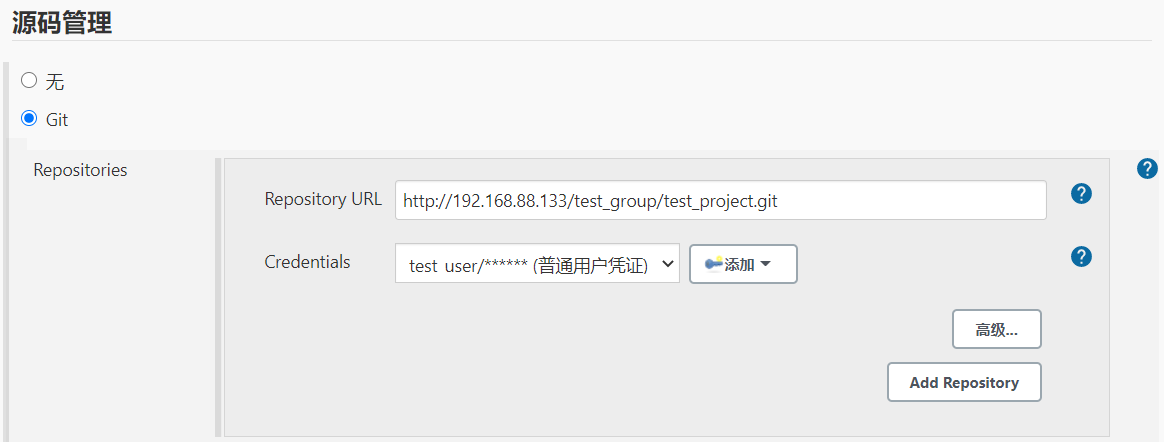
  1. 创建项目添加普通用户凭证

创建项目添加普通用户凭证

  1. build now构建

普通用户凭证build构建项目一

  1. Jenkins主机上查看是否构建成功

普通用户凭证build构建项目二

2.9 Jenkins使用ssh免密认证

  1. 在Jenkins主机上生产公钥私钥
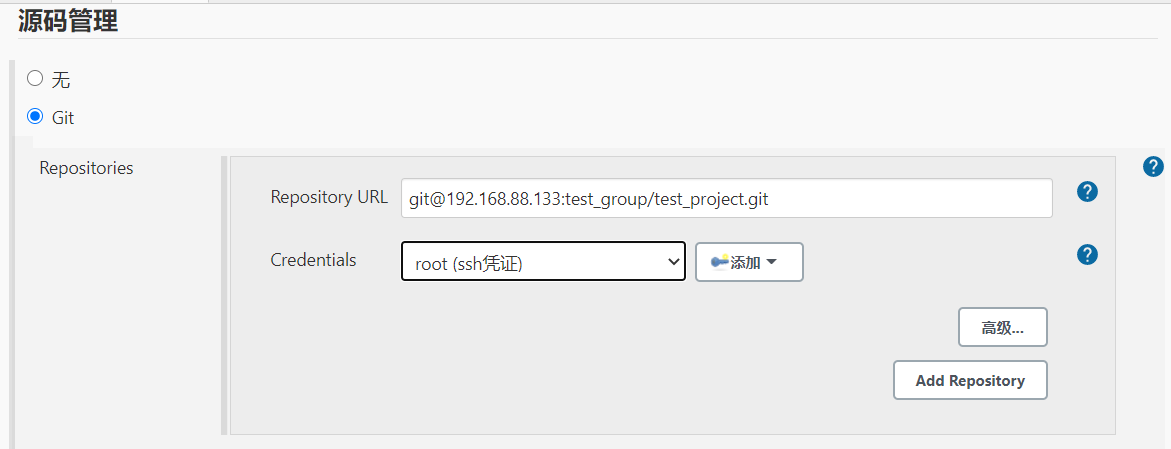
1
ssh-keygen -t rsa
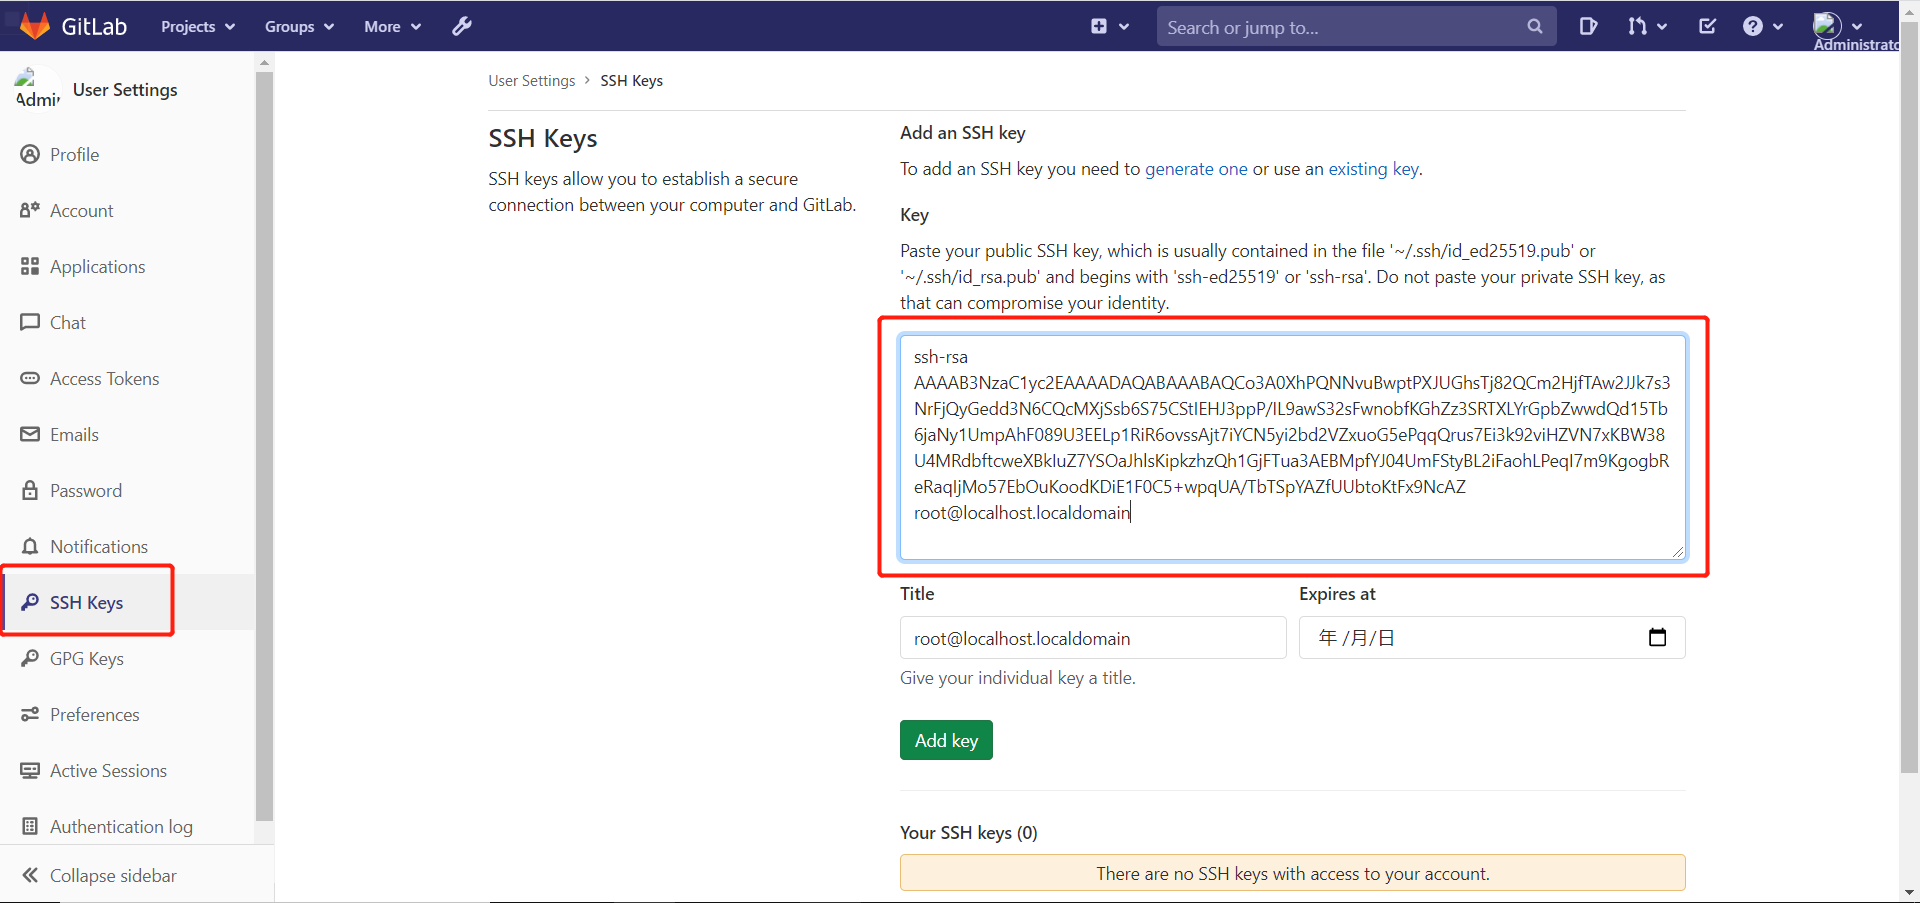
  1. 在gitlab上添加公钥

在gitlab上添加公钥

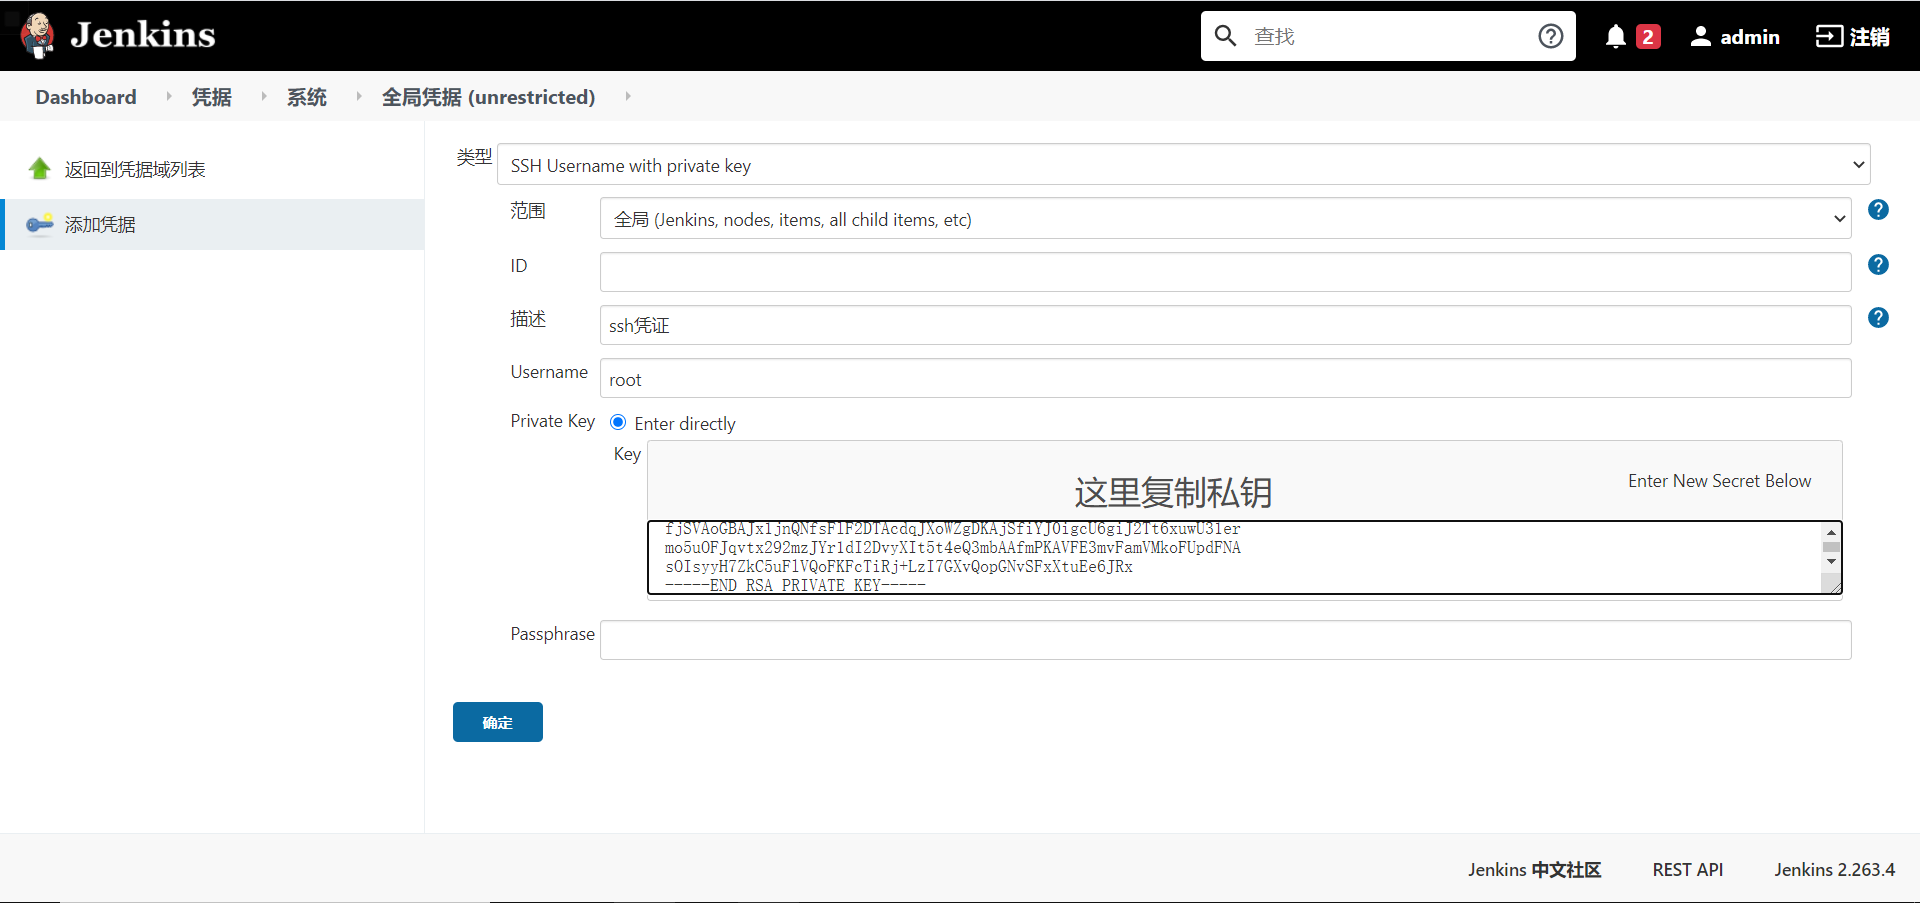
  1. 在Jenkins上添加ssh凭证

在Jenkins上添加ssh凭证

  1. 创建项目添加ssh凭证

创建项目添加ssh凭证

  1. build now构建项目后

ssh凭证build构建项目

2.10 Jenkins安装Maven

  1. 下载maven
1
2
3
4
wget https://mirrors.bfsu.edu.cn/apache/maven/maven-3/3.6.3/binaries/apache-maven-3.6.3-bin.tar.gz
mkdir maven
tar -xf apache-maven-3.6.3-bin.tar.gz
cp apache-maven-3.6.3-bin.tar.gz/* maven/
  1. 配置环境变量
1
2
3
4
5
6
vim /etc/profile
export JAVA_HOME=/usr/lib/jvm/java-1.8.0-openjdk
export MAVEN_HOME=/root/maven
export PATH=$PATH:$JAVA_HOME/bin:/$MAVEN_HOME/bin
source /etc/profile
mvn -v
  1. 全局工具配置里新增jdk和maven

新增jdk

新增maven

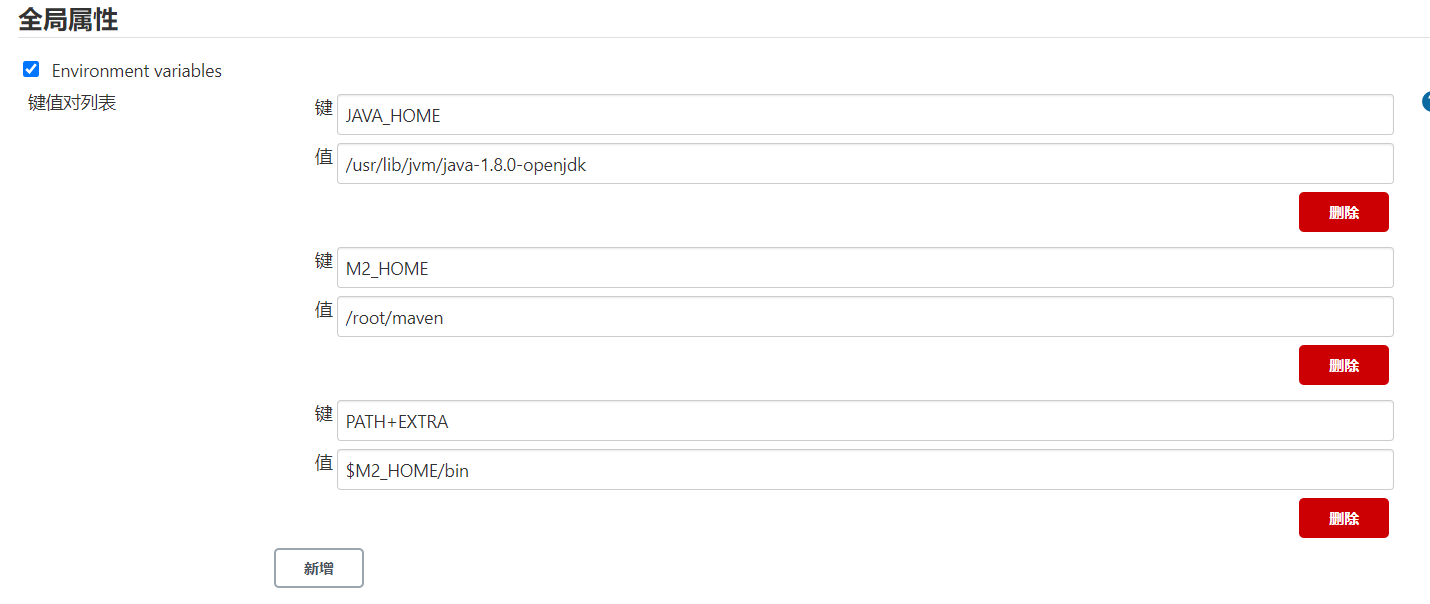
  1. 在系统配置里添加三个变量

新增变量

  1. 修改maven配置文件
1
2
3
4
5
6
7
8
9
mkdir /root/repo
vim /root/maven/conf/settings.xml
<localRepository>/root/repo</localRepository>
<mirror>
<id>aliyunmaven</id>
<mirrorOf>*</mirrorOf>
<name>阿里云公共仓库</name>
<url>https://maven.aliyun.com/repository/public</url>
</mirror>
  1. 测试maven构建项目

测试maven一

测试maven二

2.11 Tomcat安装和配置

  1. 安装jdk和tomcat
1
2
3
4
5
6
yum -y install java-1.8.0-openjdk*
wget https://downloads.apache.org/tomcat/tomcat-9/v9.0.43/bin/apache-tomcat-9.0.43.tar.gz
tar -xf apache-tomcat-9.0.43.tar.gz
mkdir /root/tomcat
mv apache-tomcat-9.0.43.tar.gz/* /root/tomcat
./root/tomcat/bin/startup.sh
  1. 添加tomcat管理用户
1
2
3
4
5
6
7
8
9
vim /root/tomcat/conf/tomcat-users.xml
<role rolename="tomcat"/>
<role rolename="role1"/>
<role rolename="manager-gui"/>
<role rolename="manager-script"/>
<role rolename="admin-gui"/>
<role rolename="admin-script"/>
<role rolename="manager-status"/>
<user username="tomcat" password="toortoor" roles="manager-gui,manager-script,tomcat,admin-gui,admin-script"/>
1
2
3
4
5
vim /root/tomcat/webapps/manager/META-INF/context.xml
<!--
<Valve className="org.apache.catalina.valves.RemoteAddrValve"
allow="127\.\d+\.\d+\.\d+|::1|0:0:0:0:0:0:0:1" />
-->
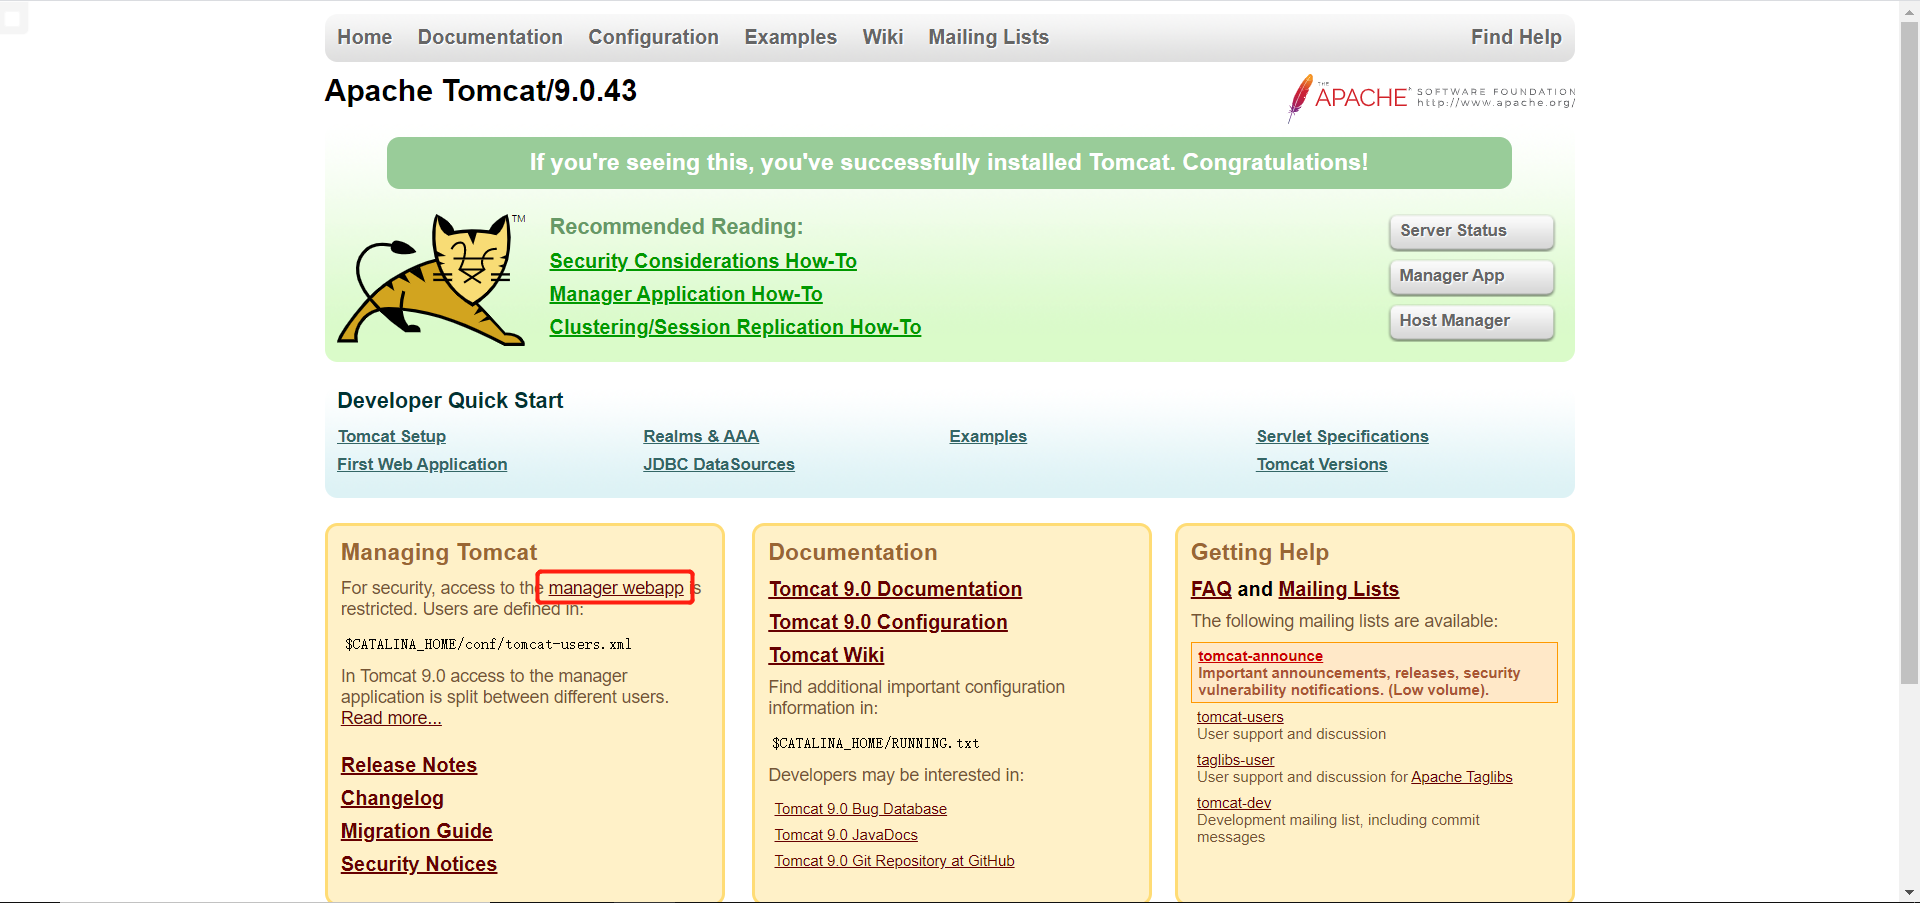
  1. 测试

tomcat安装一

tomcat安装二

三、Jenkins构建项目

Jenkins构建的项目类型主要为以下三种:

  1. 自由风格软件项目(freestyle project)
  2. Maven项目(maven project)
  3. 流水线项目(pipeline project)

3.1 自由风格软件项目构建

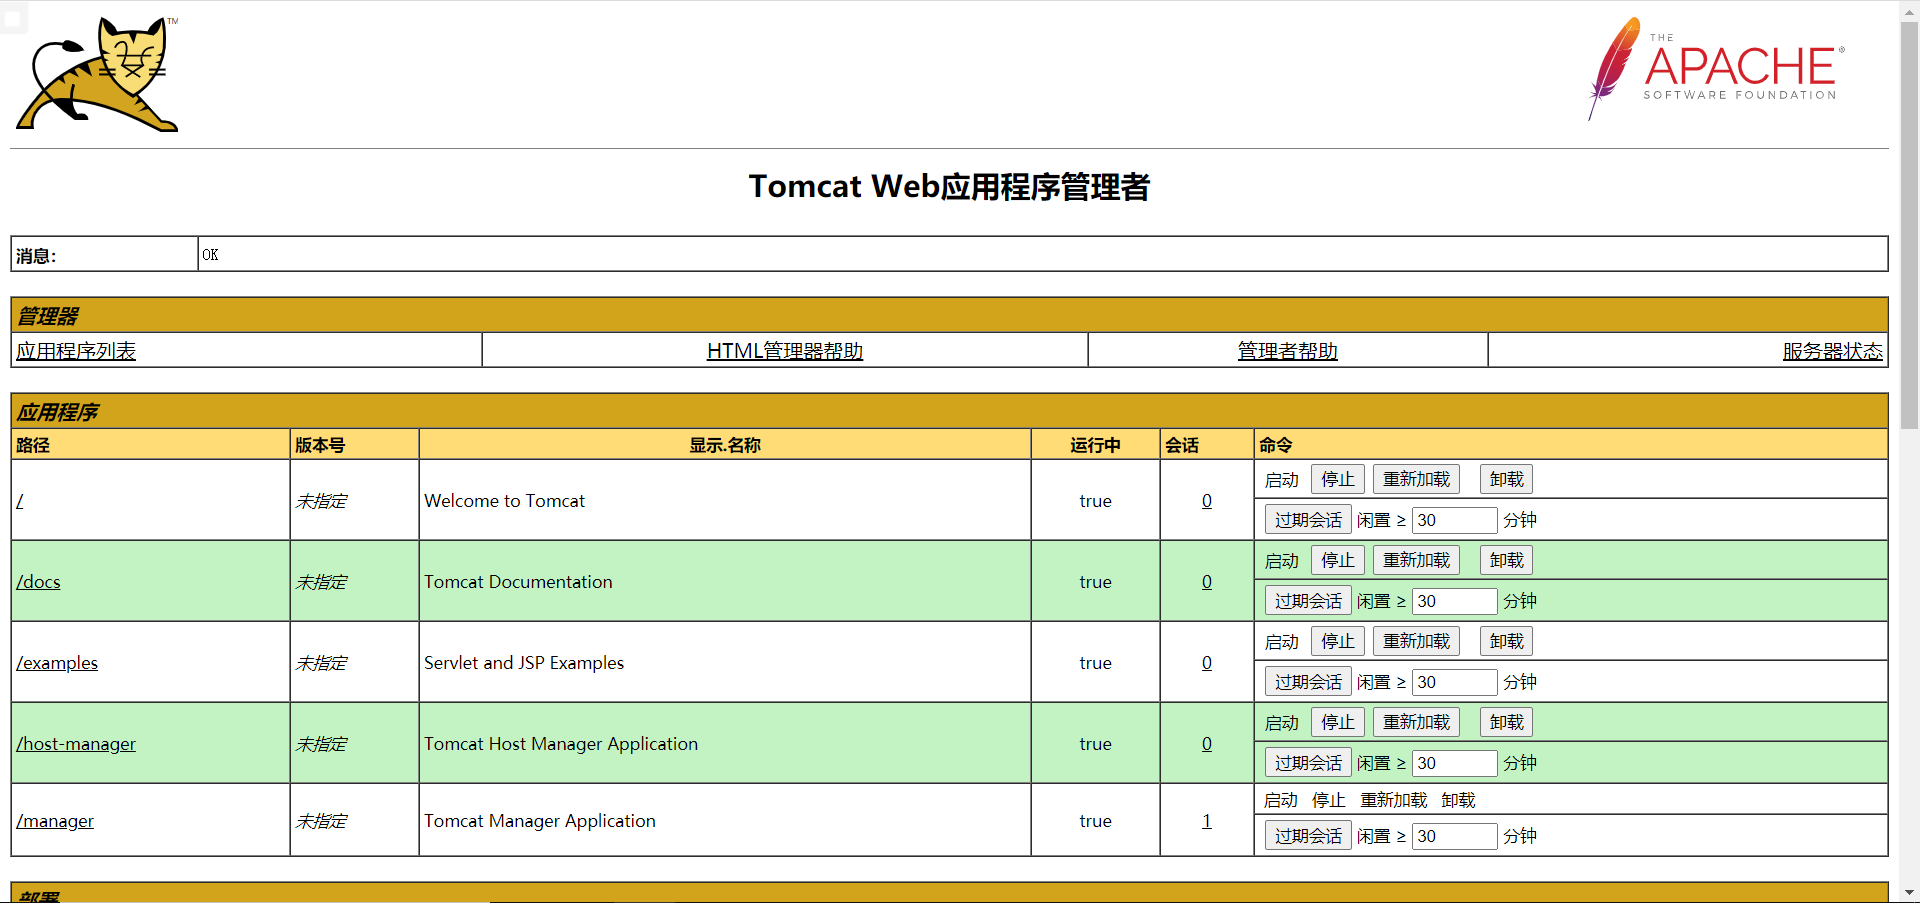
  1. 要将项目部署到tomcat服务器上,需要安装deploy to container插件

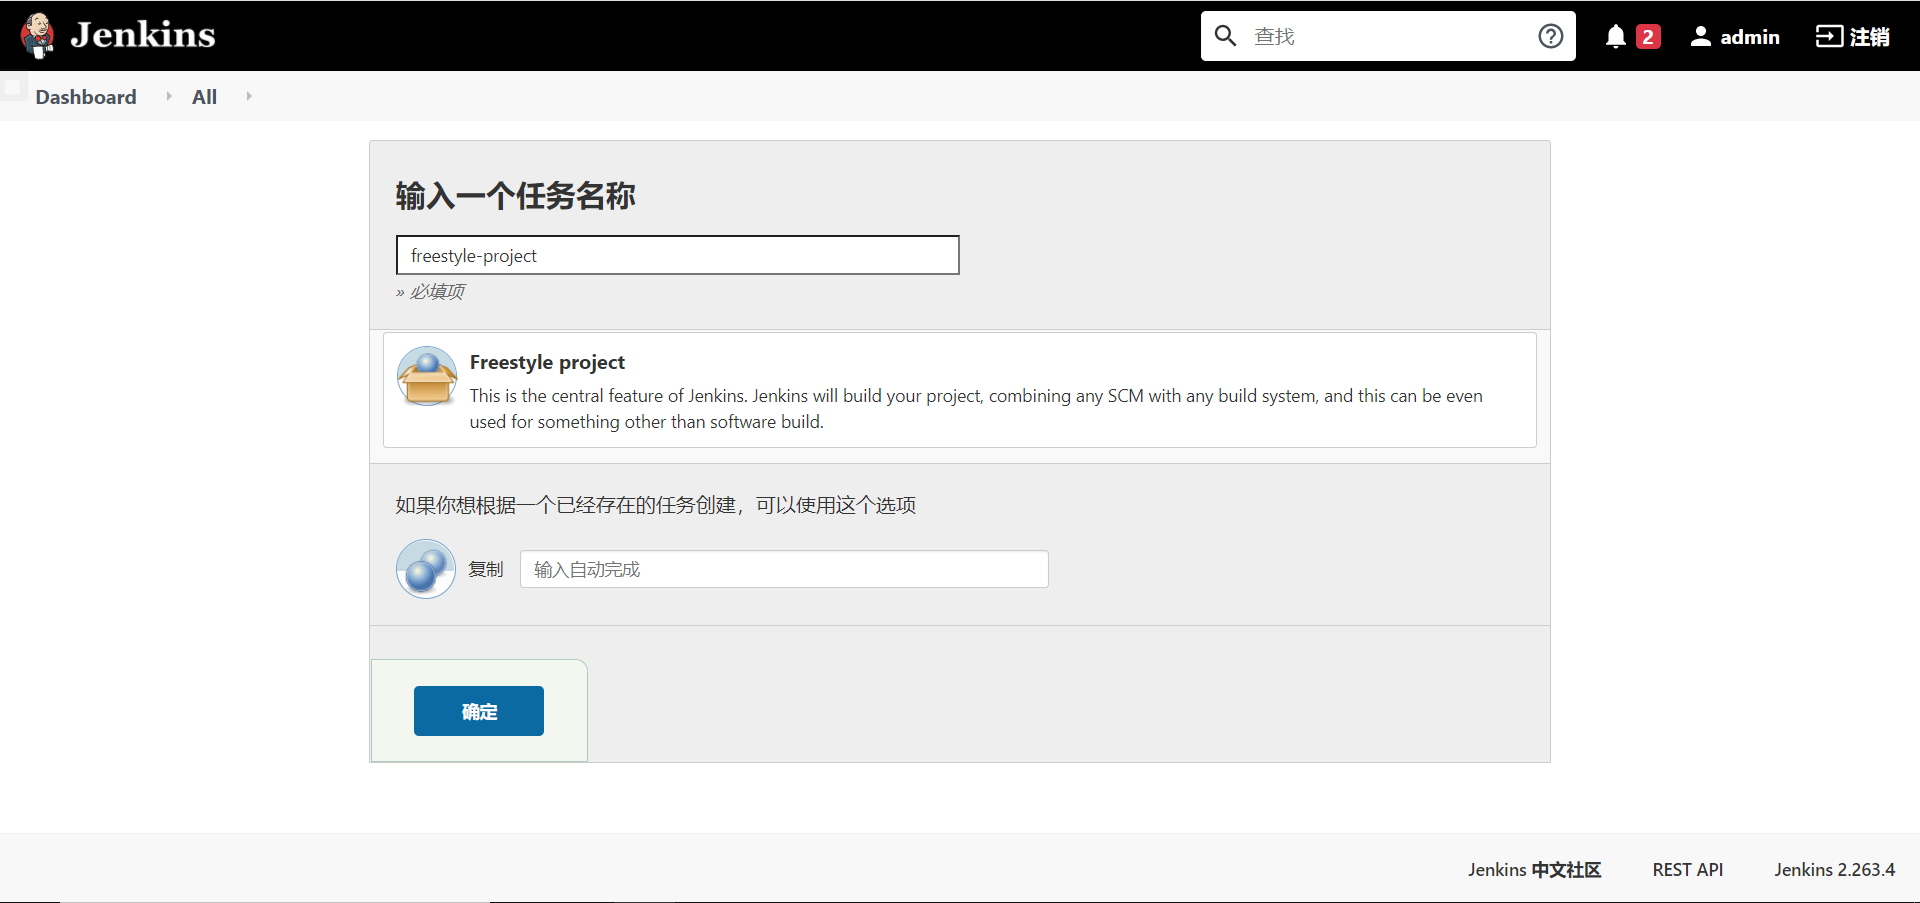
  2. Jenkins -> 新建items

freestyle一

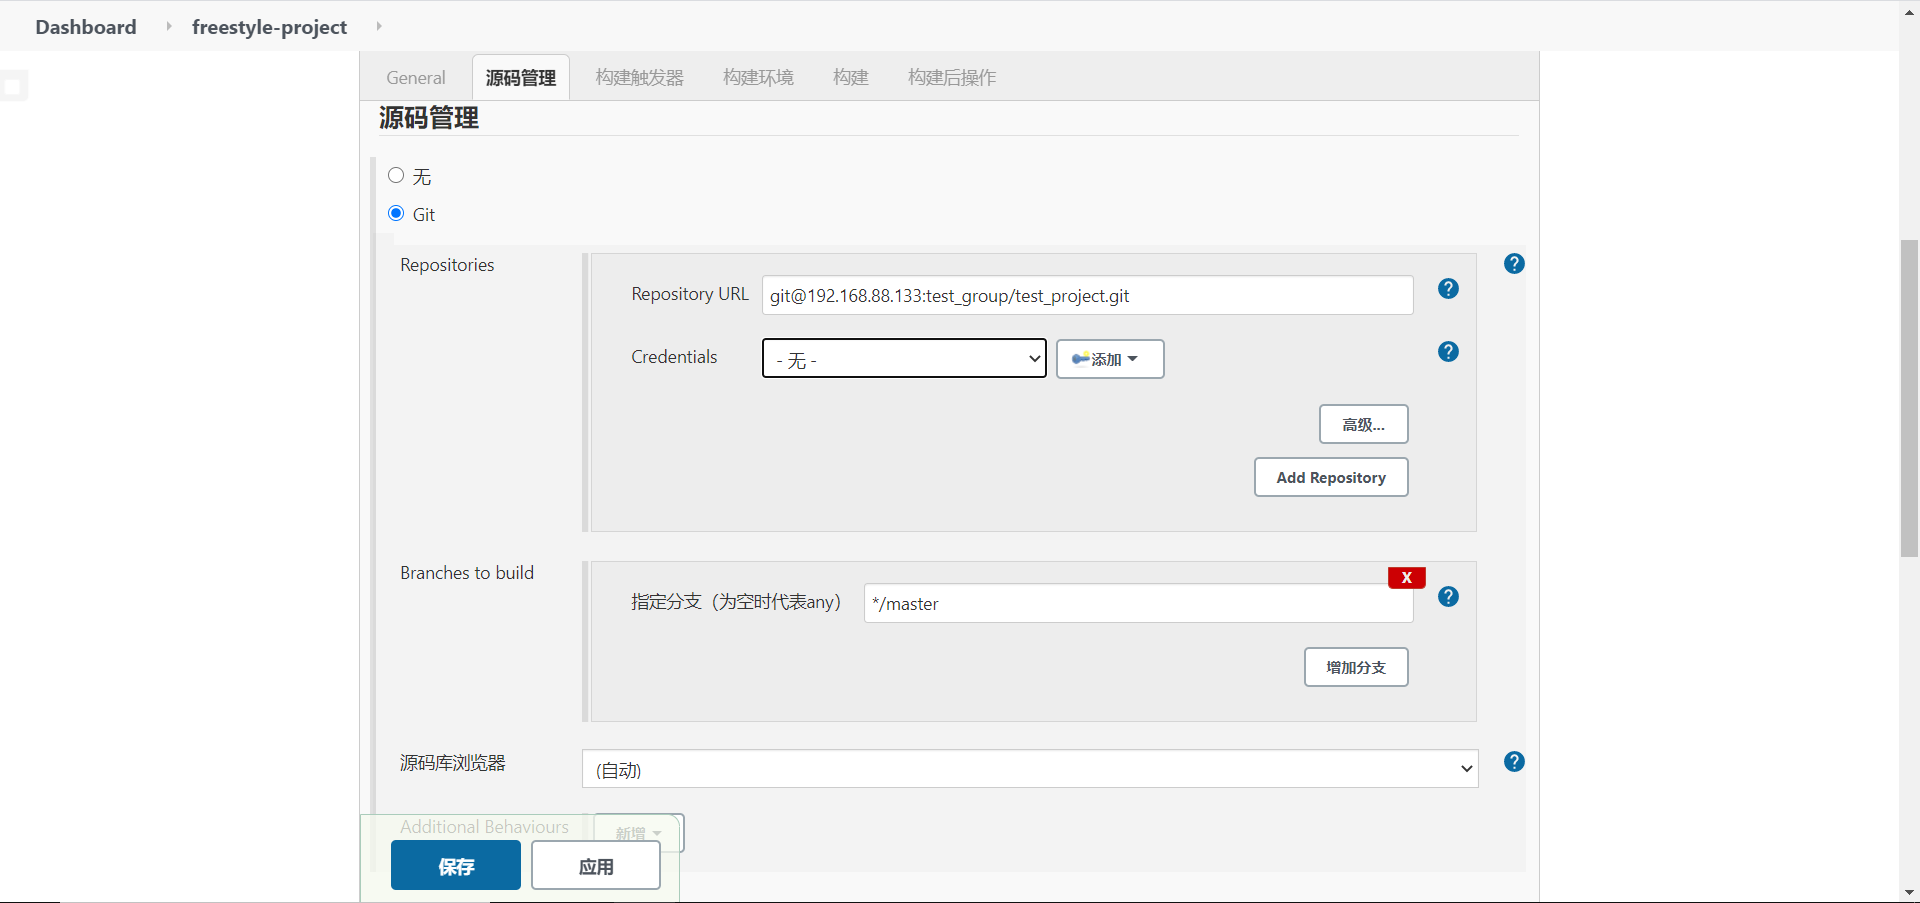
  1. 使用ssh免密登录来拉取代码

freestyle二

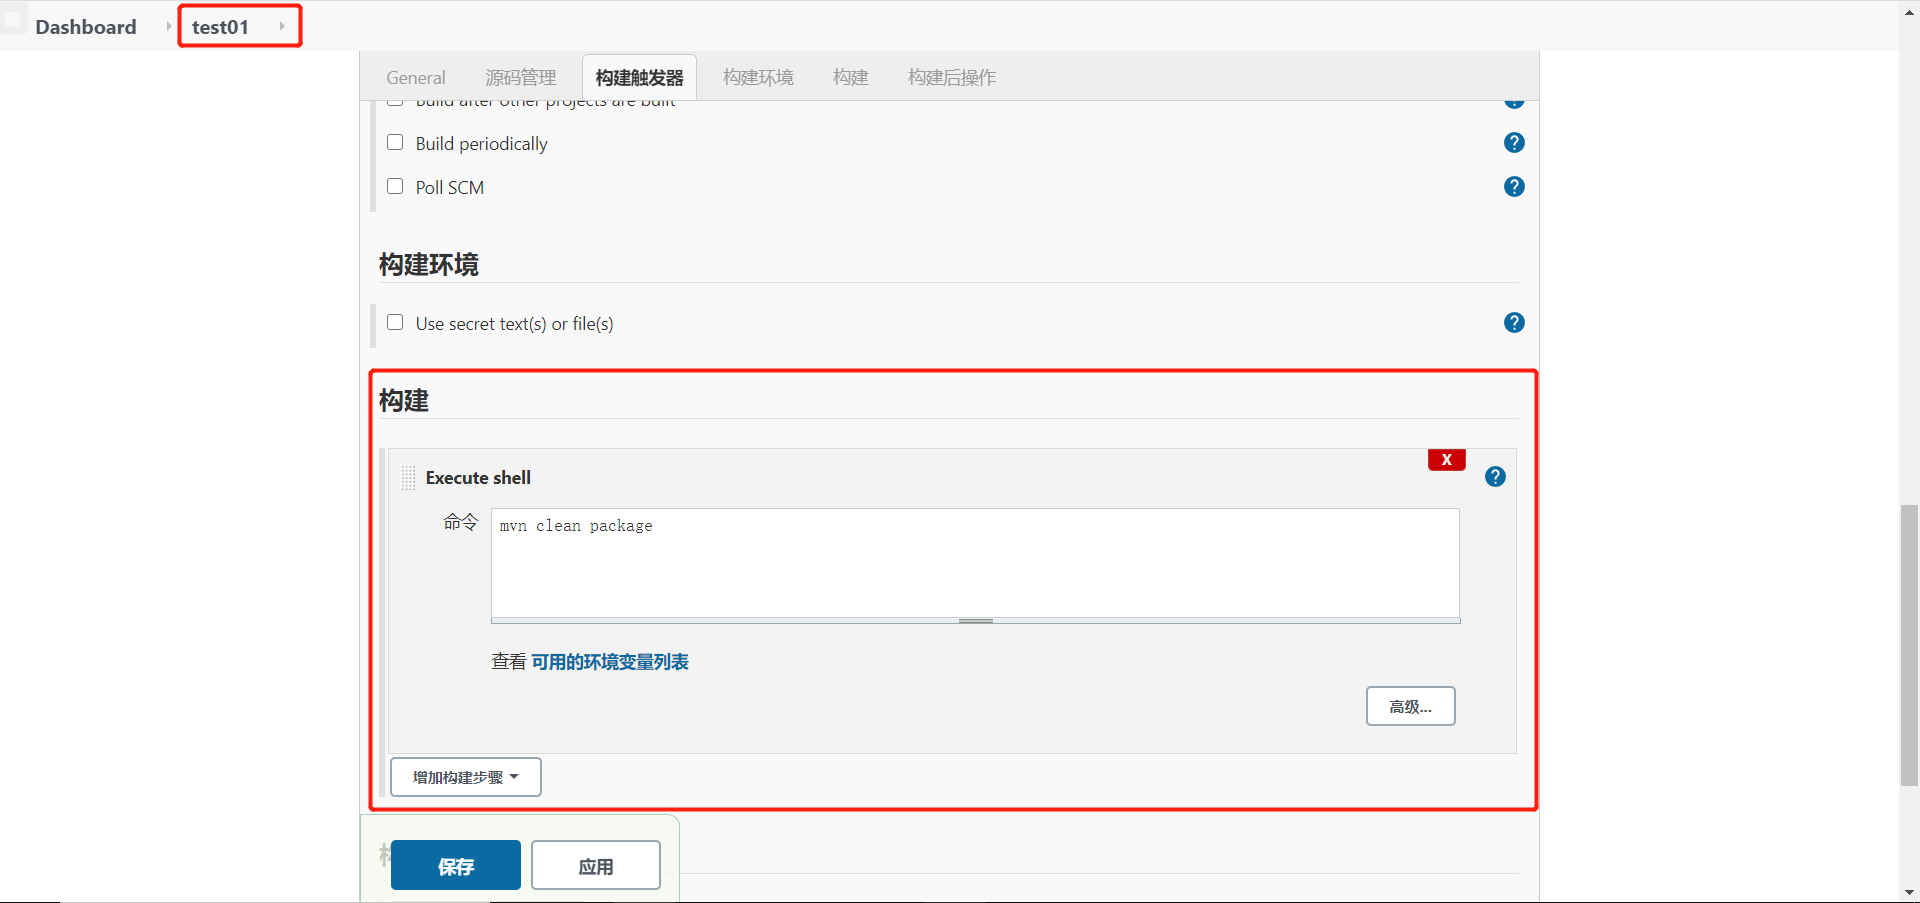
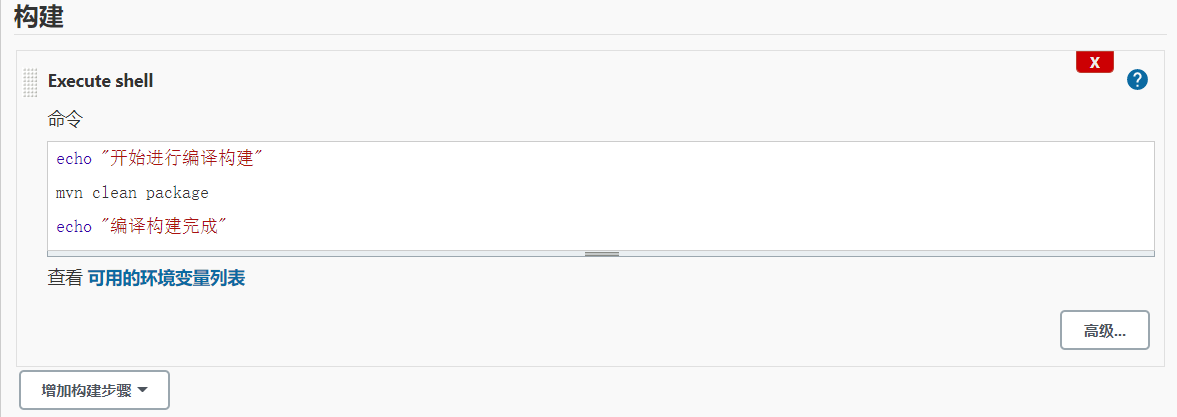
  1. 使用maven编译打包

freestyle四

  1. 部署

freestyle五

  1. 再次构建后可以回到tomcat查看是否部署成功

freestyle六

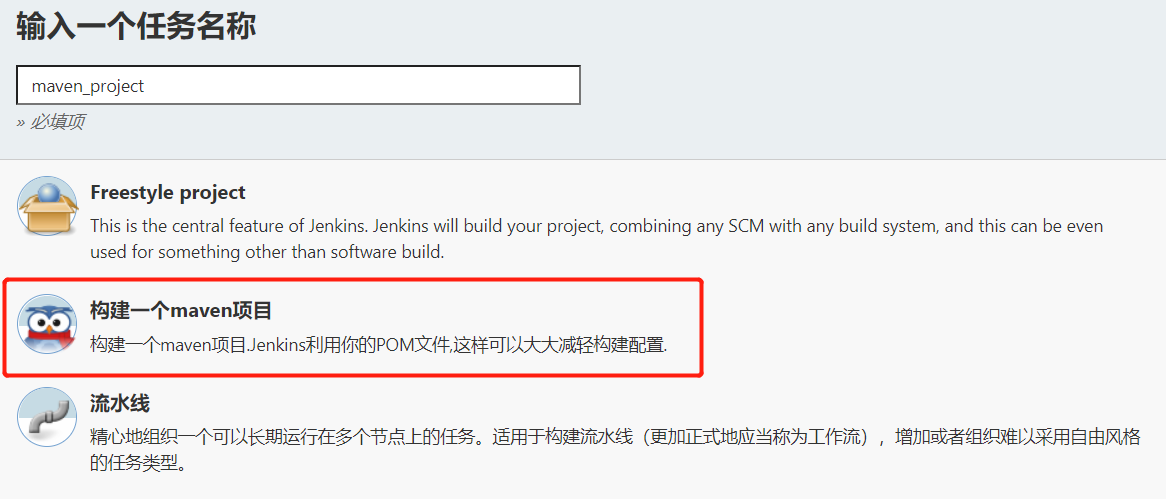
3.2 Maven项目构建

  1. 安装Maven Integration插件

  2. 创建maven项目

maven一

  1. 构建设置,其余设置都相同

maven二

  1. 构建后查看是否部署成功

maven三

3.3 Pipeline project简介

pipeline就是一套运行在Jenkins上的工作流框架,将独立运行的单个或多个节点的任务连接起来,实现复杂流程的编排和可视化的工作。

优点有:

  • 自动地为所有分支创建流水线构建过程并拉取请求。
  • 在流水线上代码复查/迭代 (以及剩余的源代码)。
  • 对流水线进行审计跟踪。
  • 该流水线的真正的源代码,可以被项目的多个成员查看和编辑。

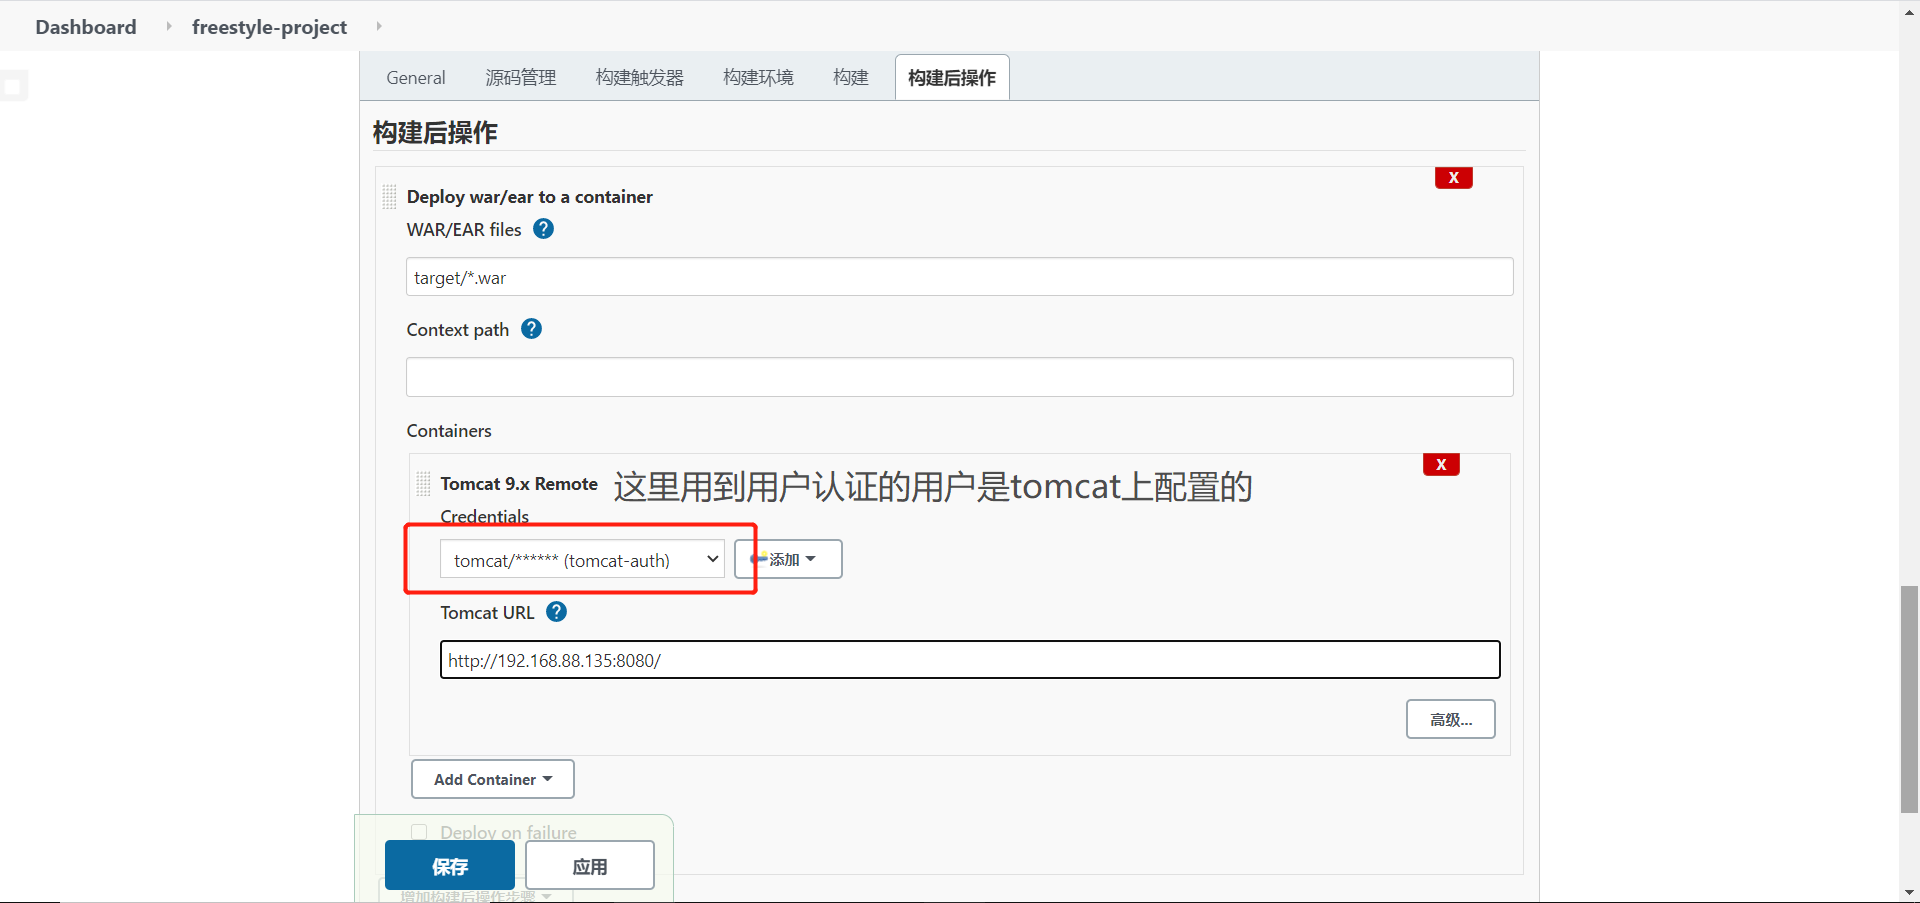
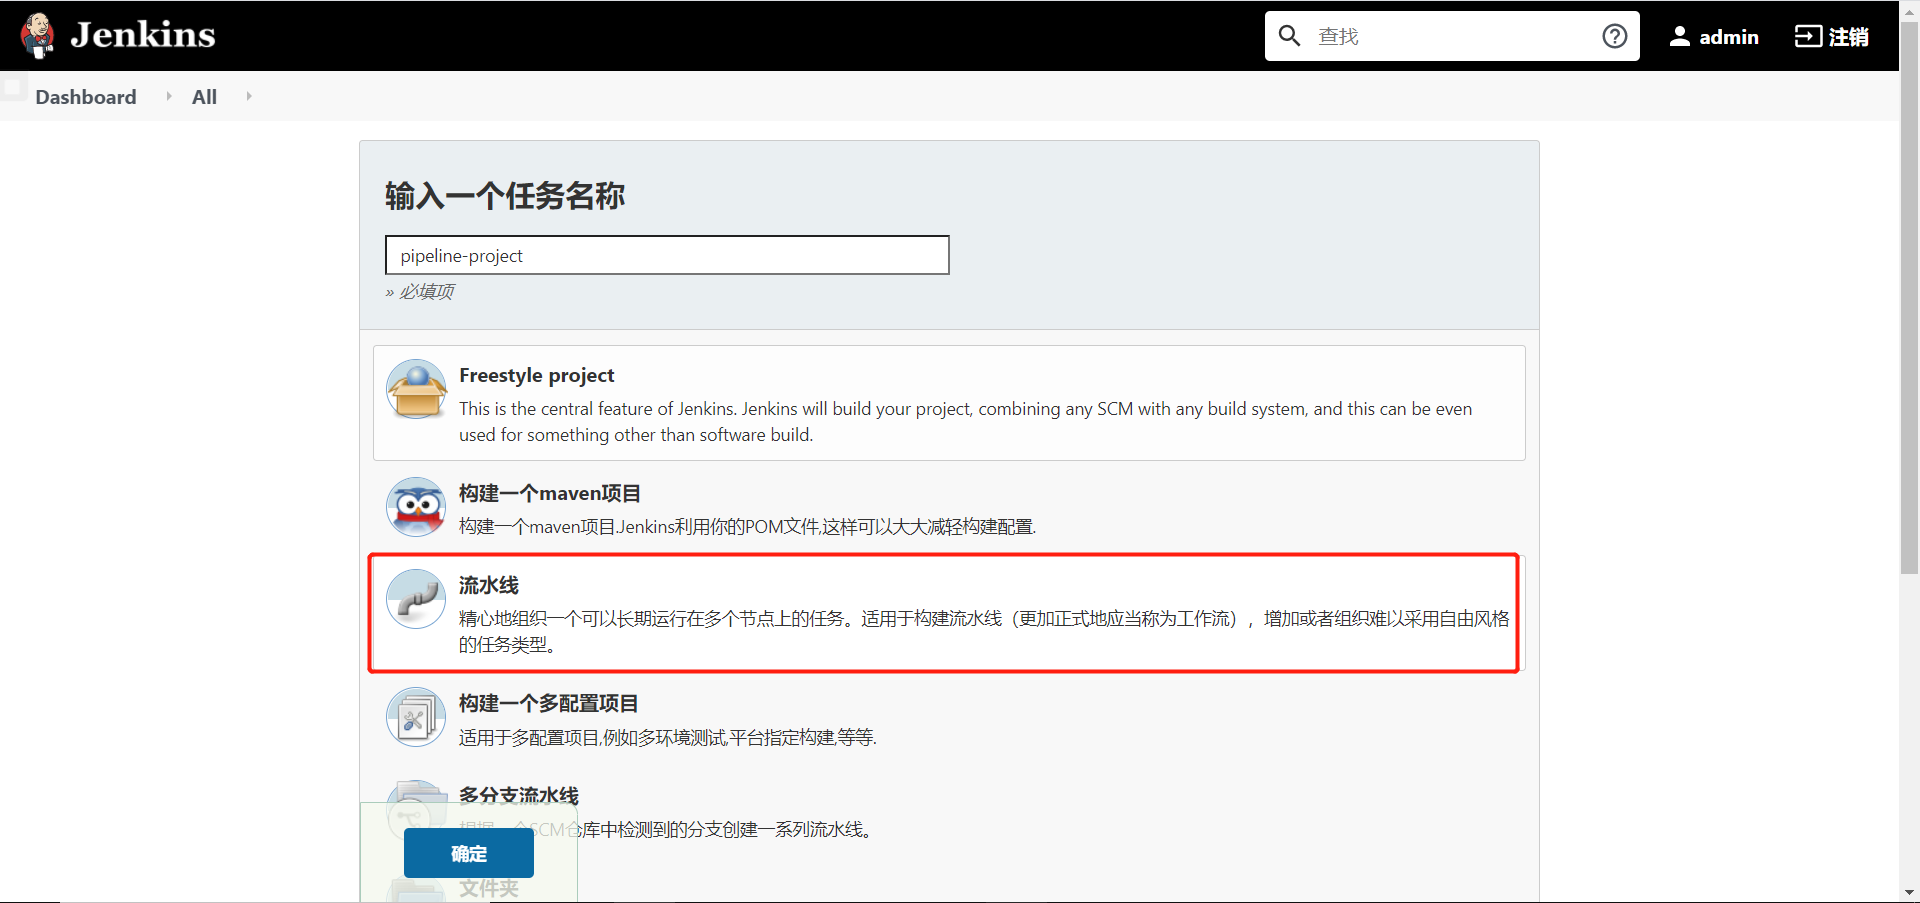
3.4 Pipeline流水线项目构建

  1. 安装pipeline插件
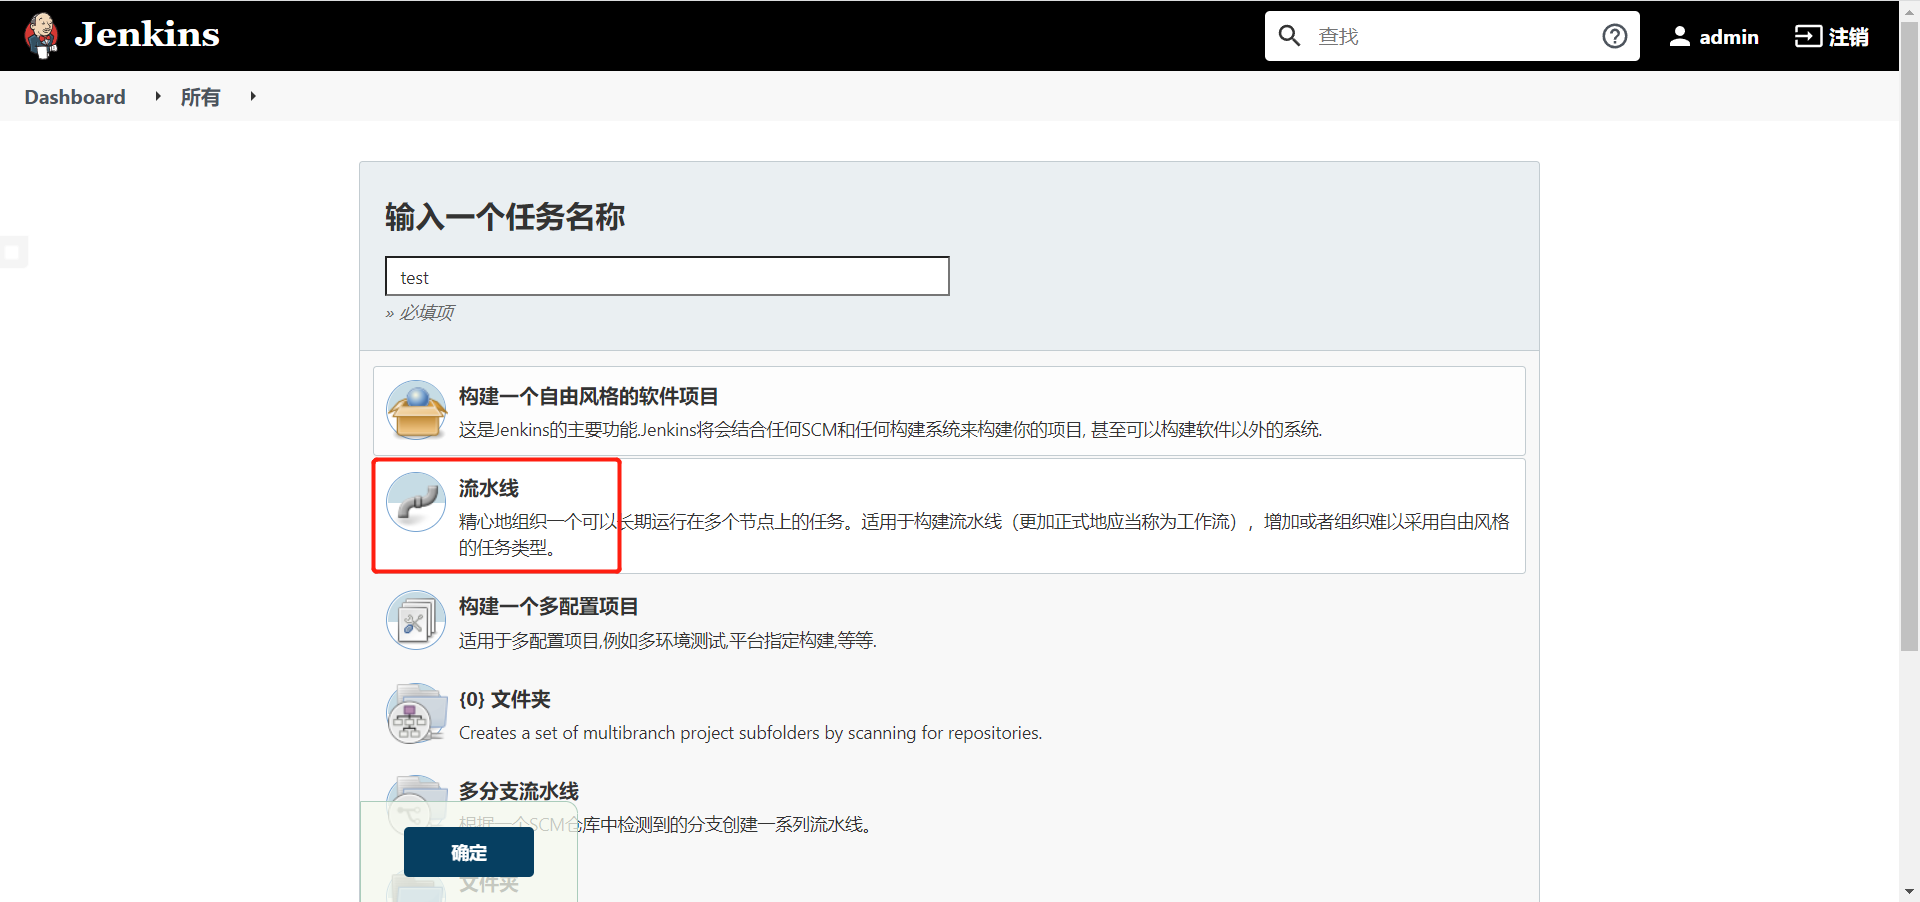
  2. 新建流水线项目

pipeline一

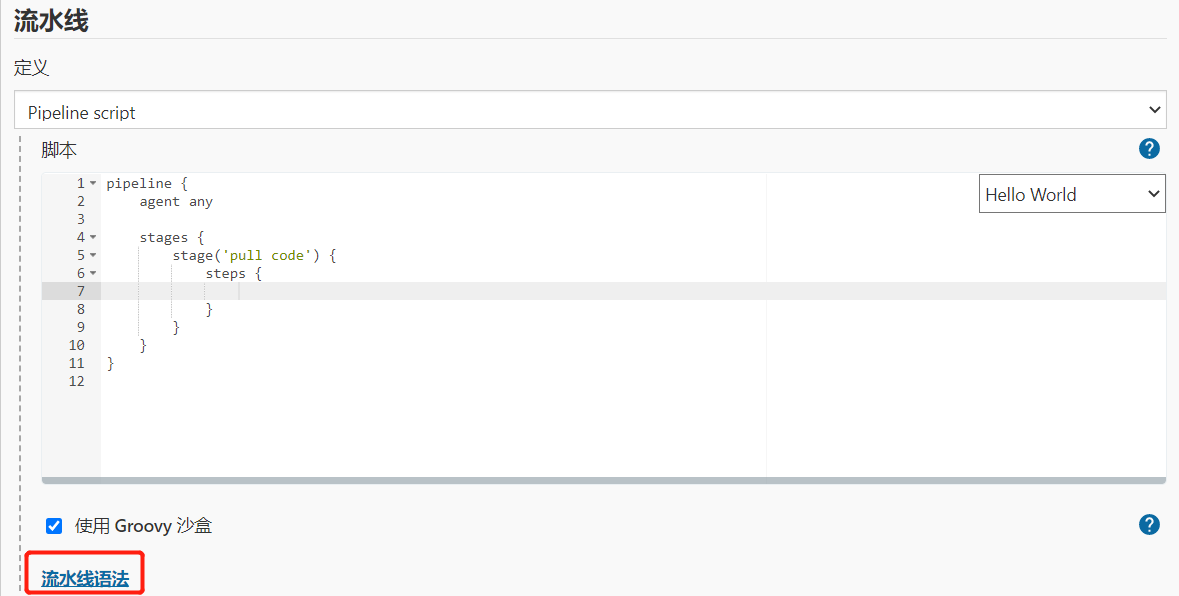
声明式流水线

  1. pipeline二

  2. pipeline三

  3. pipeline四

  4. pipeline五

  5. pipeline六

  6. pipeline七

3.5 Jenkinsfile脚本文件

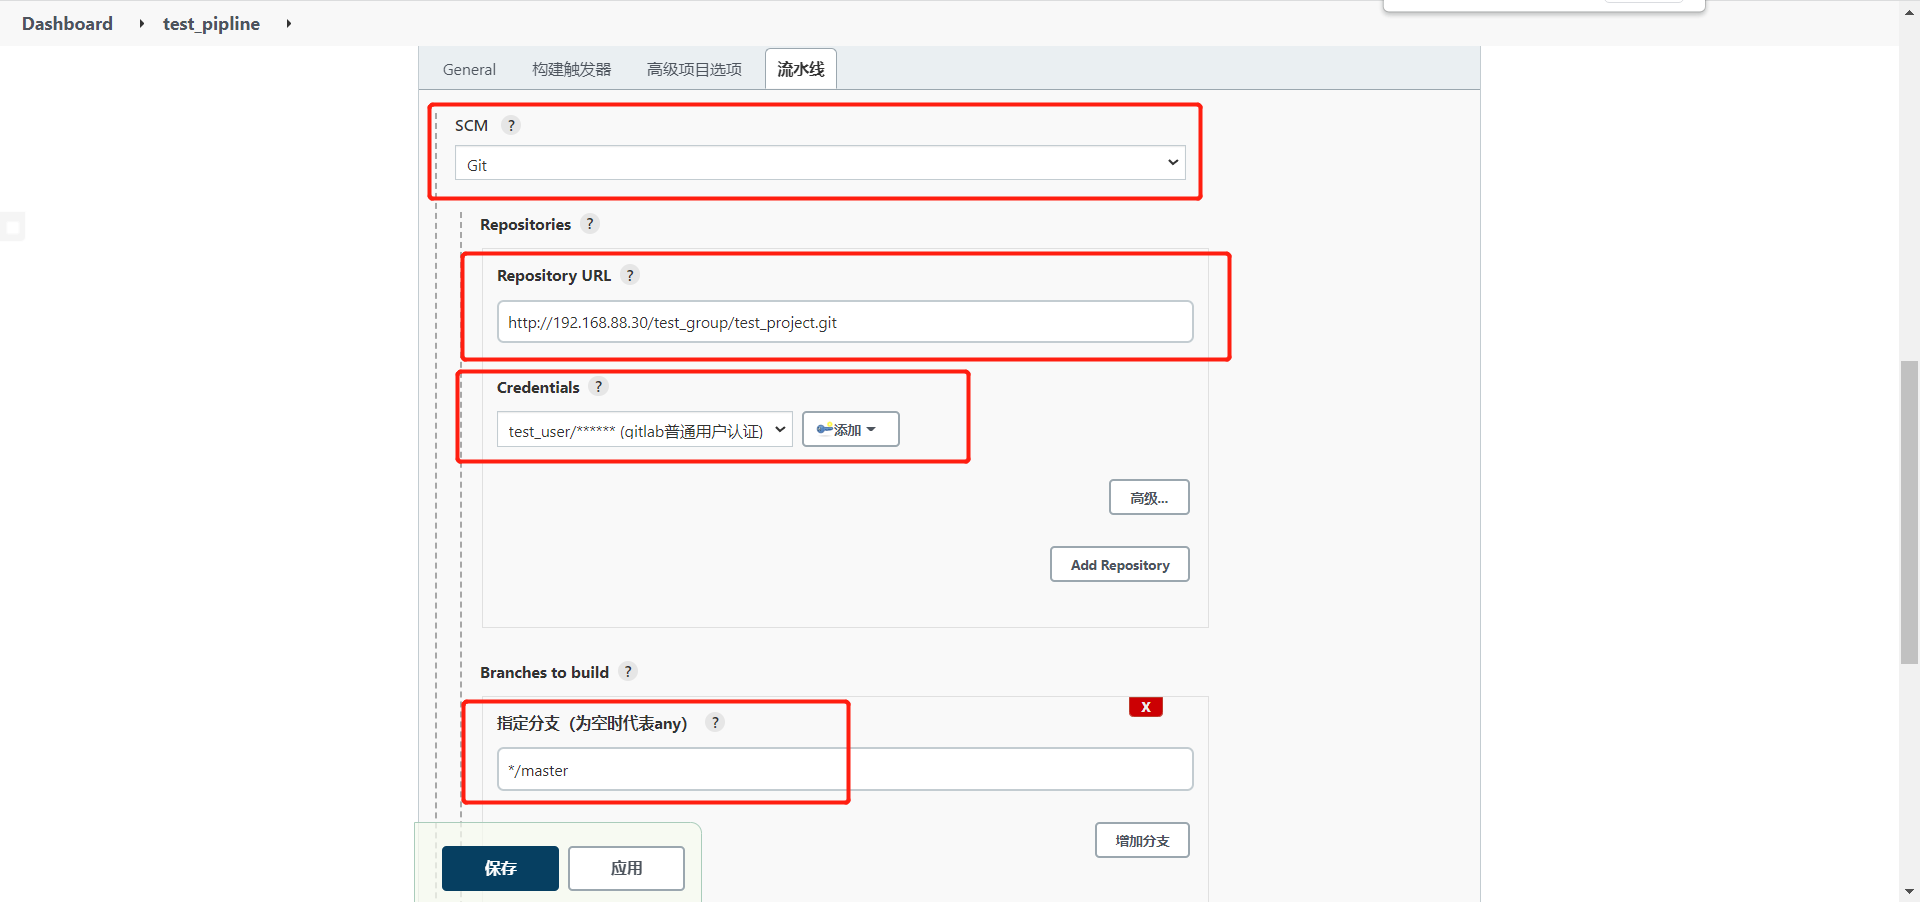
pipeline脚本内容放在Jenkins服务器不好管理,所以就在项目添加一个Jenkinsfile文件并推送到gitlab上,实现直接拉取执行。

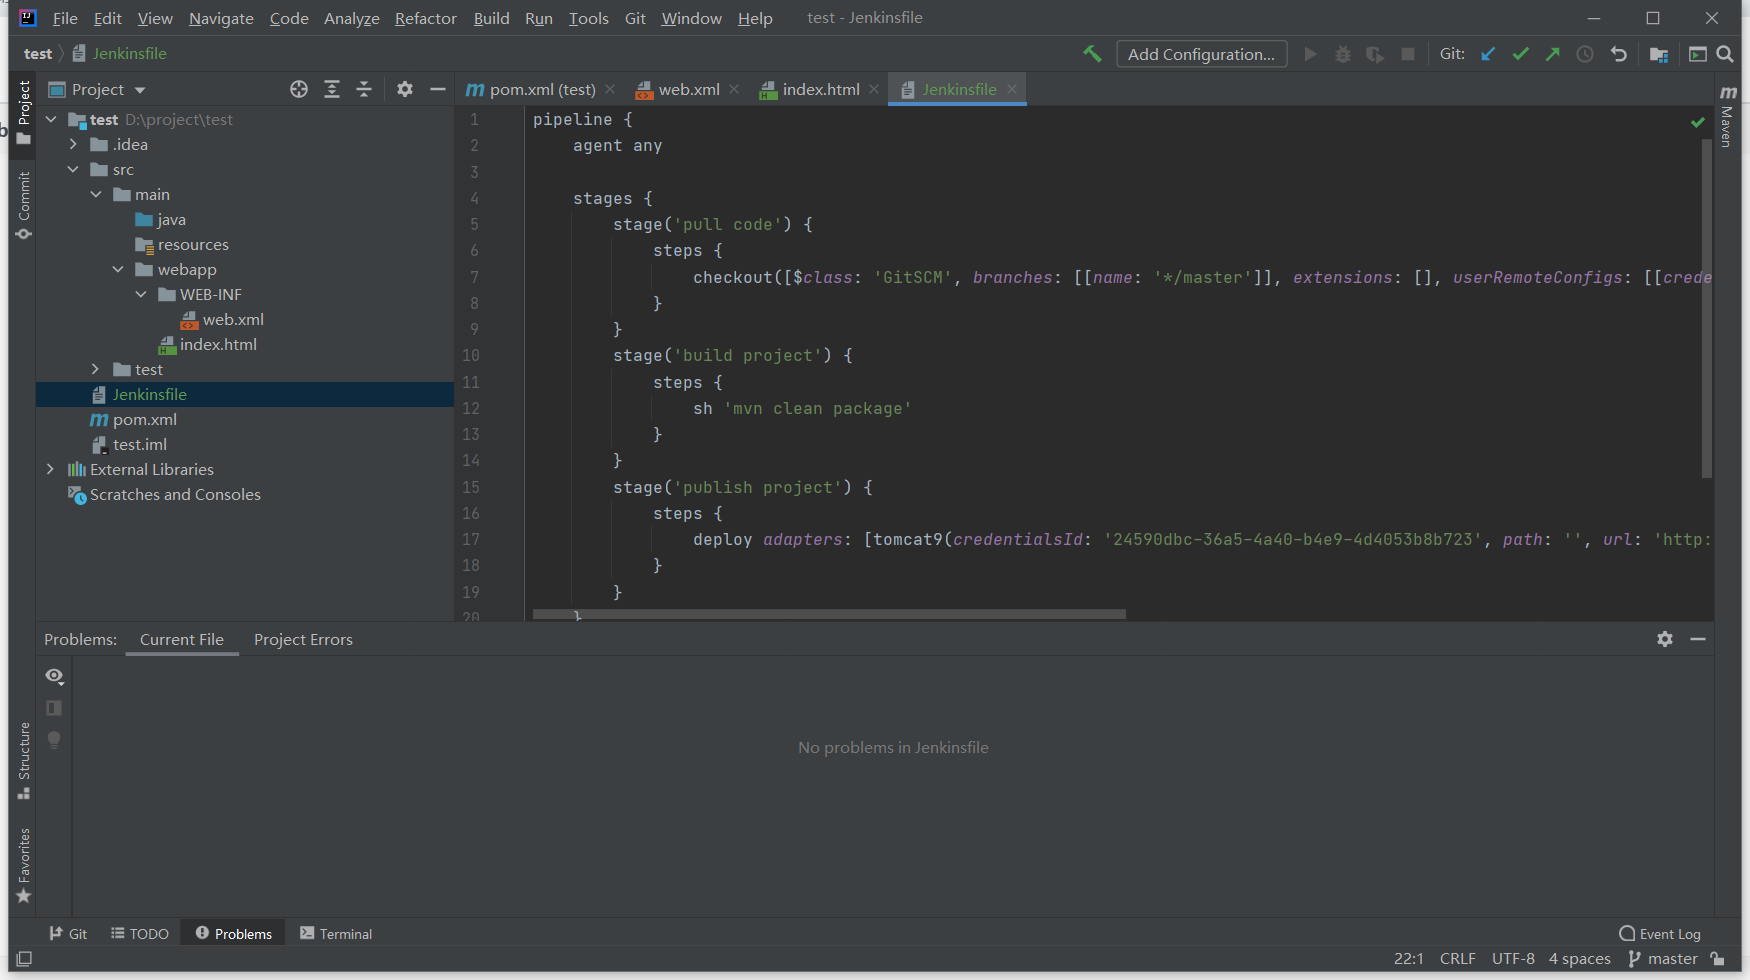
  1. 在项目下添加一个Jenkinsfile,将pipeline内容复制进去并推送到gitlab上

Jenkinsfile一

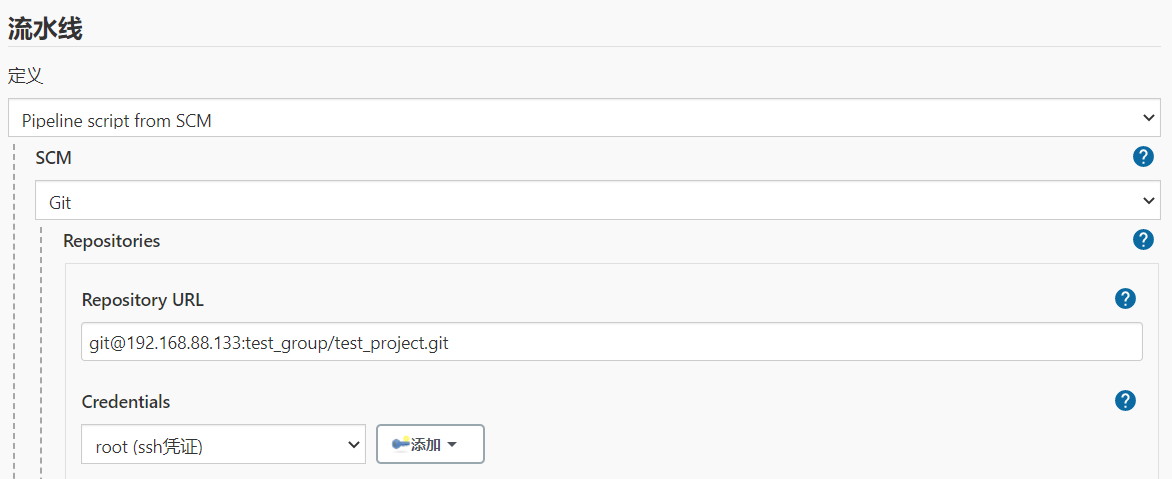
  1. 在pipeline项目中修改为在gitlab拉取Jenkinsfile文件

Jenkinsfile二

四、Jenkins构建细节

4.1 Jenkins常用的构建触发器

Jenkins内置4种构建触发器:

  • 触发远程构建
  • 其它工程构建后触发
  • 定时构建
  • 轮询SCM

4.2 触发远程构建

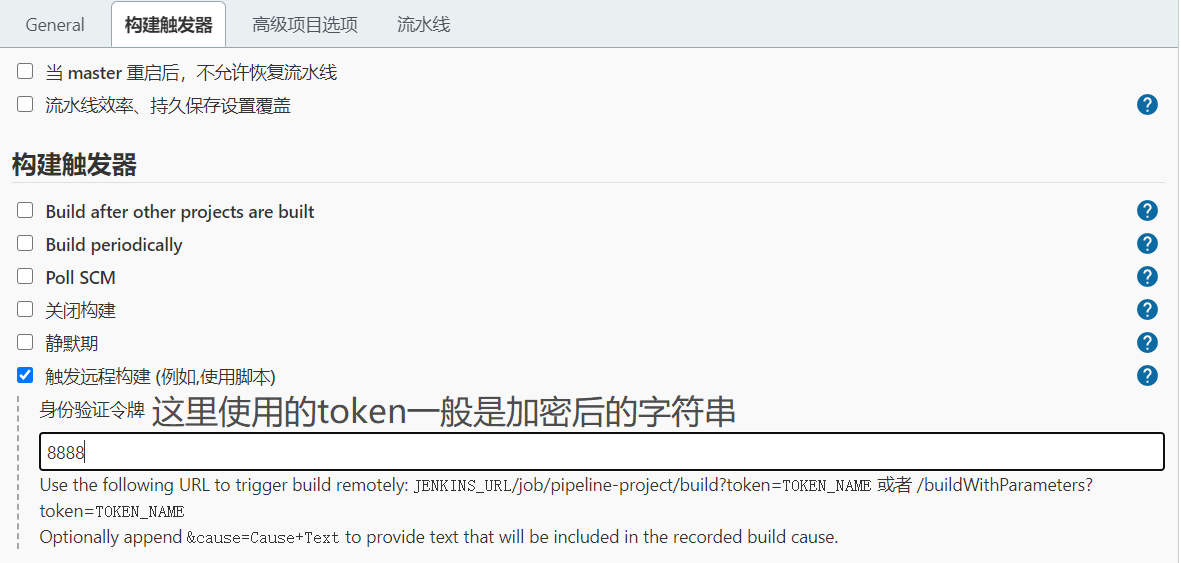
  1. 在项目中设置触发器

触发远程构建一

  1. 在浏览器输入JENKINS_URL/job/pipeline-project/build?token=TOKEN_NAME即可触发

触发远程构建二

4.3 其它工程构建后触发

是指某一工程构建后才会触发构建,这里测试freestyle工程构建后触发pipeline构建

  1. 在pipeline配置构建后触发

构建后触发一

  1. freestyle工程构建后就会触发pipeline构建

4.4 定时构建

五个*分别代表分时日月周,H/2则代表每分时日月周

定时构建一

4.5 轮询SCM

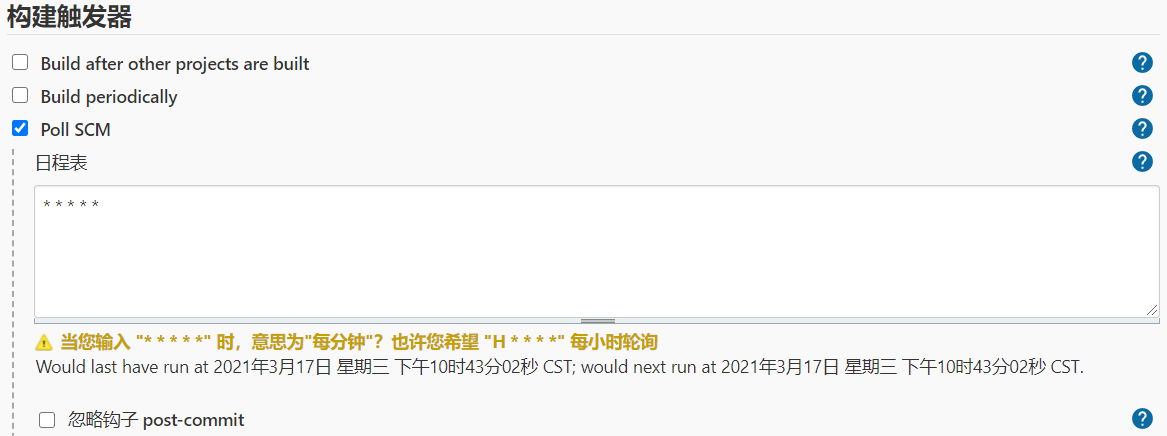
和定时构建一样是设置时间来进行构建,不过轮询只有在代码仓库发生变化后才会触发,相当于定时检查

注意:轮询会定时扫描仓库的代码,增大系统的开销,不建议使用

轮询SCM一

4.6 Gitlab Hook自动触发构建

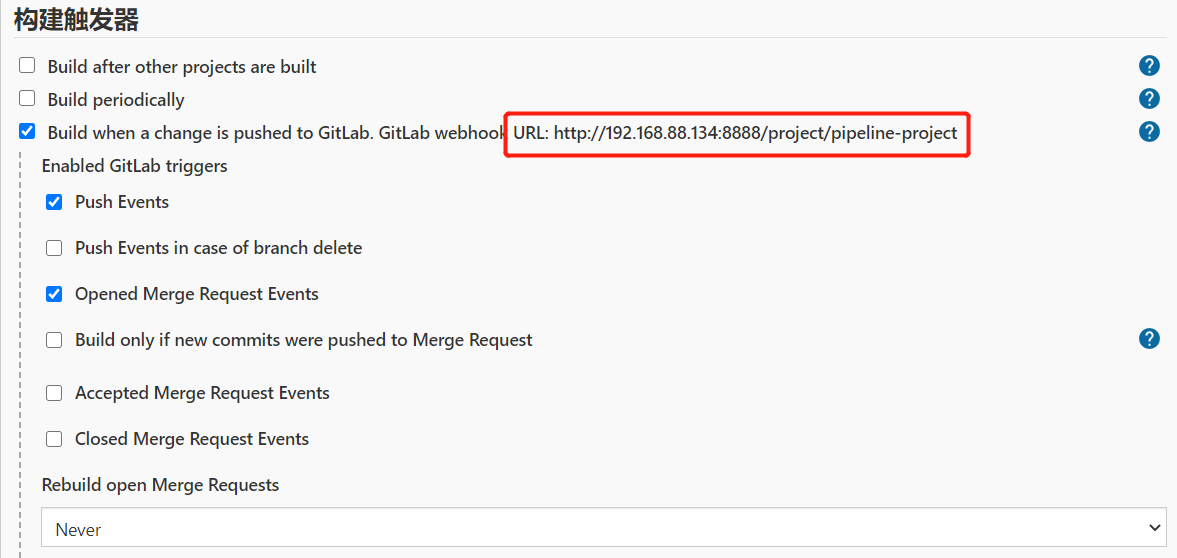
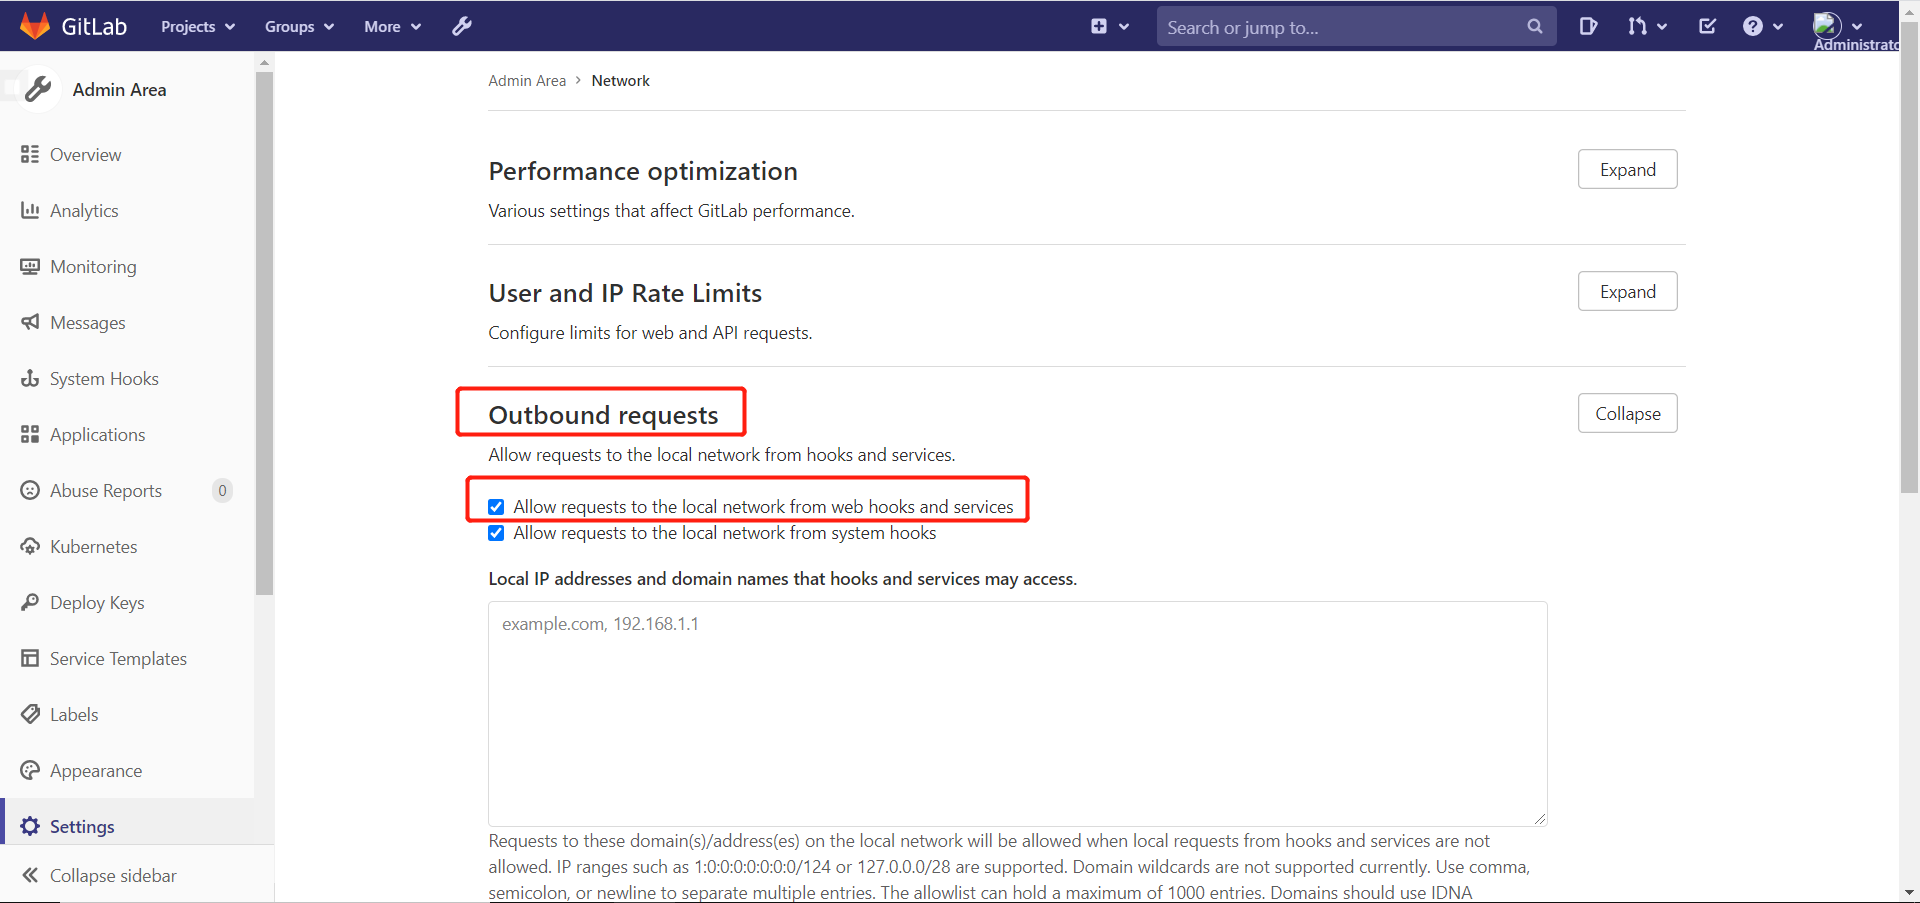
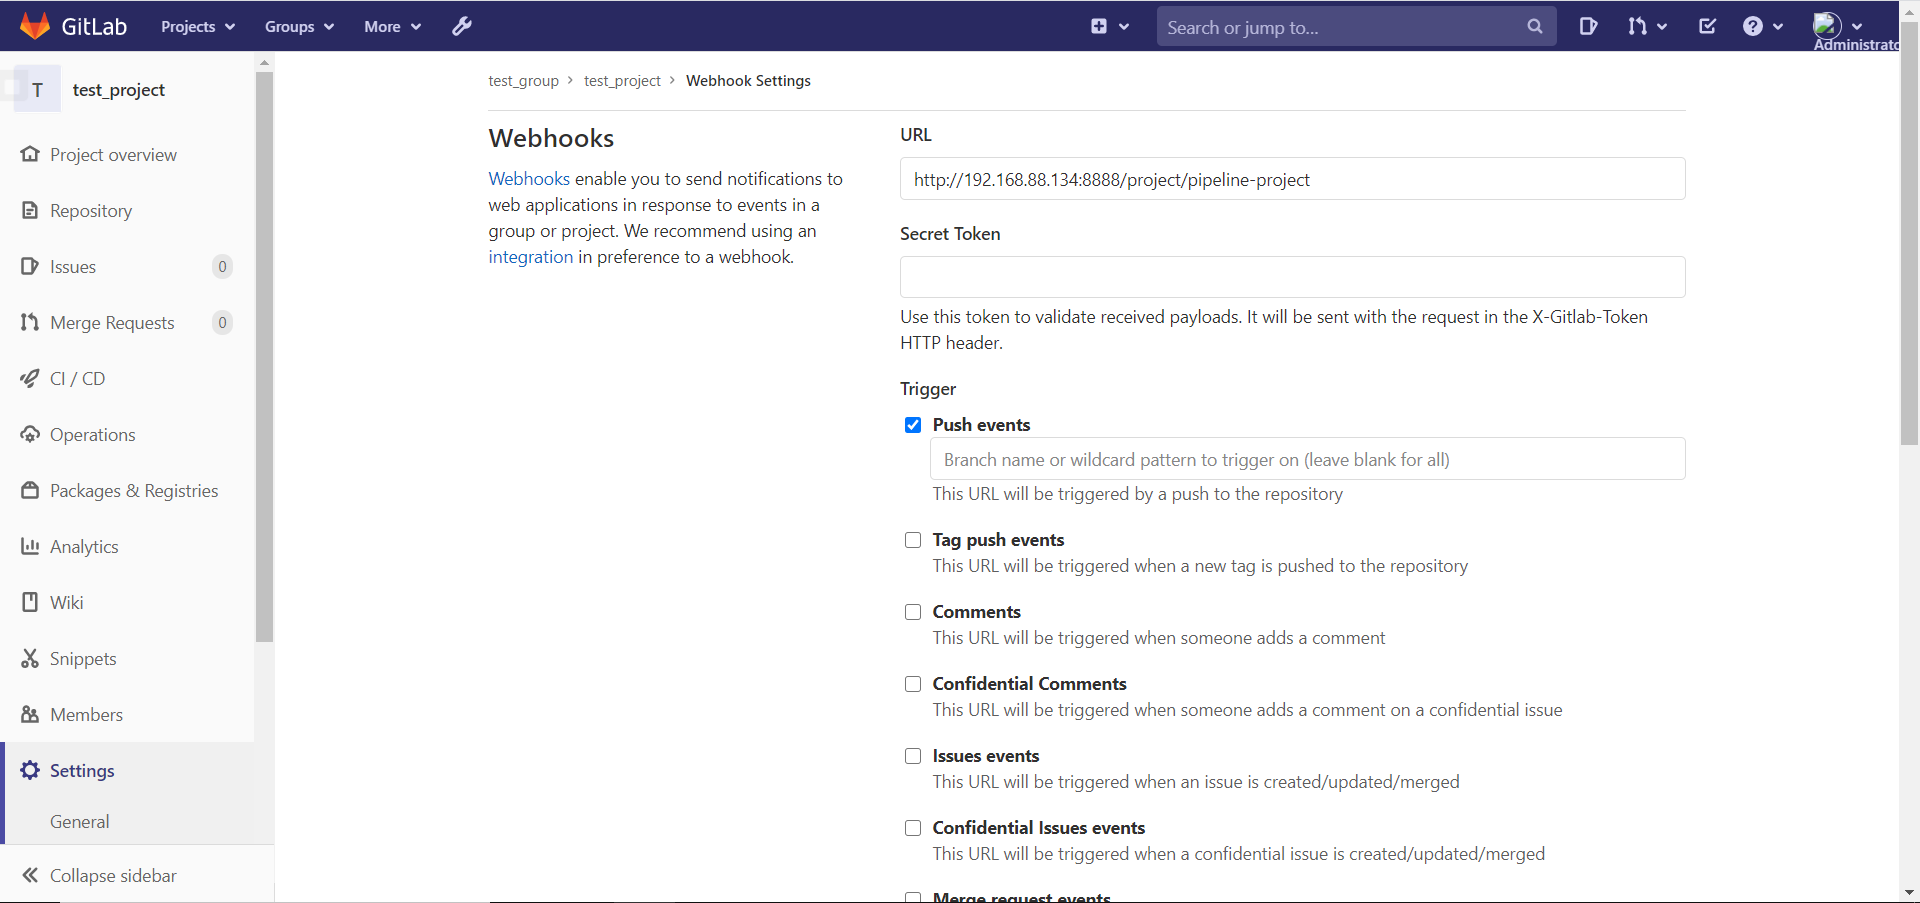
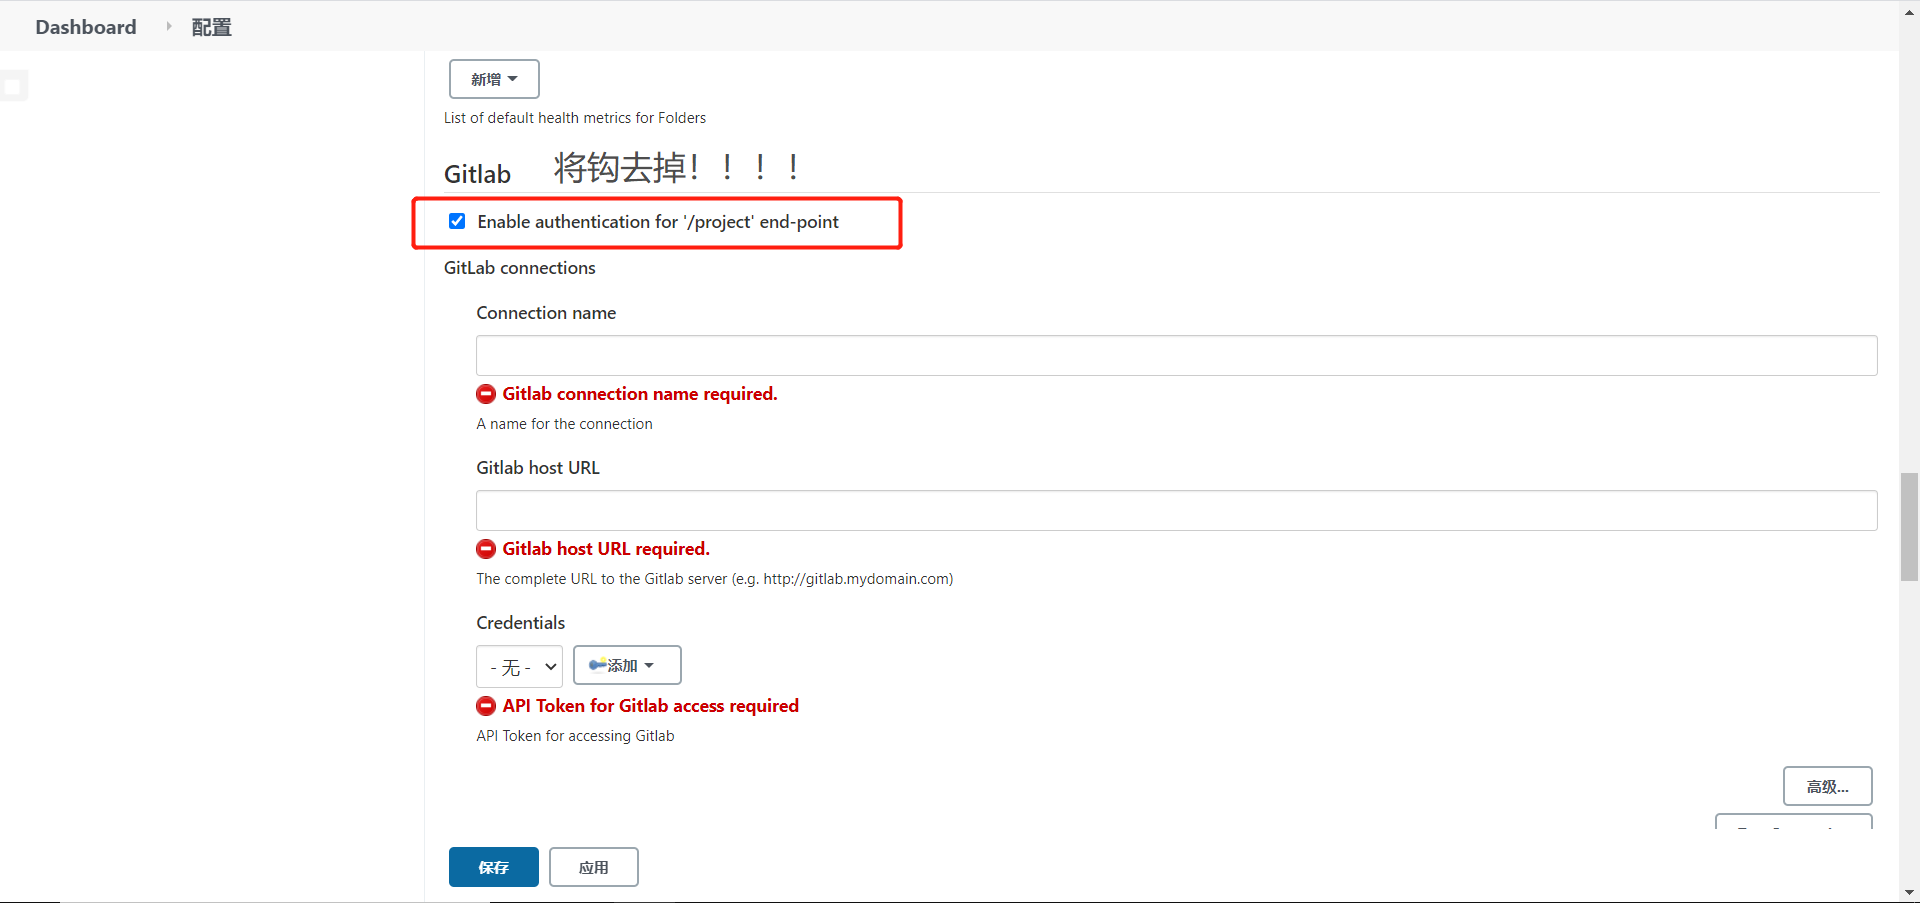
SCM轮询是Jenkins服务器主动检测gitlab中的代码有没有发生变化,而gitlab的webhook可以实现代码变更后向Jenkins服务器主动发送构建请求,实现自动构建。

  1. 在Jenkins安装gitlab和gitlab hook插件

gitlabhook一

  1. 在gitlab配置中允许发出请求

gitlabhook二

  1. 在项目中添加第一步中的地址

gitlabhook三

  1. 配置Jenkins允许接受gitlab发送过来的请求

gitlabhook四

4.7 Jenkins参数化构建

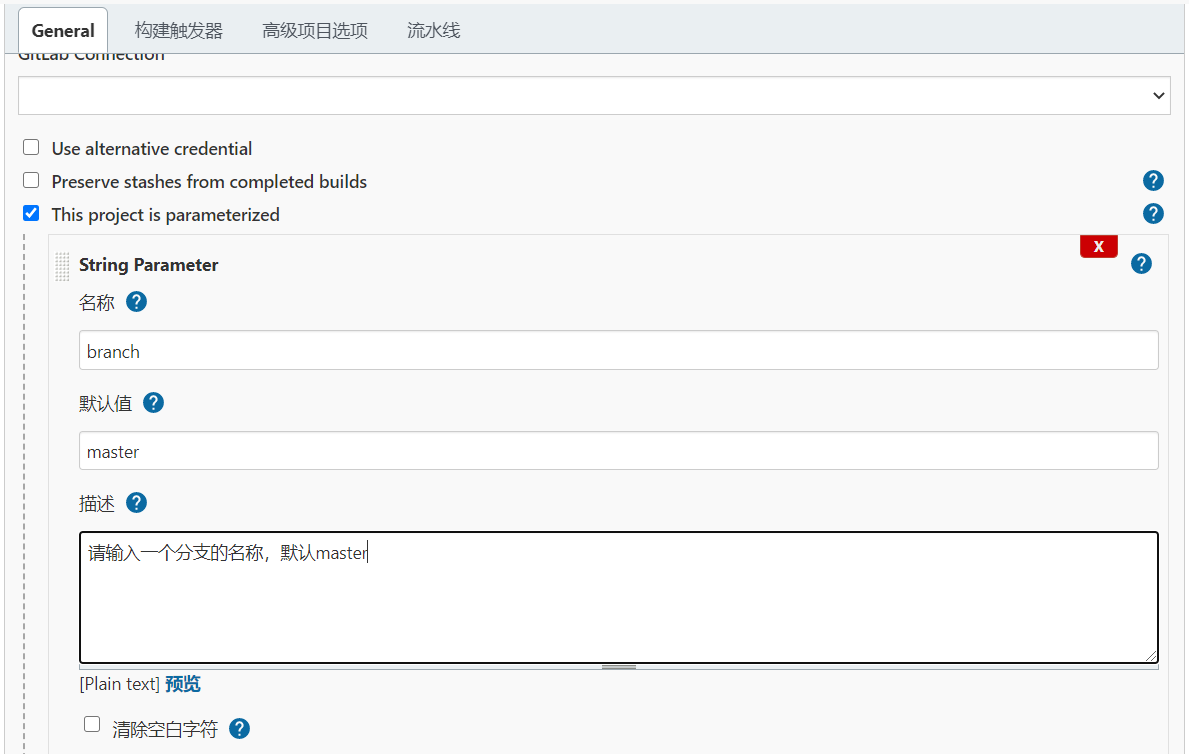
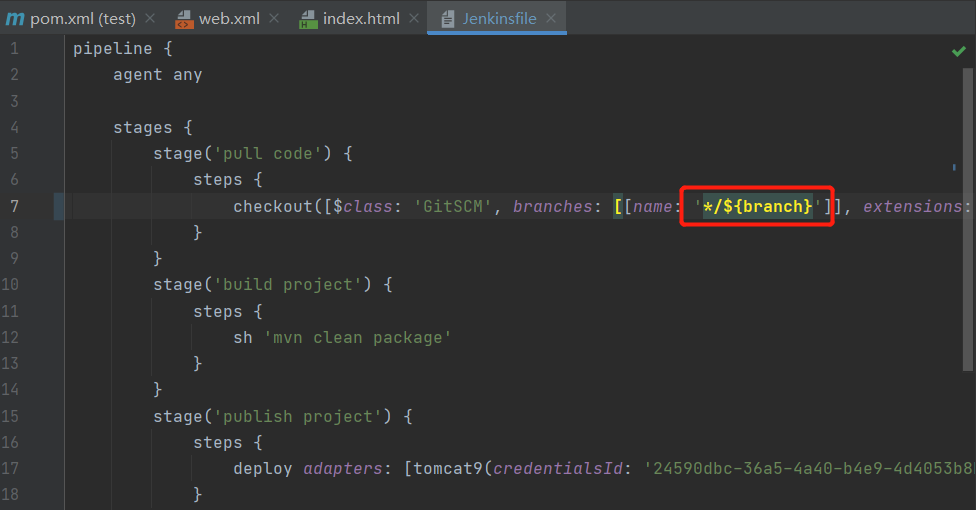
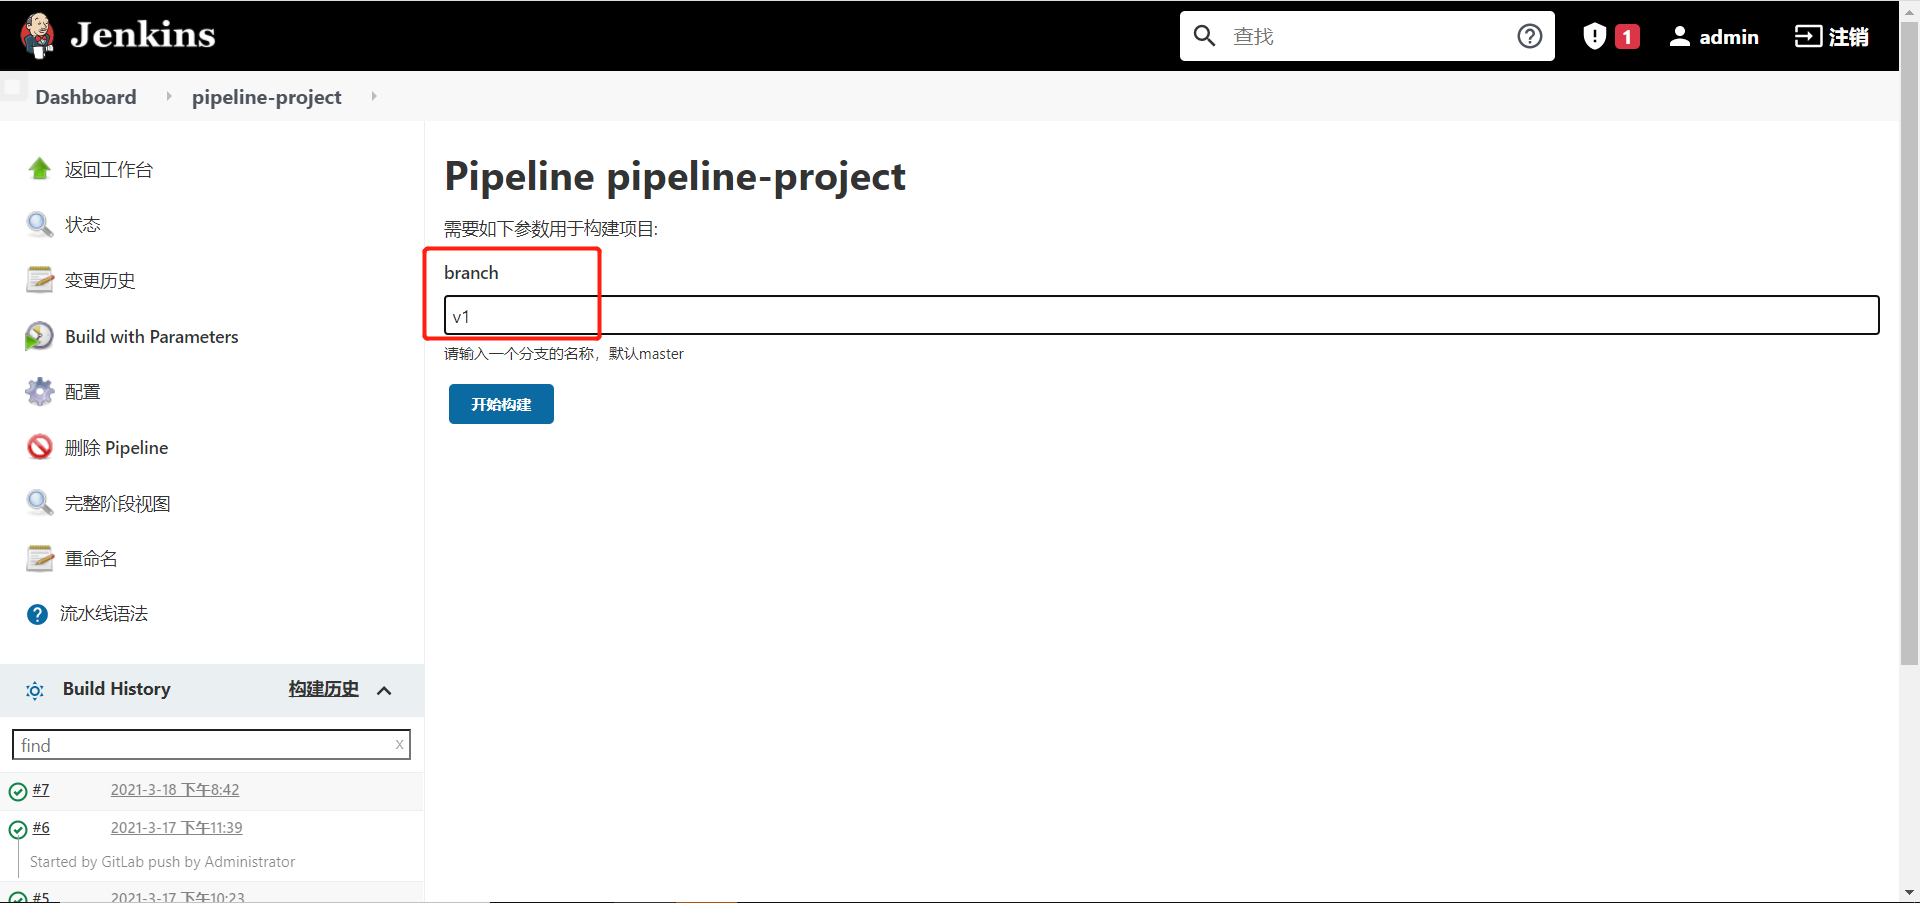
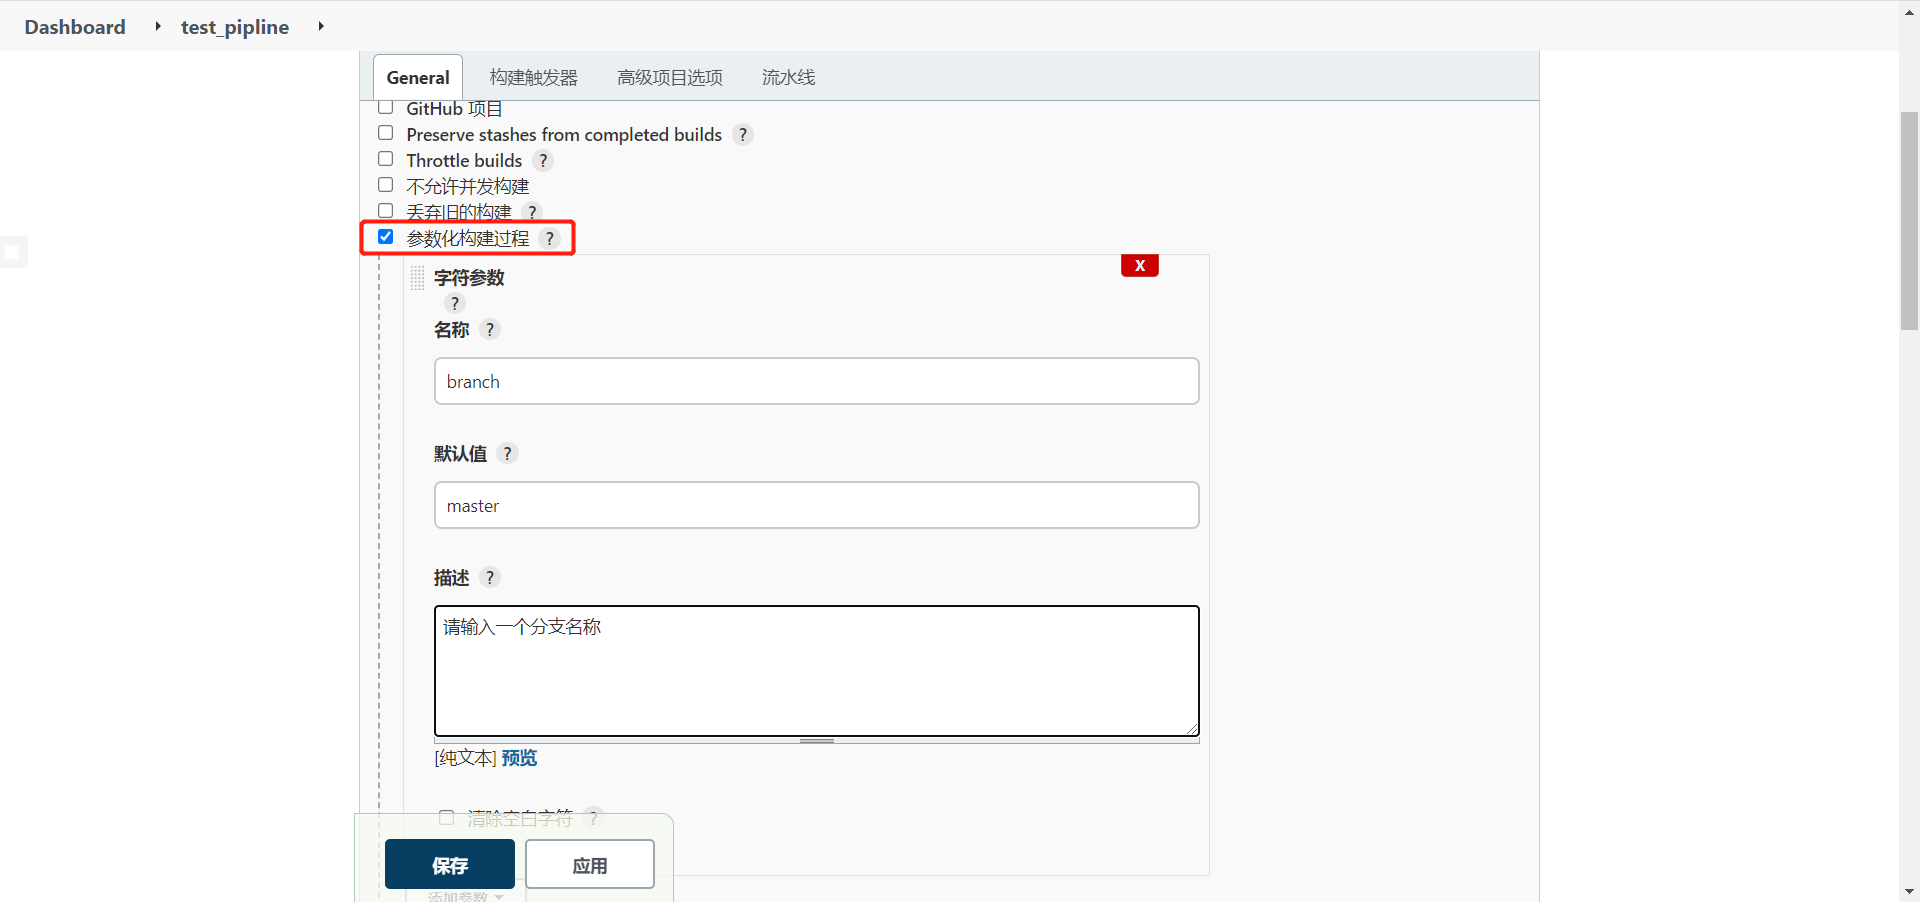
前边实操演示的都是默认从master下拉取代码,如果要实现在其他分支拉取代码,就需要设置参数化构建。

  1. 在Jenkins的项目中添加参数,这里选择字符串参数

参数化构建一

  1. 修改Jenkinsfile文件中拉取代码部分的master为变量,并推送到gitlab

参数化构建二

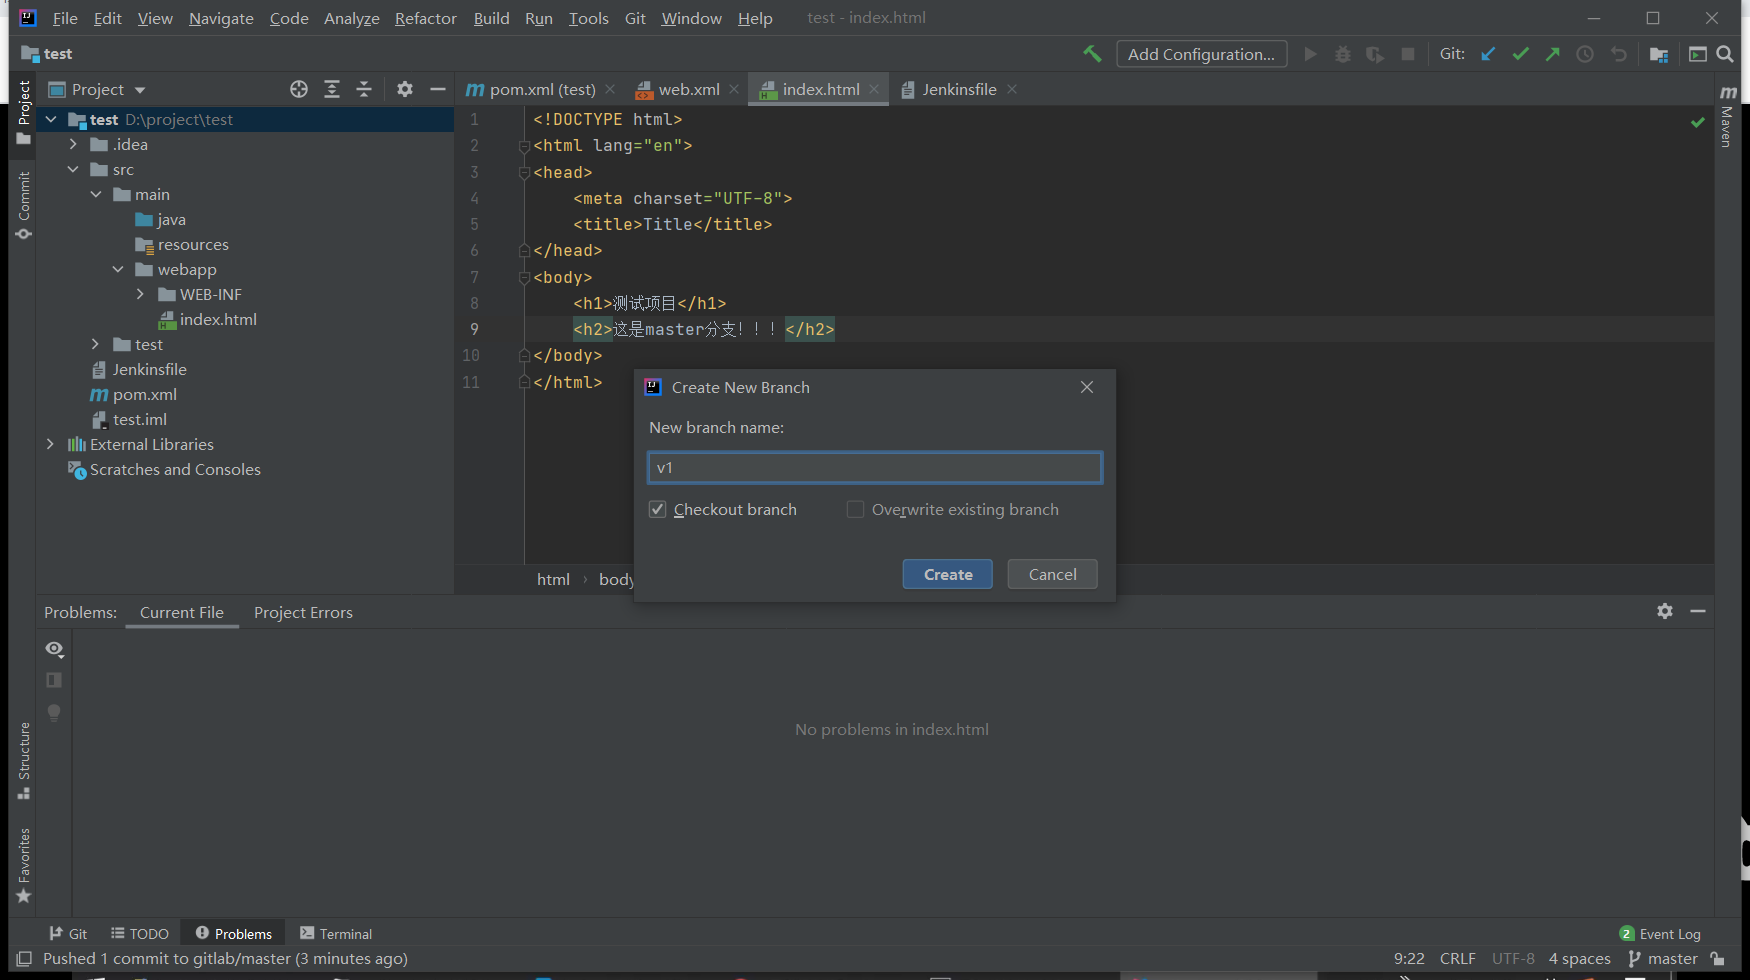
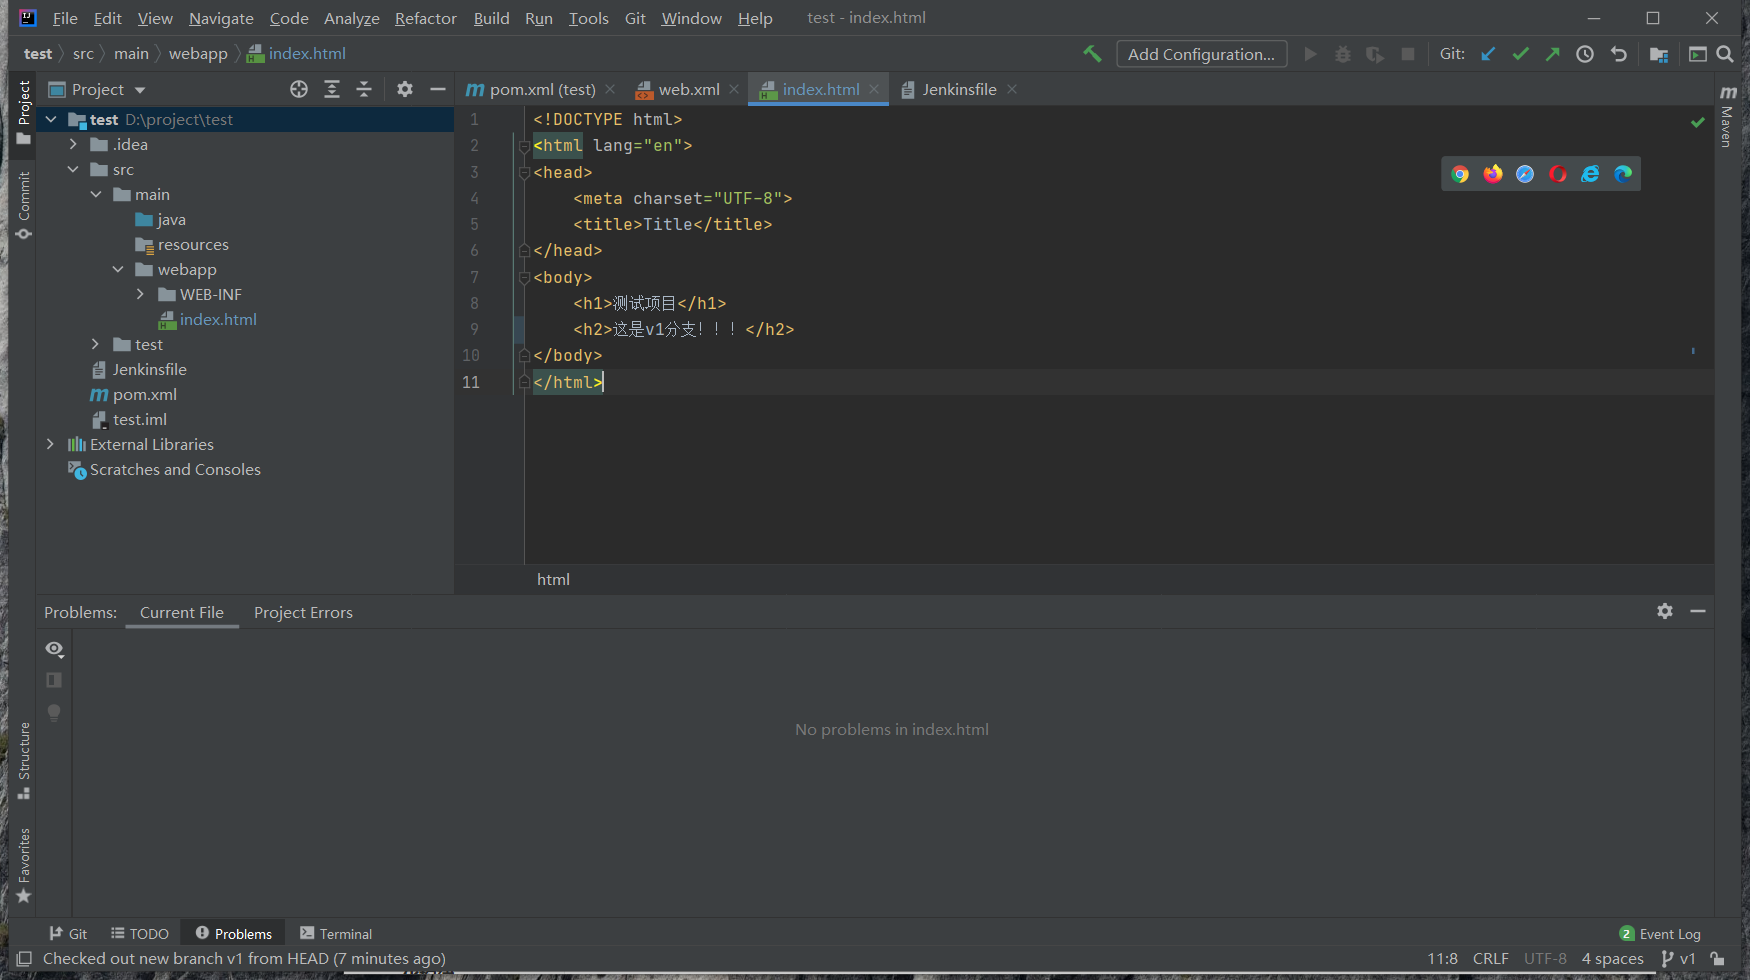
  1. 在项目中添加一个v1分支

参数化构建三

参数化构建四

  1. 在Jenkins中拉取v1代码构建

参数化构建五

参数化构建六

4.8 配置邮件服务器发送构建结果

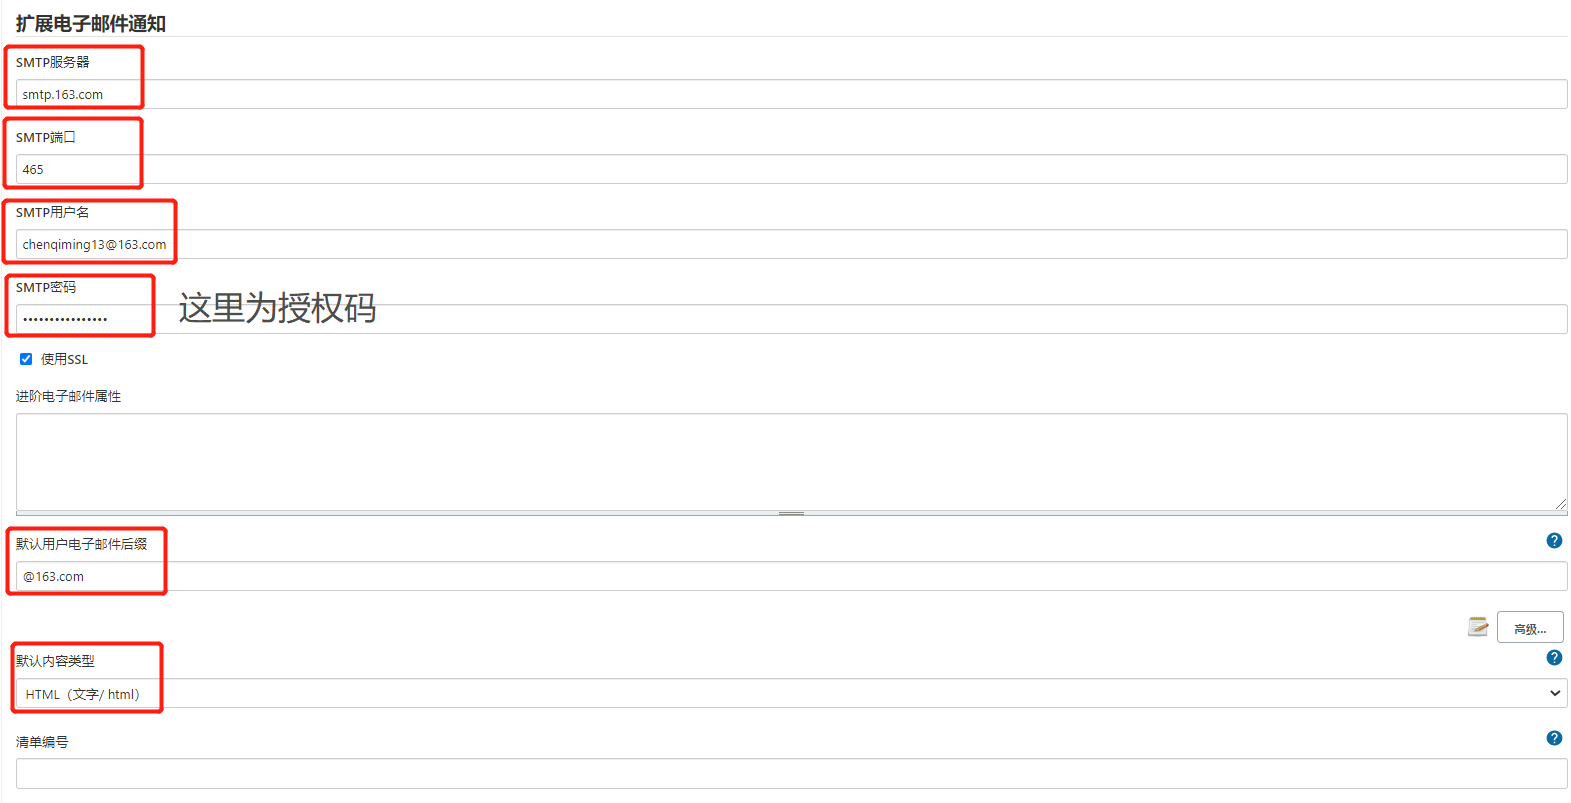
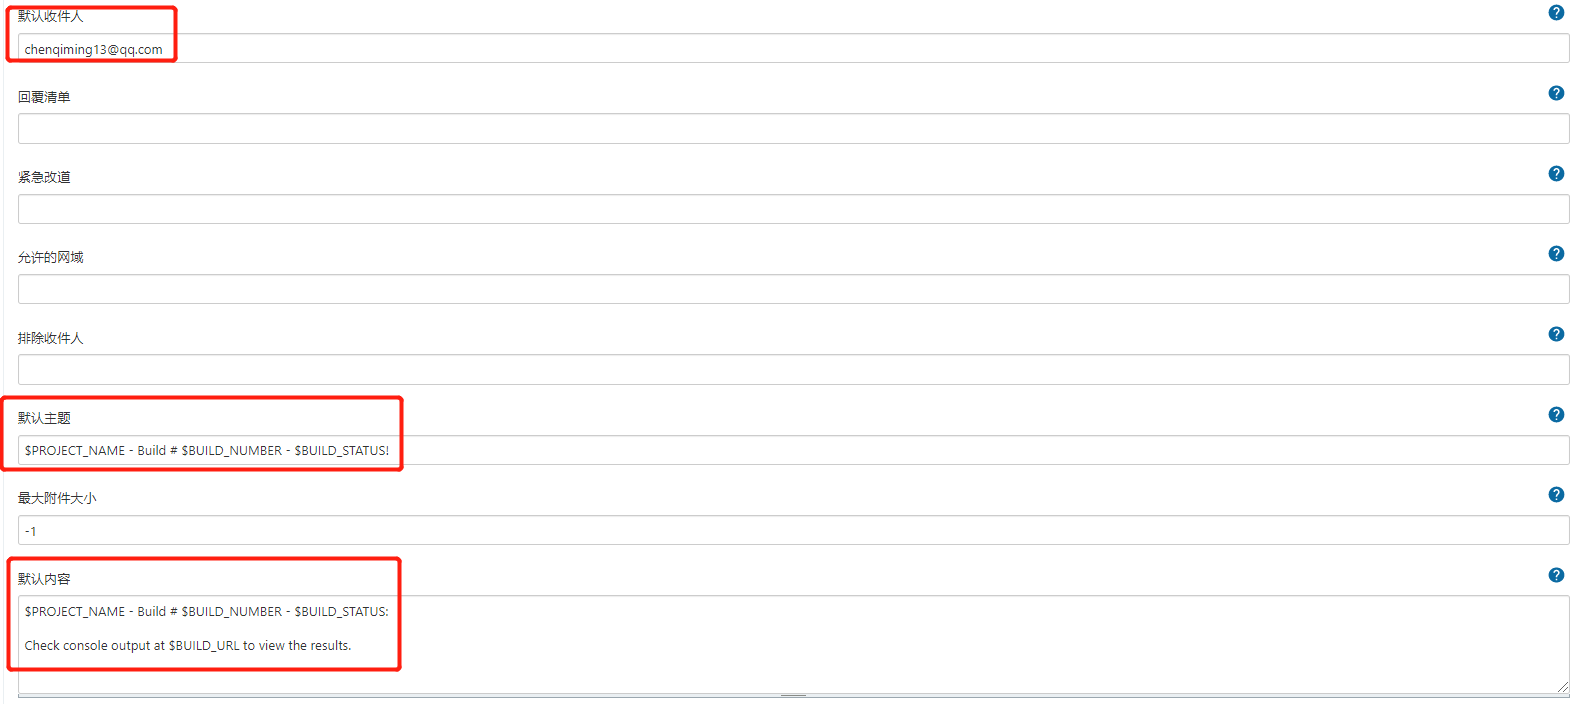
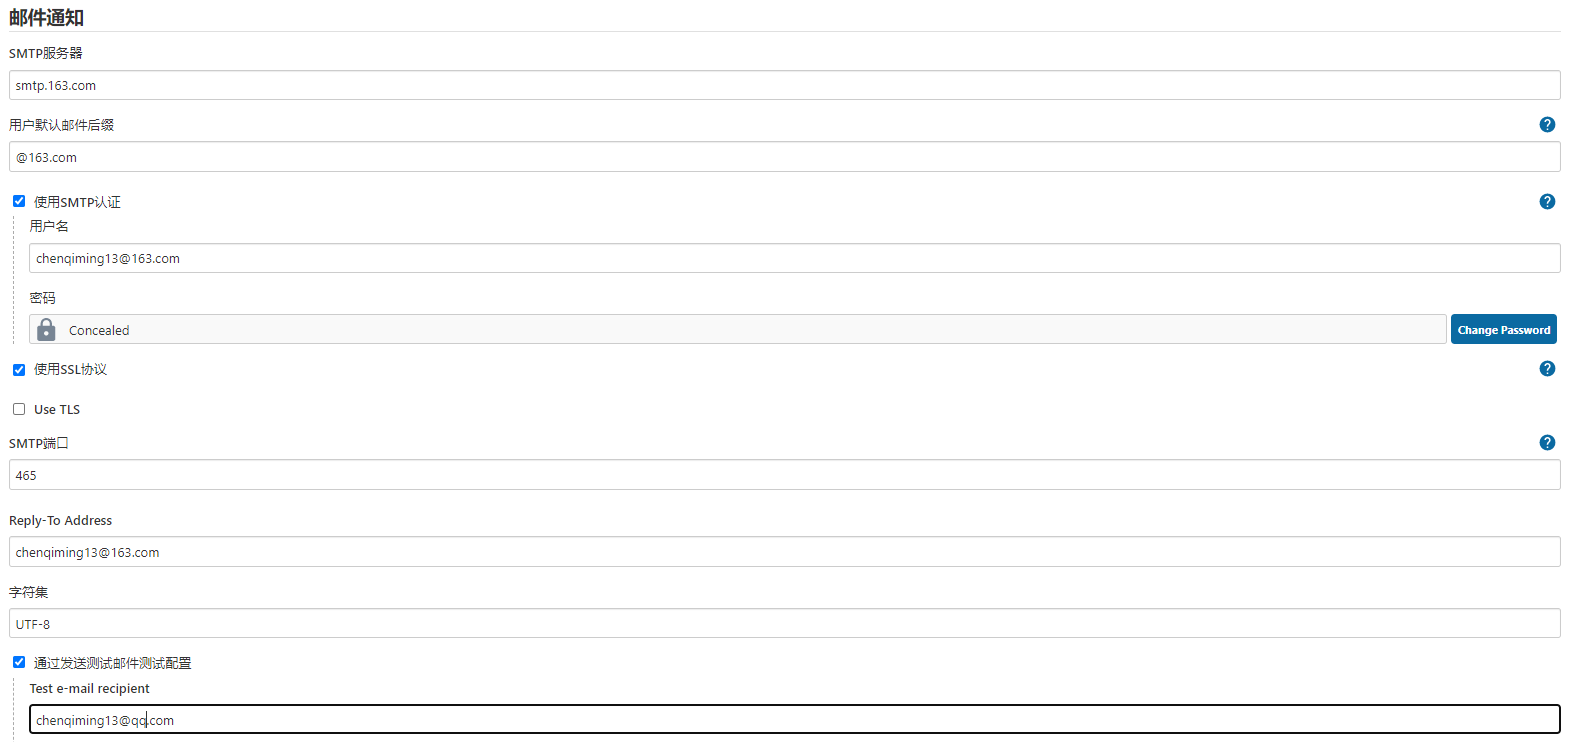
  1. 安装Email Extension插件

  2. 在Jenkins中配置

配置邮件服务器发送构建结果一配置邮件服务器发送构建结果二

配置邮件服务器发送构建结果三

配置邮件服务器发送构建结果四

  1. 在项目中创建一个email.html文件,添加以下内容并推送到gitlab中
1
2
3
4
5
6
7
8
9
10
11
12
13
14
15
16
17
18
19
20
21
22
23
24
25
26
27
28
29
30
31
32
33
34
35
36
37
38
39
40
41
42
43
44
45
46
47
48
49
50
51
52
53
54
55
56
57
58
59
60
61
62
63
64
65
<!DOCTYPE html>
<html>
<head>
<meta charset="UTF-8">
<title>${PROJECT_NAME}-第${BUILD_NUMBER}次构建日志</title>
</head>

<body leftmargin="8" marginwidth="0" topmargin="8" marginheight="4">
<table width="95%" cellpadding="0" cellspacing="0"
style="font-size: 11pt; font-family: Tahoma, Arial, Helvetica, sans-serif">
<tr>
<td>(本邮件是程序自动下发的,请勿回复!)<br/></td>
</tr>
<tr>
<td><h2>
<font color="#0000FF">构建结果 - ${BUILD_STATUS}</font>
</h2></td>
</tr>
<tr>
<td><br />
<b><font color="#0B610B">构建信息</font></b>
<hr size="2" width="100%" align="center" /></td>
</tr>
<tr>
<td>
<ul>
<li>项目名称 : ${PROJECT_NAME}</li>
<li>构建编号 : 第${BUILD_NUMBER}次构建</li>
<li>触发原因: ${CAUSE}</li>
<li>构建日志: <a href="${BUILD_URL}console">${BUILD_URL}console</a></li>
<li>构建 Url : <a href="${BUILD_URL}">${BUILD_URL}</a></li>
<li>工作目录 : <a href="${PROJECT_URL}ws">${PROJECT_URL}ws</a></li>
<li>项目 Url : <a href="${PROJECT_URL}">${PROJECT_URL}</a></li>
</ul>
</td>
</tr>
<tr>
<td><b><font color="#0B610B">Changes Since Last Successful Build:</font></b>
<hr size="2" width="100%" align="center" /></td>
</tr>
<tr>
<td>
<ul>
<li>历史变更记录 : <a href="${PROJECT_URL}changes">${PROJECT_URL}changes</a></li>
</ul> ${CHANGES_SINCE_LAST_SUCCESS,reverse=true, format="Changes for Build #%n:<br />%c<br />",showPaths=true,changesFormat="<pre>[%a]<br />%m</pre>",pathFormat=" %p"}
</td>
</tr>
<tr>
<td> <hr size="2" width="100%" align="center" /></td>
</tr>
<tr>
<td></td>
</tr>
<tr>
<td><b><font color="#0B610B">构建情况总览:</font></b>${TEST_COUNTS,var="fail"}<br/>
<hr size="2" width="100%" align="center" /></td>
</tr>
<tr>
<td><textarea cols="80" rows="30" readonly="readonly"
style="font-family: Courier New">${BUILD_LOG,maxLines=23}</textarea>
</td>
</tr>
</table>
</body>
</html>
  1. 在Jenkinsfile中添加发送email功能,post即指构建后操作
1
2
3
4
5
6
7
8
9
post {
always {
emailext(
subject: '构建通知:${PROJECT_NAME} - Build # ${BUILD_NUMBER} - ${BUILD_STATUS}!',
body: '${FILE,path="email.html"}',
to: 'chenqiming13@qq.com'
)
}
}
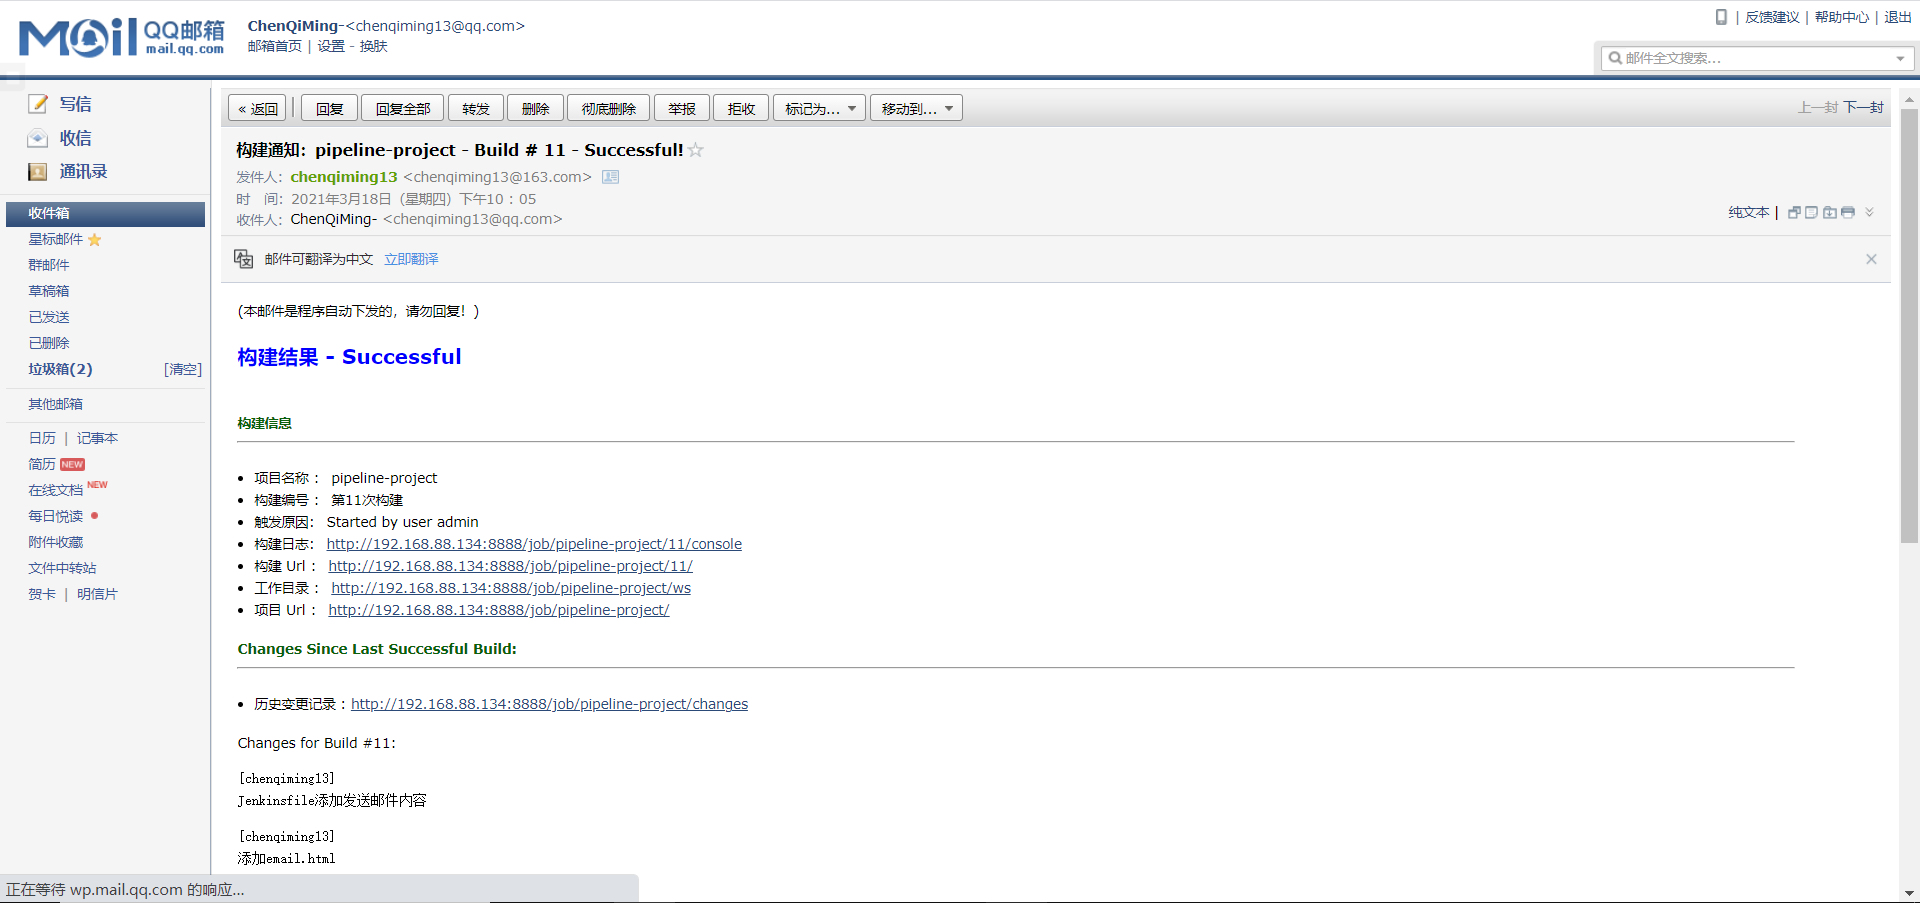
  1. 构建测试是否收到邮件

配置邮件服务器发送构建结果五

五、Jenkins+SonarQube代码审查

sonarqube图标

sonarqube是一个用于管理代码质量的开放平台,可以快速定位代码中潜在的错误。

环境要求:

  1. JDK11
  2. PostgreSQL

5.1 安装PostgreSQL

  1. 新版本的sonarqube不再支持MySQL,所以在Jenkins服务器上安装PostgreSQL并创建一个sonar数据库
1
2
3
4
5
6
7
8
9
10
11
12
13
14
15
16
17
18
19
20
21
22
23
#安装postgresql
yum -y install https://download.postgresql.org/pub/repos/yum/9.6/redhat/rhel-7-x86_64/pgdg-redhat-repo-latest.noarch.rpm
yum -y install postgresql96-server postgresql96-contrib

#初始化postgresql
postgresql-9.6-setup initdb
systemctl enable postgresql-9.6.service
systemctl start postgresql-9.6.service

#初始化之后会自动创建postgres用户,切换用户
su - postgres

#psql进入命令行模式配,\q退出
psql
alter user postgres with password 'toortoor';
create database sonar;
create user sonar;
alter user sonar with password 'toortoor';
alter role sonar createdb;
alter role sonar superuser;
alter role sonar createrole;
alter database sonar owner to sonar;
\q

postgresql一

  1. 开启远程访问和远程连接
1
2
3
4
5
vim /var/lib/pgsql/9.6/data/postgresql.conf
listen_addresses = '*'
vim /var/lib/pgsql/9.6/data/pg_hba.conf
host all all 127.0.0.1/32 trust
host all all 192.168.88.1/32 trust
  1. 重启服务

5.2 安装SonarQube

  1. 安装sonarqube
1
2
3
4
5
6
wget https://binaries.sonarsource.com/Distribution/sonarqube/sonarqube-8.7.1.42226.zip
unzip sonarqube-8.7.1.42226.zip
mv sonarqube-8.7.1.42226 sonarqube
useradd sonar
chown -R sonar:sonar sonarqube/*
mv sonarqube /opt/sonarqube
  1. 修改sonar配置文件
1
2
3
4
5
6
vim sonarqube/conf/sonar.properties
sonar.jdbc.username=sonar
sonar.jdbc.password=toortoor
sonar.jdbc.url=jdbc:postgresql://localhost/sonarqube?currentSchema=my_schema
sonar.jdbc.url=jdbc:postgresql://localhost/sonar?currentSchema=public
sonar.web.port=9000
  1. 启动sonarqube
1
2
3
#只能用sonar用户启动
su sonar
./opt/sonarqube/bin/linux-x86-64/sonar.sh start
  1. 遇到的问题
1
2
3
4
5
6
#sonar用户线程数不够,*代表所有用户
cat /etc/security/limits.conf
* soft nofile 65536
* hard nofile 65536
* soft noproc 65535
* hard noproc 65535
  1. deploy.yaml
1
2
3
4
5
6
7
8
9
10
11
12
13
14
15
16
17
18
19
20
21
22
23
24
25
26
27
28
29
30
31
32
33
34
35
36
37
38
39
40
41
42
43
44
45
46
47
48
49
50
51
52
53
54
55
56
57
58
59
60
61
62
63
64
65
66
67
68
69
70
71
72
73
74
apiVersion: apps/v1
kind: Deployment
metadata:
name: sonarqube
labels:
app: sonarqube
spec:
replicas: 1
selector:
matchLabels:
app: sonarqube
template:
metadata:
name: sonarqube
labels:
app: sonarqube
spec:
initContainers:
- name: init-sysctl
image: busybox
imagePullPolicy: IfNotPresent
command: ["sysctl", "-w", "vm.max_map_count=262144"]
securityContext:
privileged: true
containers:
- name: sonarqube
image: sonarqube:lts-community
imagePullPolicy: IfNotPresent
ports:
- containerPort: 9000
env:
# 此处用到了集群现有的pg
# 数据库用户sonarqube
# 数据库名sonarqube
- name: SONARQUBE_JDBC_USERNAME
value: "sonarqube"
- name: SONARQUBE_JDBC_PASSWORD
value: "dangerous"
- name: SONARQUBE_JDBC_URL
value: "jdbc:postgresql://dcs-installer-gitlab-postgresql.dcs-system:5432/sonarqube"
livenessProbe:
httpGet:
path: /sessions/new
port: 9000
initialDelaySeconds: 60
periodSeconds: 30
readinessProbe:
httpGet:
path: /sessions/new
port: 9000
initialDelaySeconds: 60
periodSeconds: 30
failureThreshold: 6
resources:
limits:
cpu: 2000m
memory: 2048Mi
requests:
cpu: 1000m
memory: 1024Mi

---
apiVersion: v1
kind: Service
metadata:
name: sonarqube
spec:
type: NodePort
selector:
app: sonarqube
ports:
- port: 9000
targetPort: 9000
protocol: TCP

5.3 Jenkins整合SonarQube

实现代码审查一

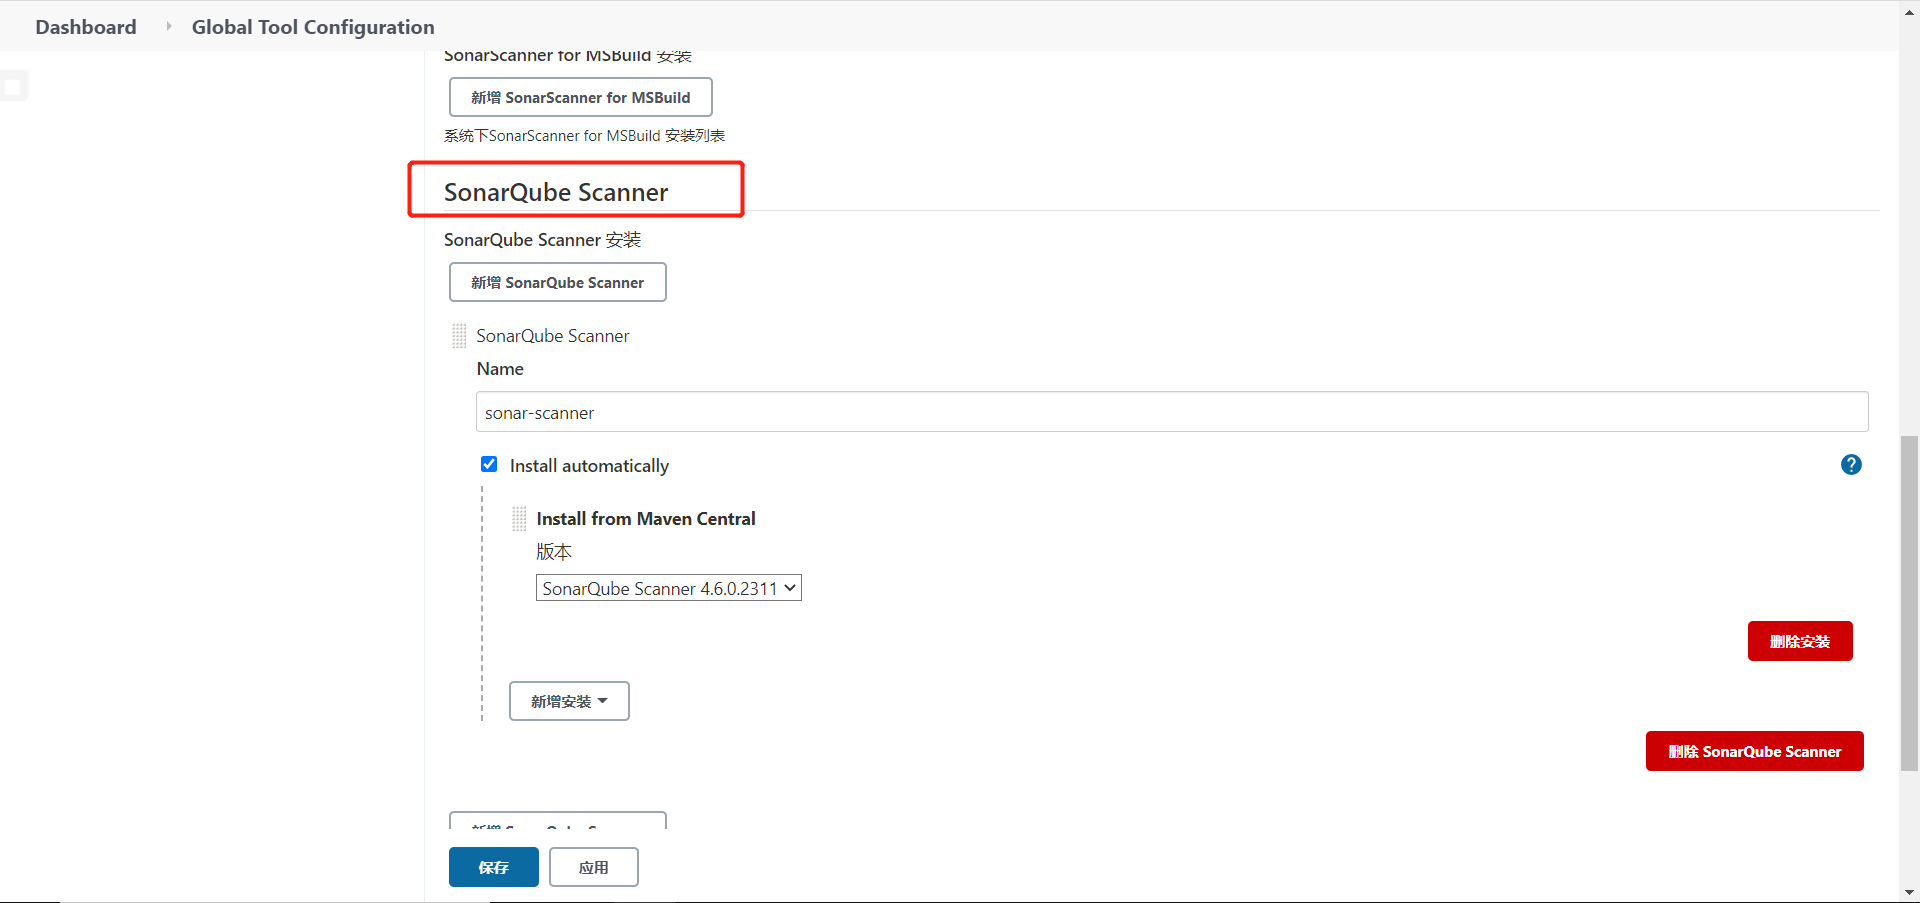
  1. 安装sonarqube scanner插件
  2. 在Jenkins安装sonarqube scanner

实现代码审查二

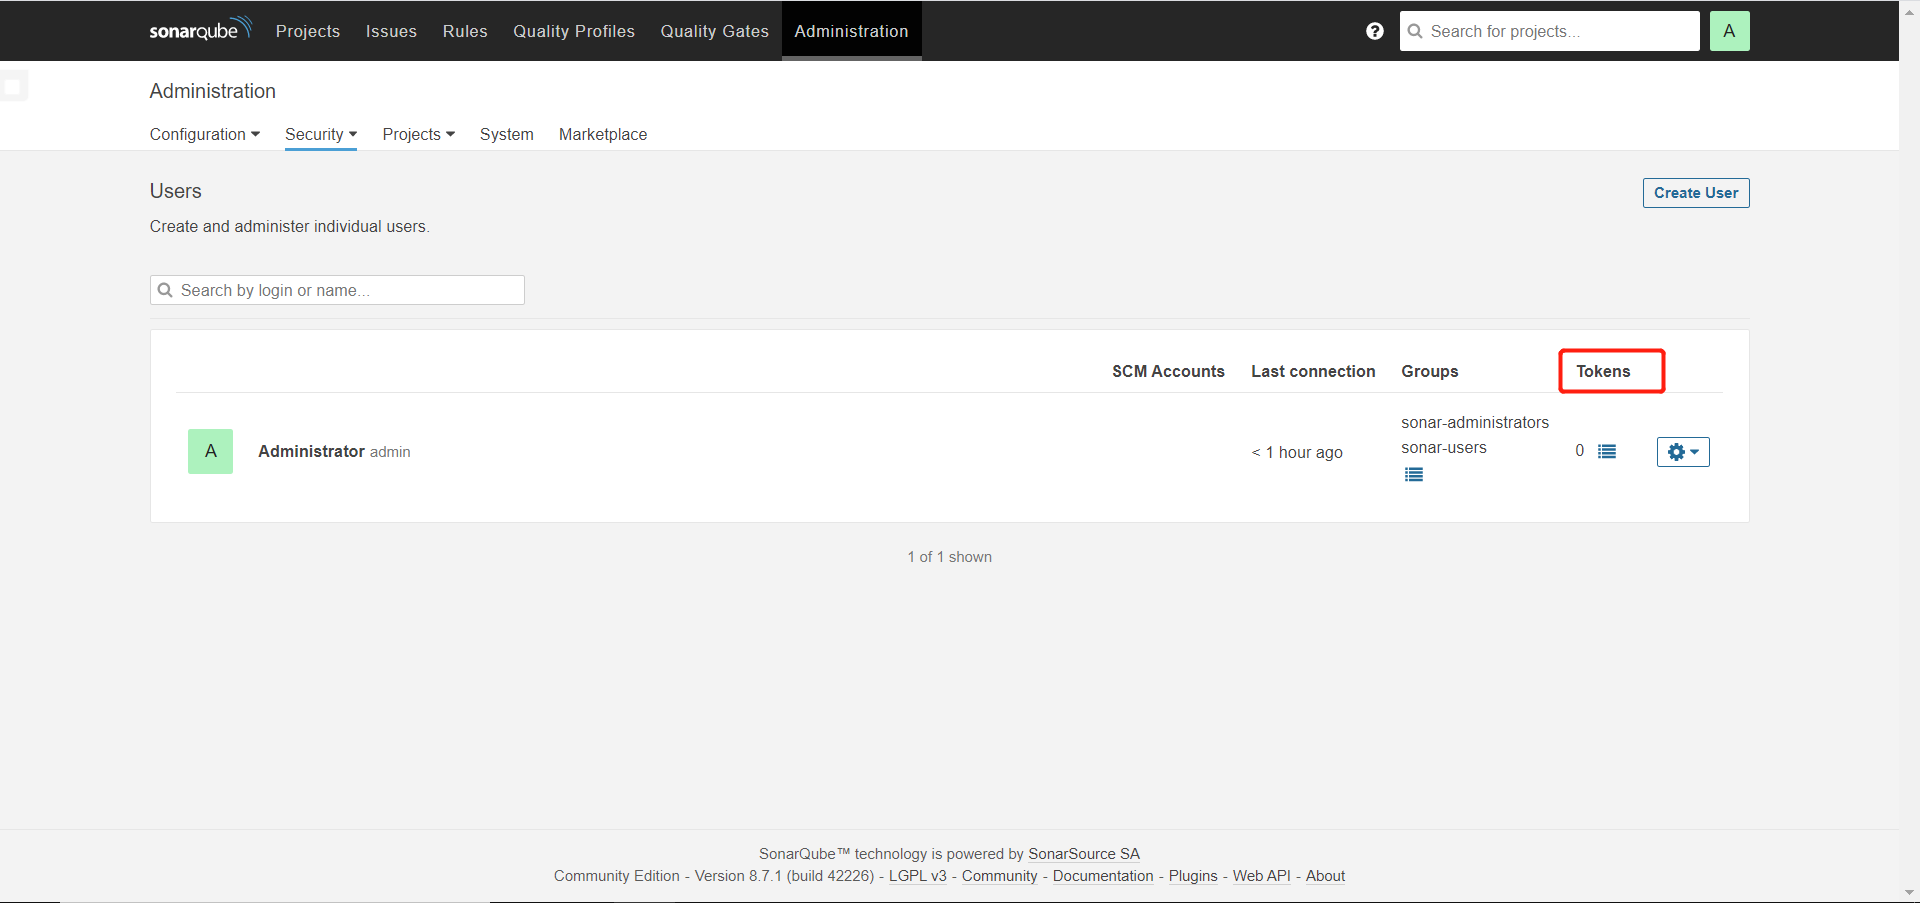
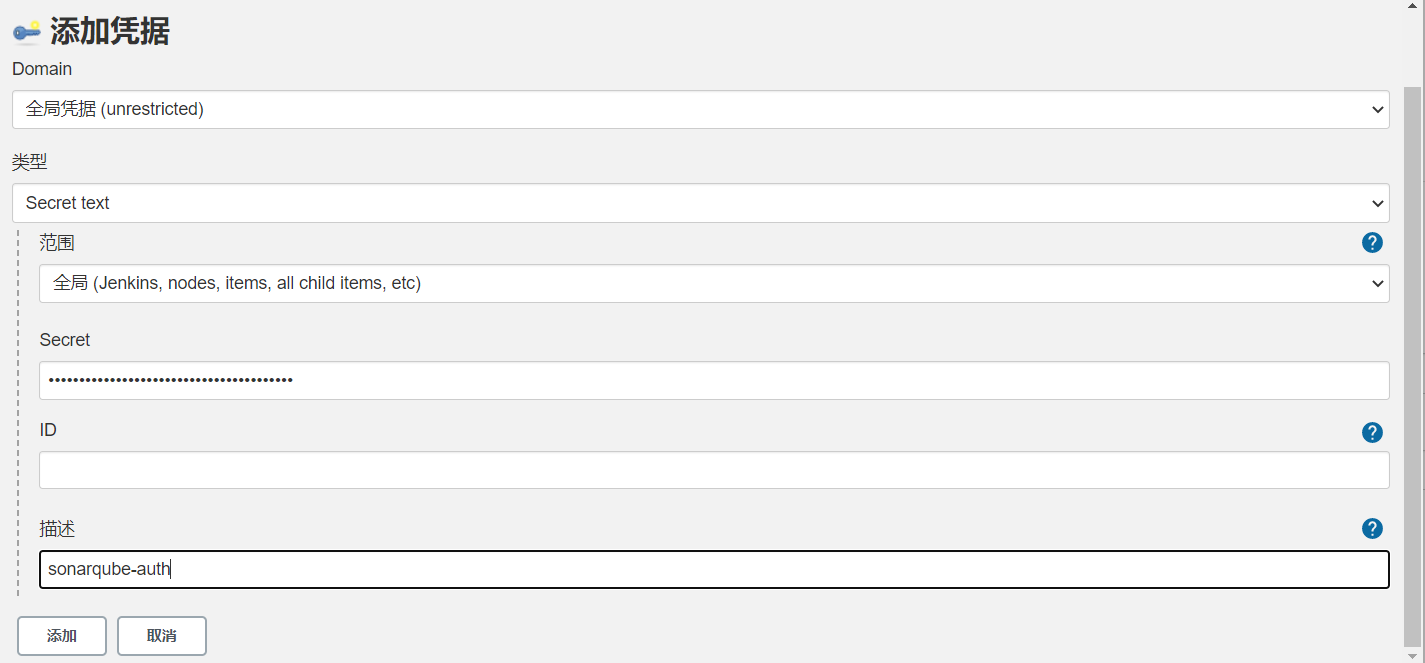
  1. 在sonarqube中生成密钥

实现代码审查二

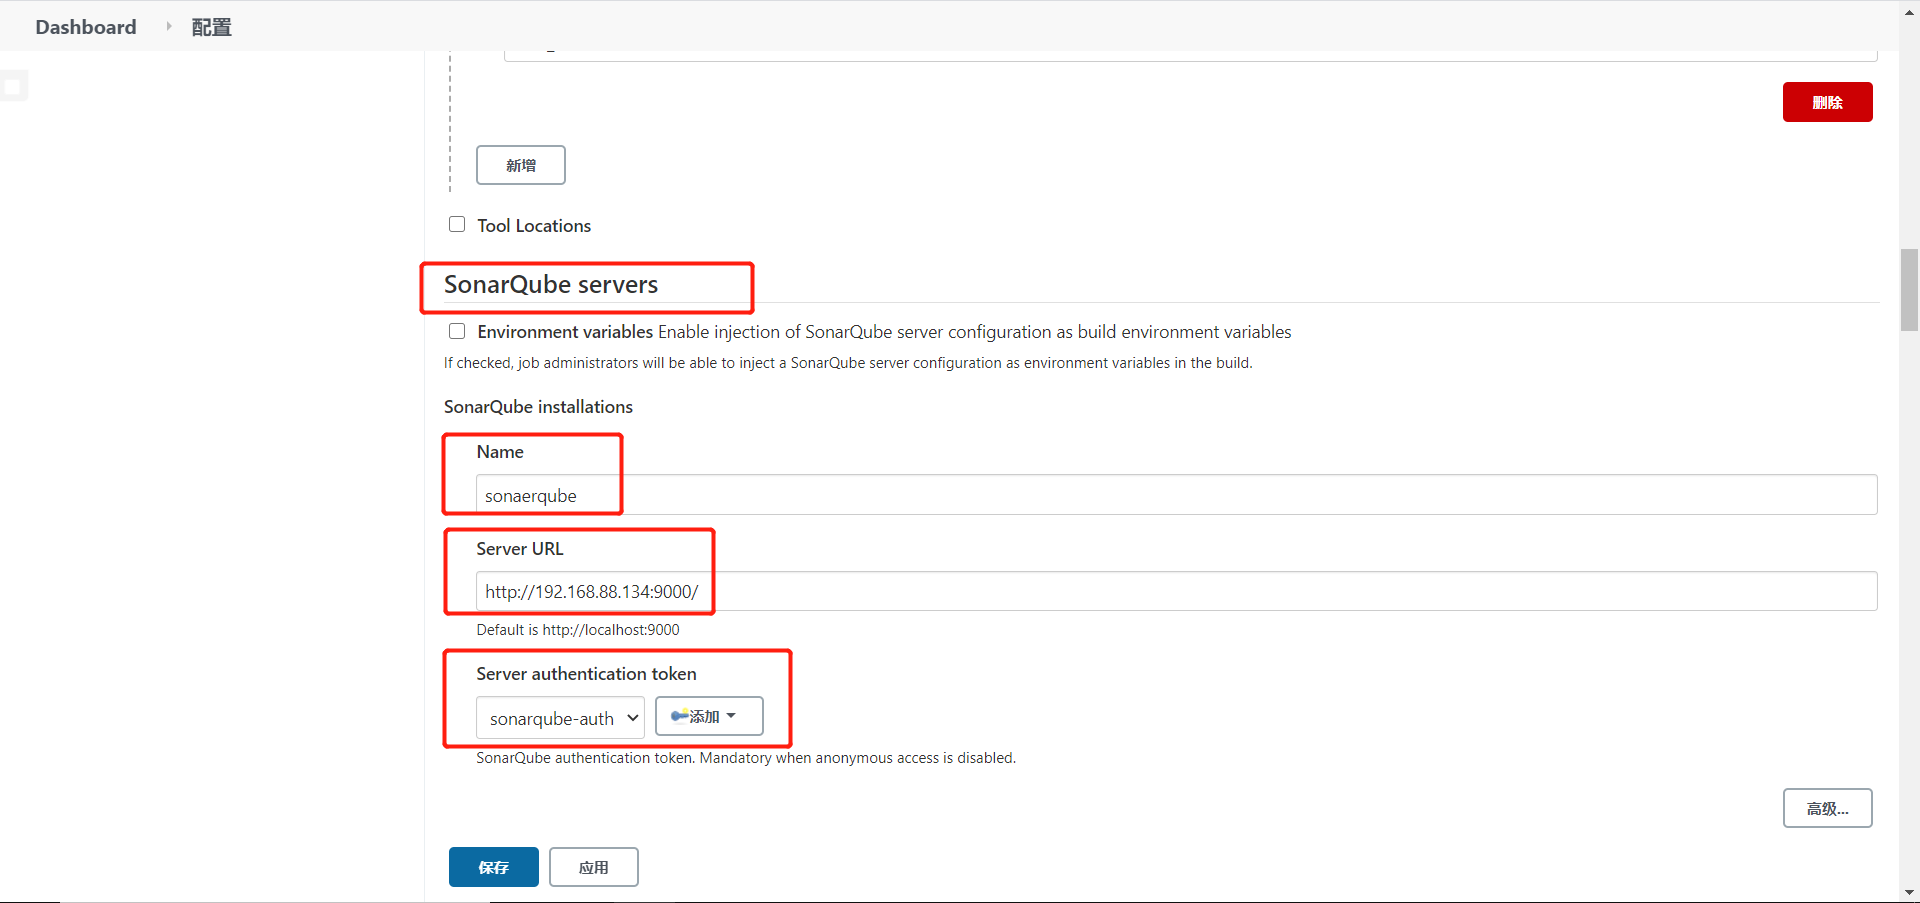
  1. 在系统配置中配置sonarqube server,利用刚刚生成的密钥

实现代码审查五

实现代码审查六

5.4 实现代码审查

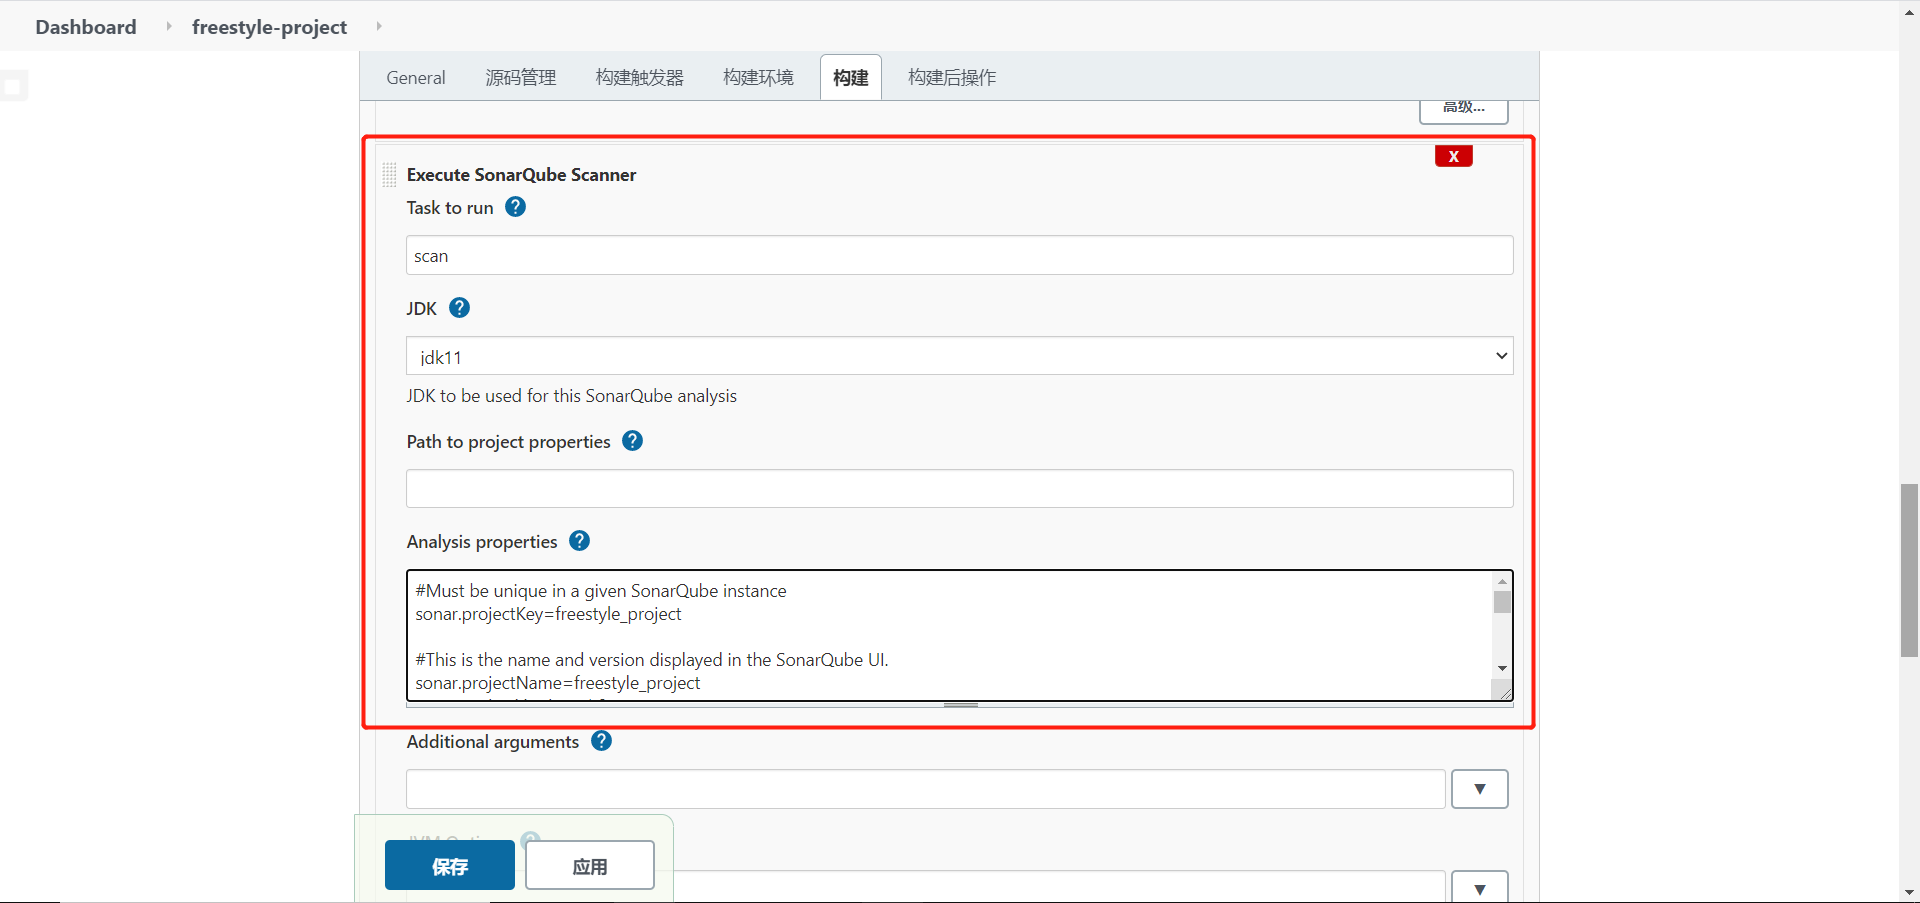
非流水线项目添加代码审查

  1. 在项目中添加构建步骤

实现代码审查七

1
2
3
4
5
6
7
8
9
10
11
12
13
14
15
16
17
18
19
20
21
#Must be unique in a given SonarQube instance
# SonarQube创建项目时的key
sonar.projectKey=freestyle_project

#This is the name and version displayed in the SonarQube UI.
# 项目名称
sonar.projectName=freestyle_project
# 项目版本
sonar.projectVersion=1.0

#Path is relative to the sonar-project.properties file.
#This property is optional if sonar.modules is set.
sonar.sources=.
# 忽略扫描的目录
sonar.exclusions=**/test/**,**/target/**

sonar.java.source=11
sonar.java.target=11

#Encoding of the source code.Default is default system encoding.
sonar.sourceEncoding=UTF-8
  1. 构建项目
  2. 回到sonarqube就可以看到提交的代码审查了

实现代码审查八

流水线项目添加代码审查

  1. 在项目中创建sonar-project.properties
1
2
3
4
5
6
7
8
9
10
11
12
13
14
15
16
17
#Must be unique in a given SonarQube instance
sonar.projectKey=pipeline_project

#This is the name and version displayed in the SonarQube UI.
sonar.projectName=pipeline_project
sonar.projectVersion=1.0

#Path is relative to the sonar-project.properties file.
#This property is optional if sonar.modules is set.
sonar.sources=.
sonar.exclusions=**/test/**,**/target/**

sonar.java.source=11
sonar.java.target=11

#Encoding of the source code.Default is default system encoding.
sonar.sourceEncoding=UTF-8
  1. 修改Jenkinsfile文件
1
2
3
4
5
6
7
8
9
10
11
12
stage('code checking'){
steps {
script {
//引入scanner工具
scannerHome = tool 'sonar-scanner'
}
//引入sonarqube服务器环境
withSonarQubeEnv('sonarqube') {
sh "${scannerHome}/bin/sonar-scanner"
}
}
}
  1. 将Jenkinsfile和sonar-project.properties推送到gitlab
  2. 构建项目后在sonarqube就可以看到代码审查了

实现代码审查九

六、Jenkins+Docker+SpringCloud微服务持续集成

微服务架构

大致流程:

  1. 开发人员push代码到gitlab。
  2. Jenkins服务器进行编译打包并构建镜像推送到harbor镜像仓库(服务器的JAVA环境要与项目对应)。
  3. Jenkins服务器触发远程命令使生产服务器(tomcat)从私有仓库拉取镜像。
  4. 生产服务器(tomcat)生成容器,项目上线。
  5. 用户访问。

6.1 Harbor部署

  1. 下载
1
curl -O https://github.com/goharbor/harbor/releases/download/v2.3.4/harbor-offline-installer-v2.3.4.tgz
  1. 修改 harbor.yml
1
2
3
4
5
6
7
8
9
10
11
12
13
14
15
16
17
18
19
20
21
22
23
24
25
26
27
28
29
30
31
32
33
34
35
36
cp harbor.yml.tmpl harbor.yml
egrep -v '^#|^$|*#' harbor.yml
hostname: 192.168.88.30
http:
port: 81
harbor_admin_password: toortoor
database:
password: toortoor
max_idle_conns: 100
max_open_conns: 900
data_volume: /root/cicd/harbor/data
trivy:
ignore_unfixed: false
skip_update: false
insecure: false
jobservice:
max_job_workers: 10
notification:
webhook_job_max_retry: 10
chart:
absolute_url: disabled
log:
level: info
local:
rotate_count: 50
rotate_size: 200M
location: /root/cicd/harbor/var
_version: 2.3.0
proxy:
http_proxy:
https_proxy:
no_proxy:
components:
- core
- jobservice
- trivy
  1. docker-compose.yaml 文件中指定 harbor 访问端口为 80,避免与 gitlab 冲突, 修改为 81

  2. 通过脚本部署

1
2
./prepare
./install.sh
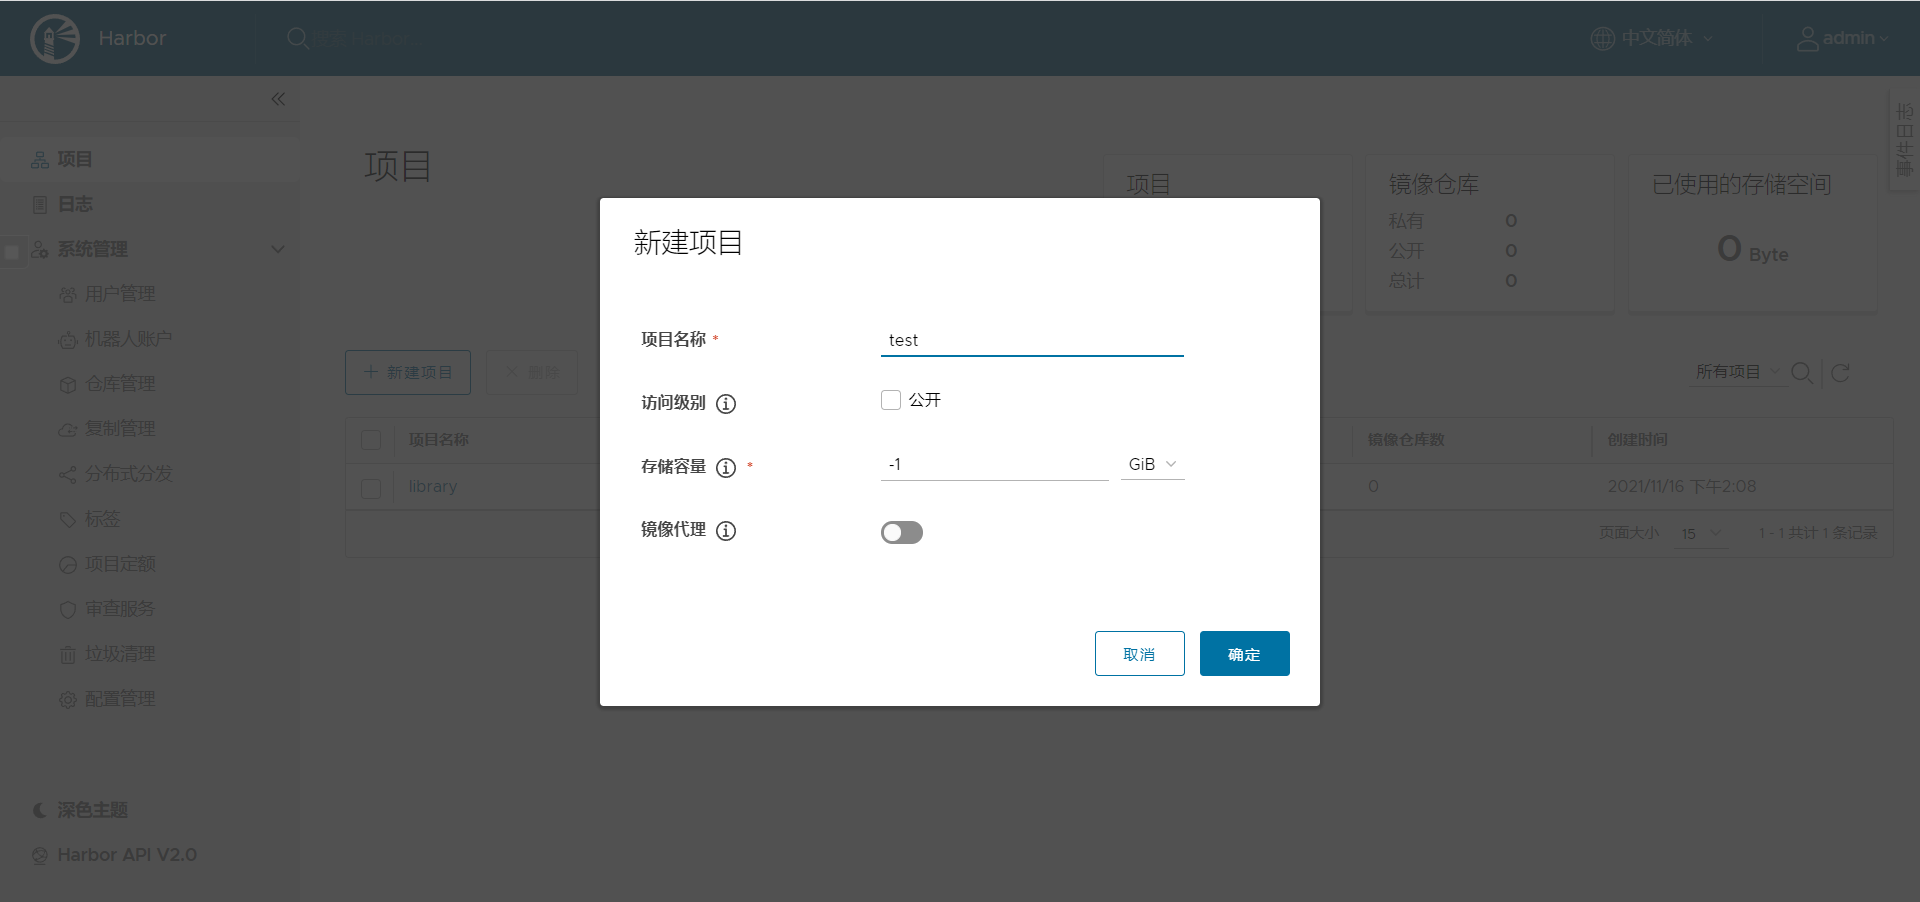
  1. 创建私有仓库

微服务CICD一

  1. 修改 daemon.json,让 docker 信任此仓库
1
2
3
4
{
"registry-mirrors": ["https://5v5rh037.mirror.aliyuncs.com"],
"insecure-registries": ["192.168.88.30:81"]
}
  1. 登录远程镜像仓库
1
docker login -u admin -p toortoor 192.168.88.30:81

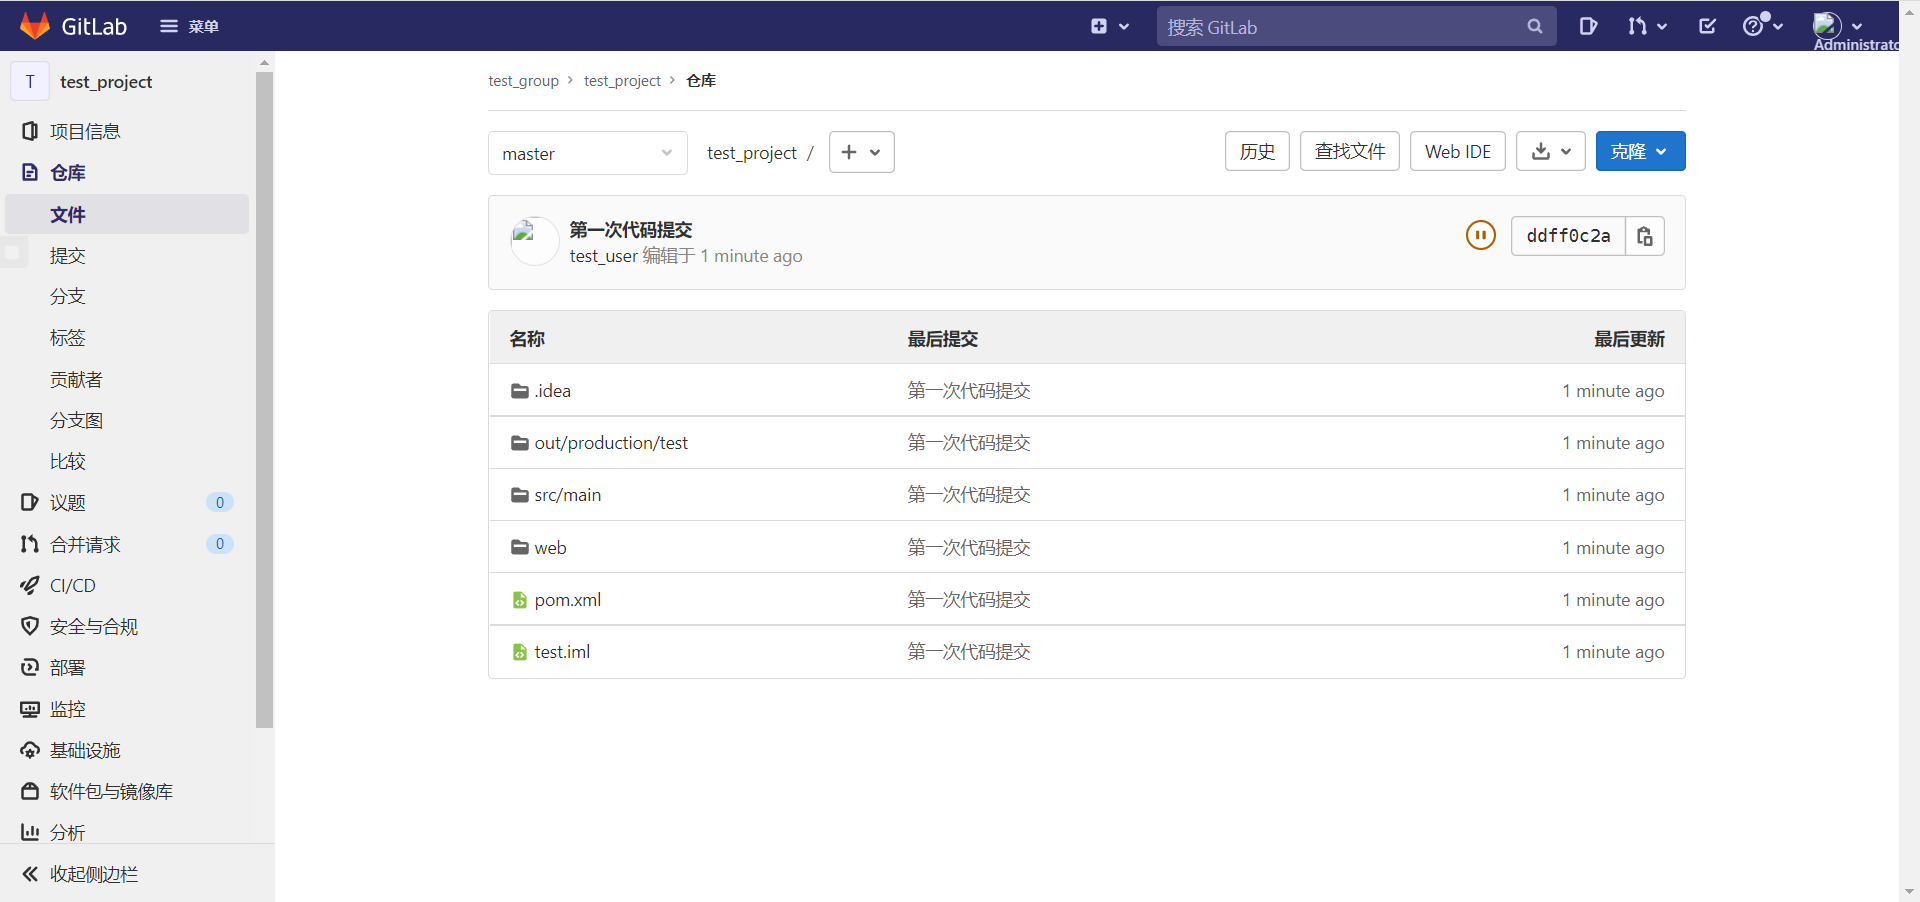
6.2 提交代码到Gitlab

微服务CICD二

6.3 Jenkins创建流水线工程

  1. 创建工程

微服务CICD三


微服务CICD四


微服务CICD七

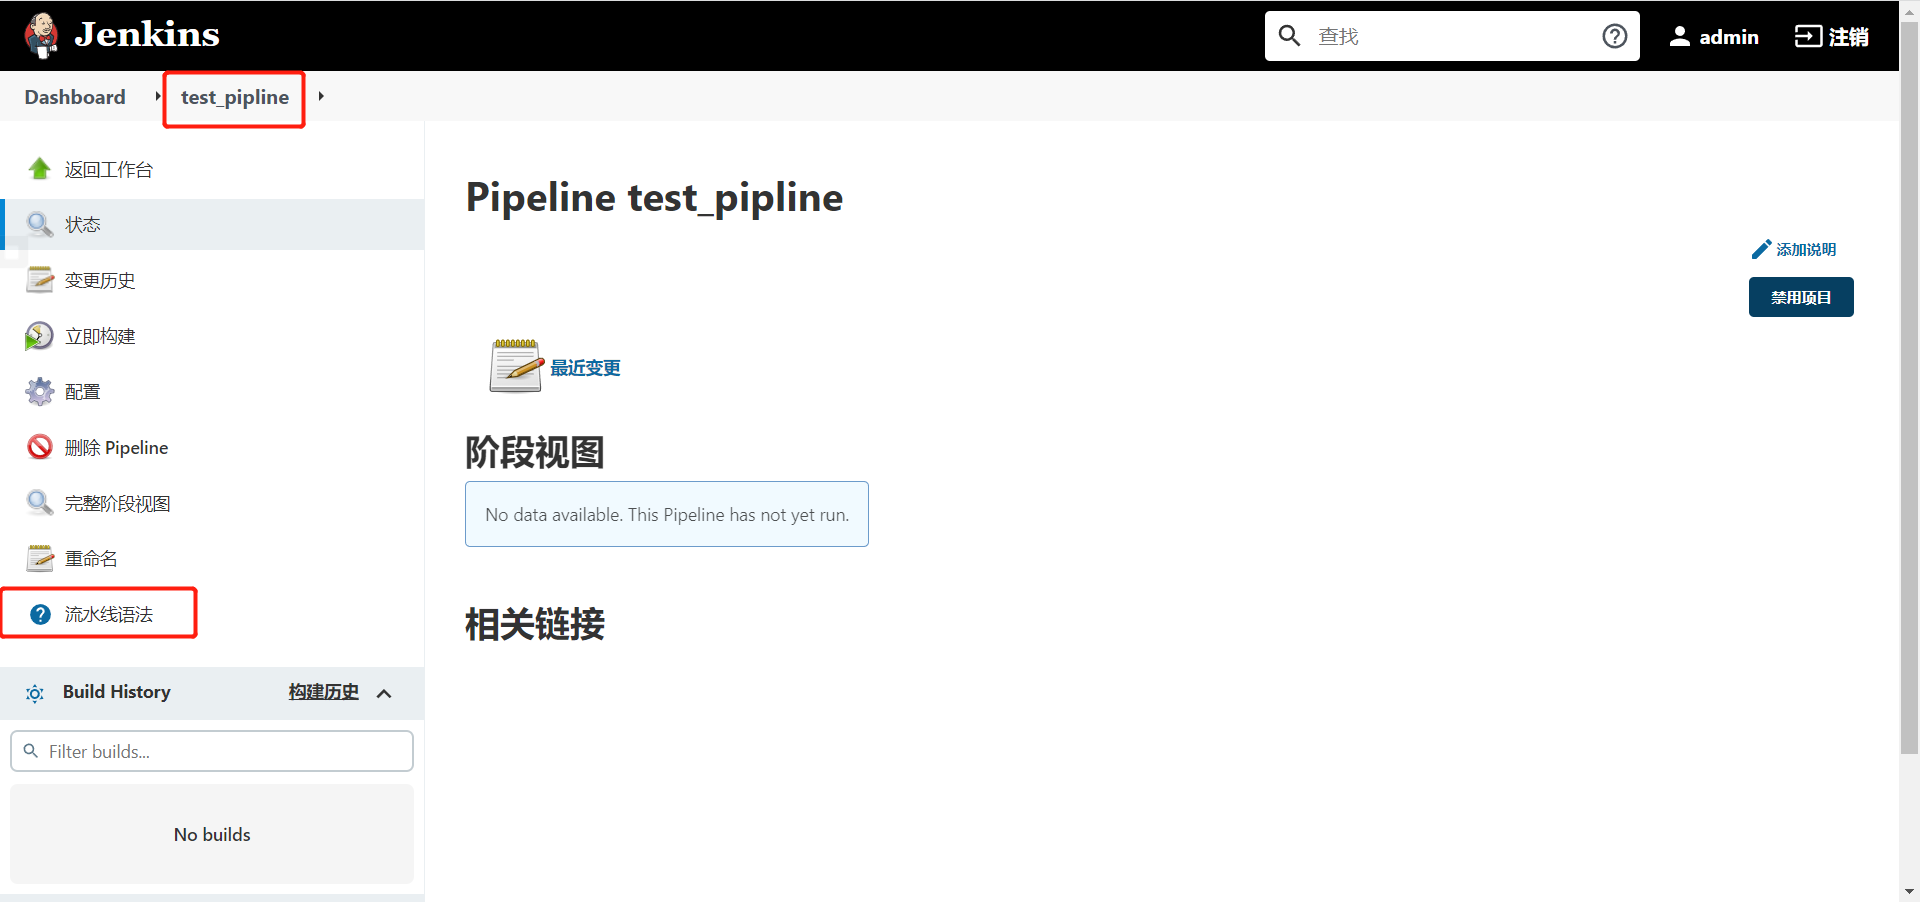
  1. 在项目根目录下创建 Jenkinsfile,通过语法生成器进行编写

微服务CICD五

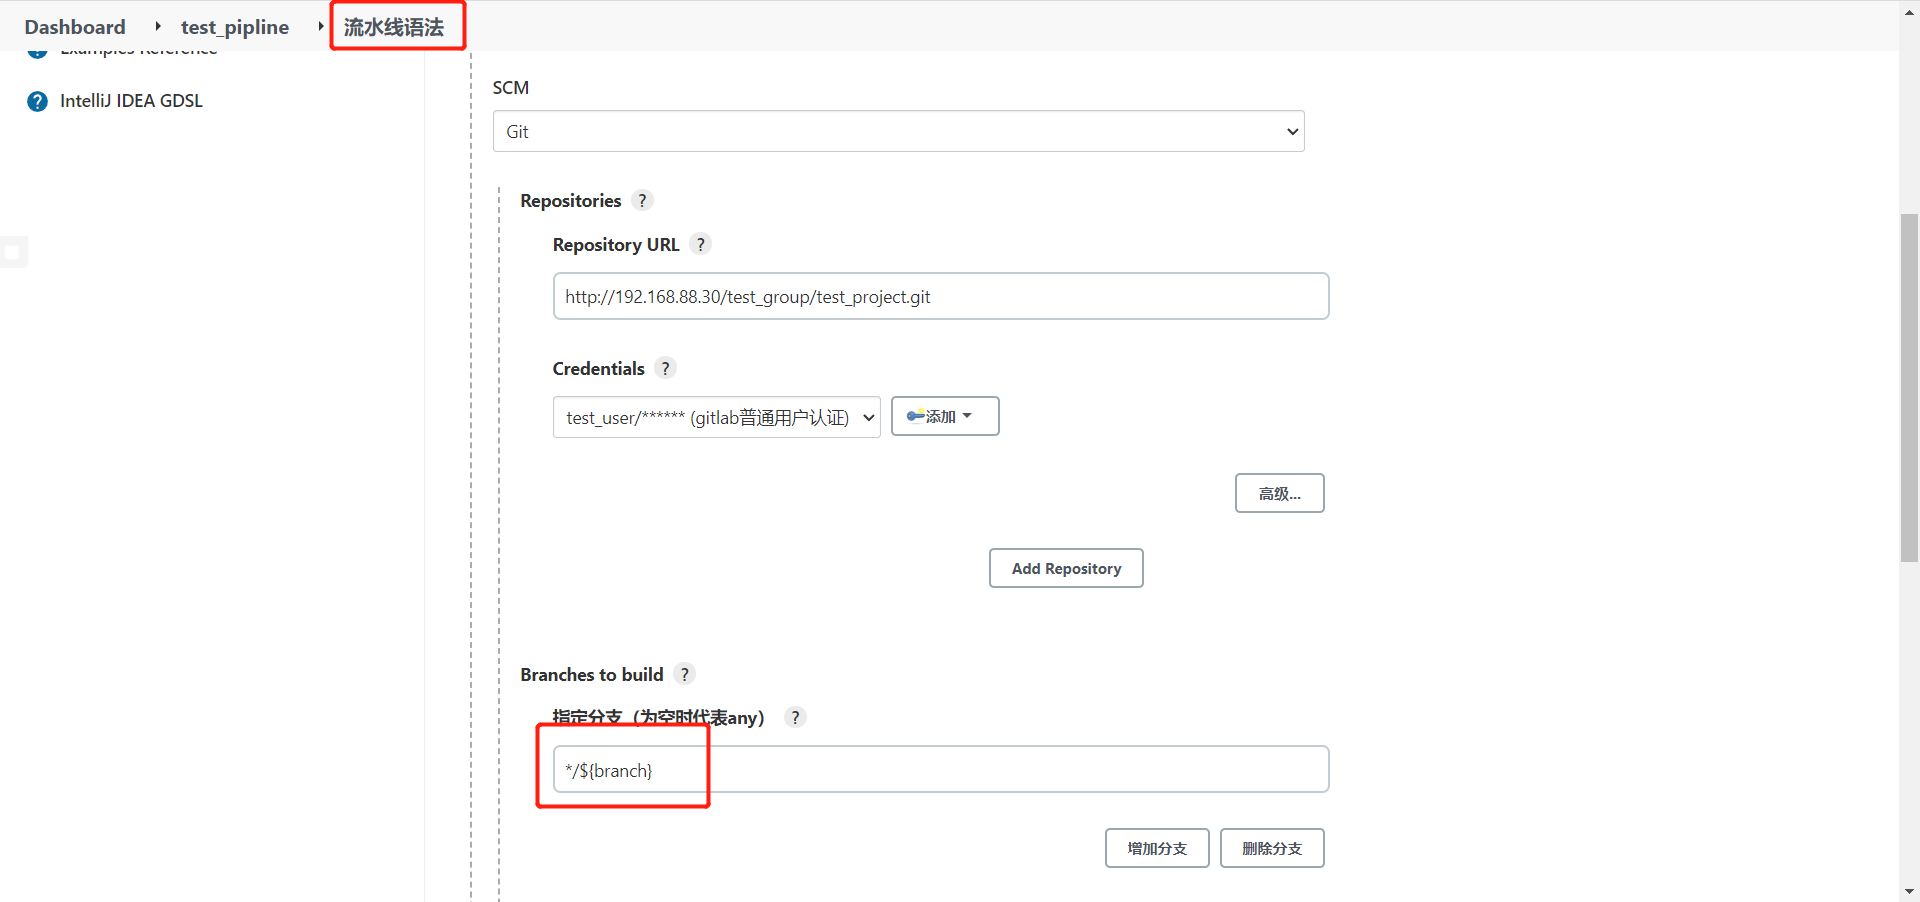
  1. Jenkinsfile 拉取代码部分

微服务CICD六

  1. 在流水线工程中创建参数,如果有多个服务就可以根据参数选择进行构建

微服务CICD十一

  1. Jenkinsfile 添加编译打包微服务工程部分,以及通过 Dockerfile 构建镜像部分
  • 在 pom.xml 中添加 Dockerfile 依赖
1
2
3
4
5
6
7
8
9
10
<plugin>
<groupId>com.spotify</groupId>
<artifactId>dockerfile-maven-plugin</artifactId>
<version>1.4.10</version>
<configuration>
<repository>${project.artifactId}</repository>
<buildArgs>
<JAR_NAME>target/${project.build.finalname}.jar</JAR_NAME>
</buildArgs>
</plugin>
  • 在项目根目录添加 Dockerfile
1
2
3
4
5
6
FROM openjdk:11
ARG JAR_NAME
WORKDIR /usr/src/myapp
EXPOSE 8080
COPY ./${JAR_NAME} /usr/src/myapp/
ENTRYPOINT ["java", "-jar", "/usr/src/myapp/${JAR_NAME}"]
  1. Jenkinsfile 添加上传镜像至 Harbor 部分
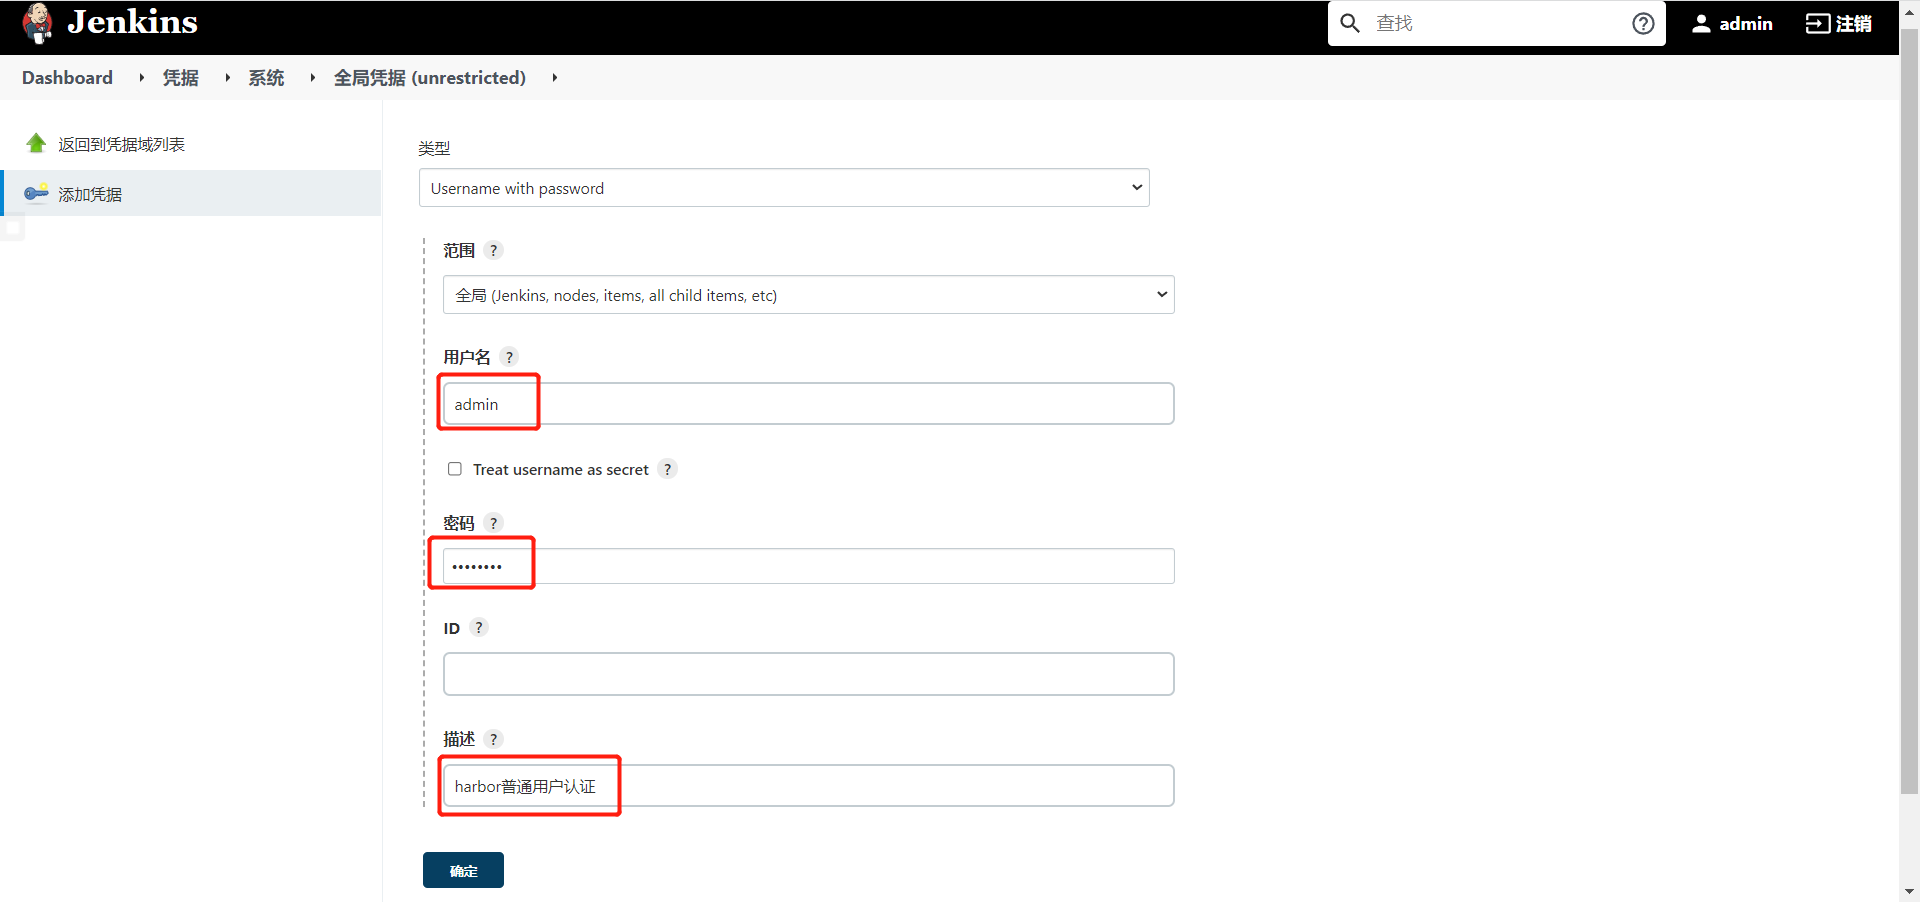
  • 在 Jenkins 中添加 Harbor 账户凭证,以便于上传代码,这里用到的是 Harbor 的用户名和密码

微服务CICD八

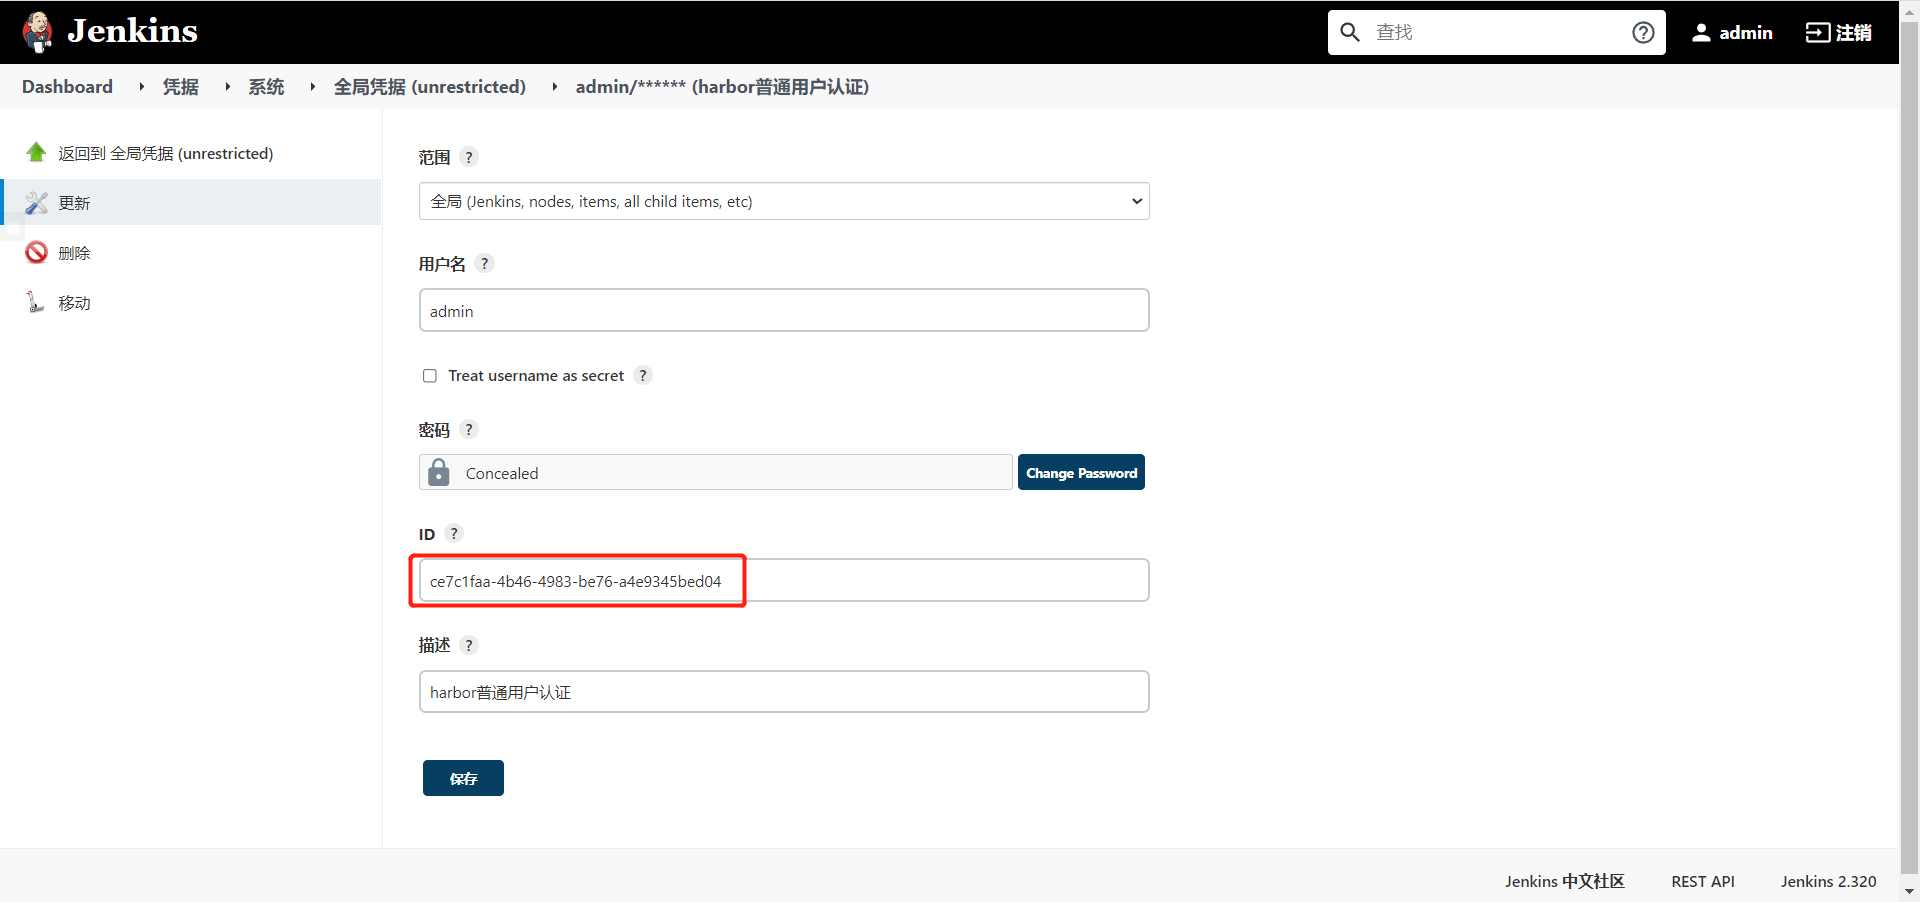
  • 保留好凭证ID

微服务CICD九

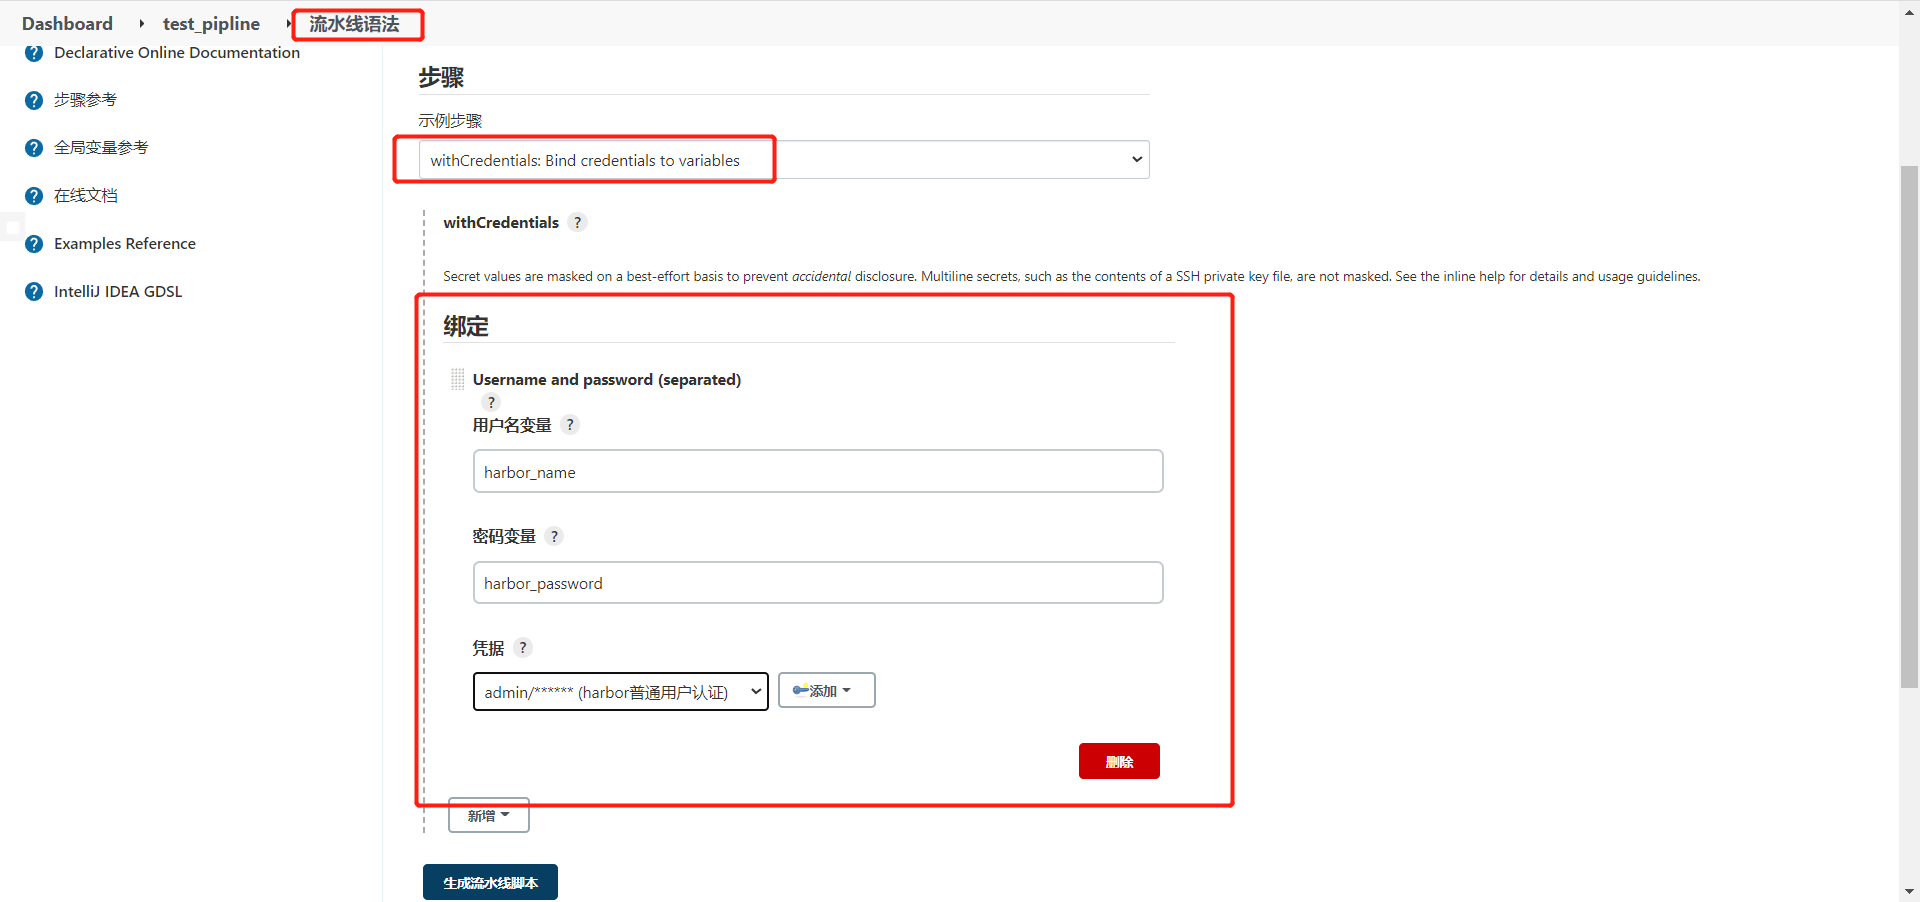
  • 在语法生成器中生成新语法用于登录 Harbor 仓库

微服务CICD十

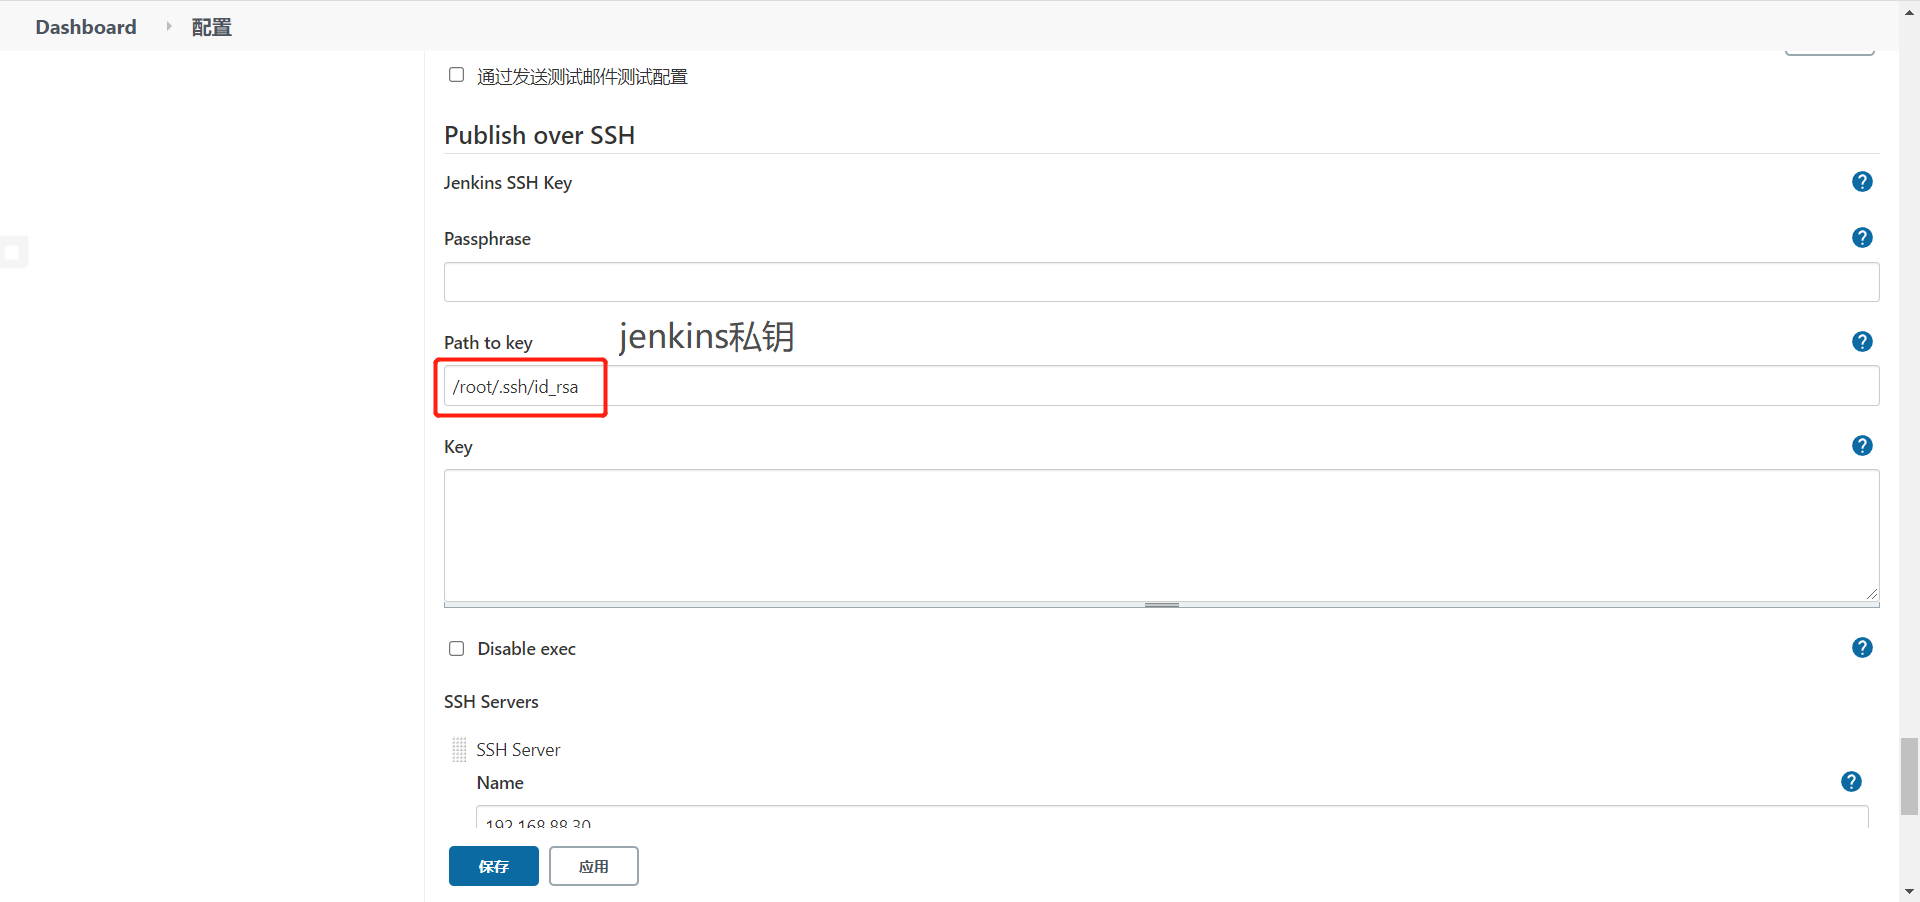
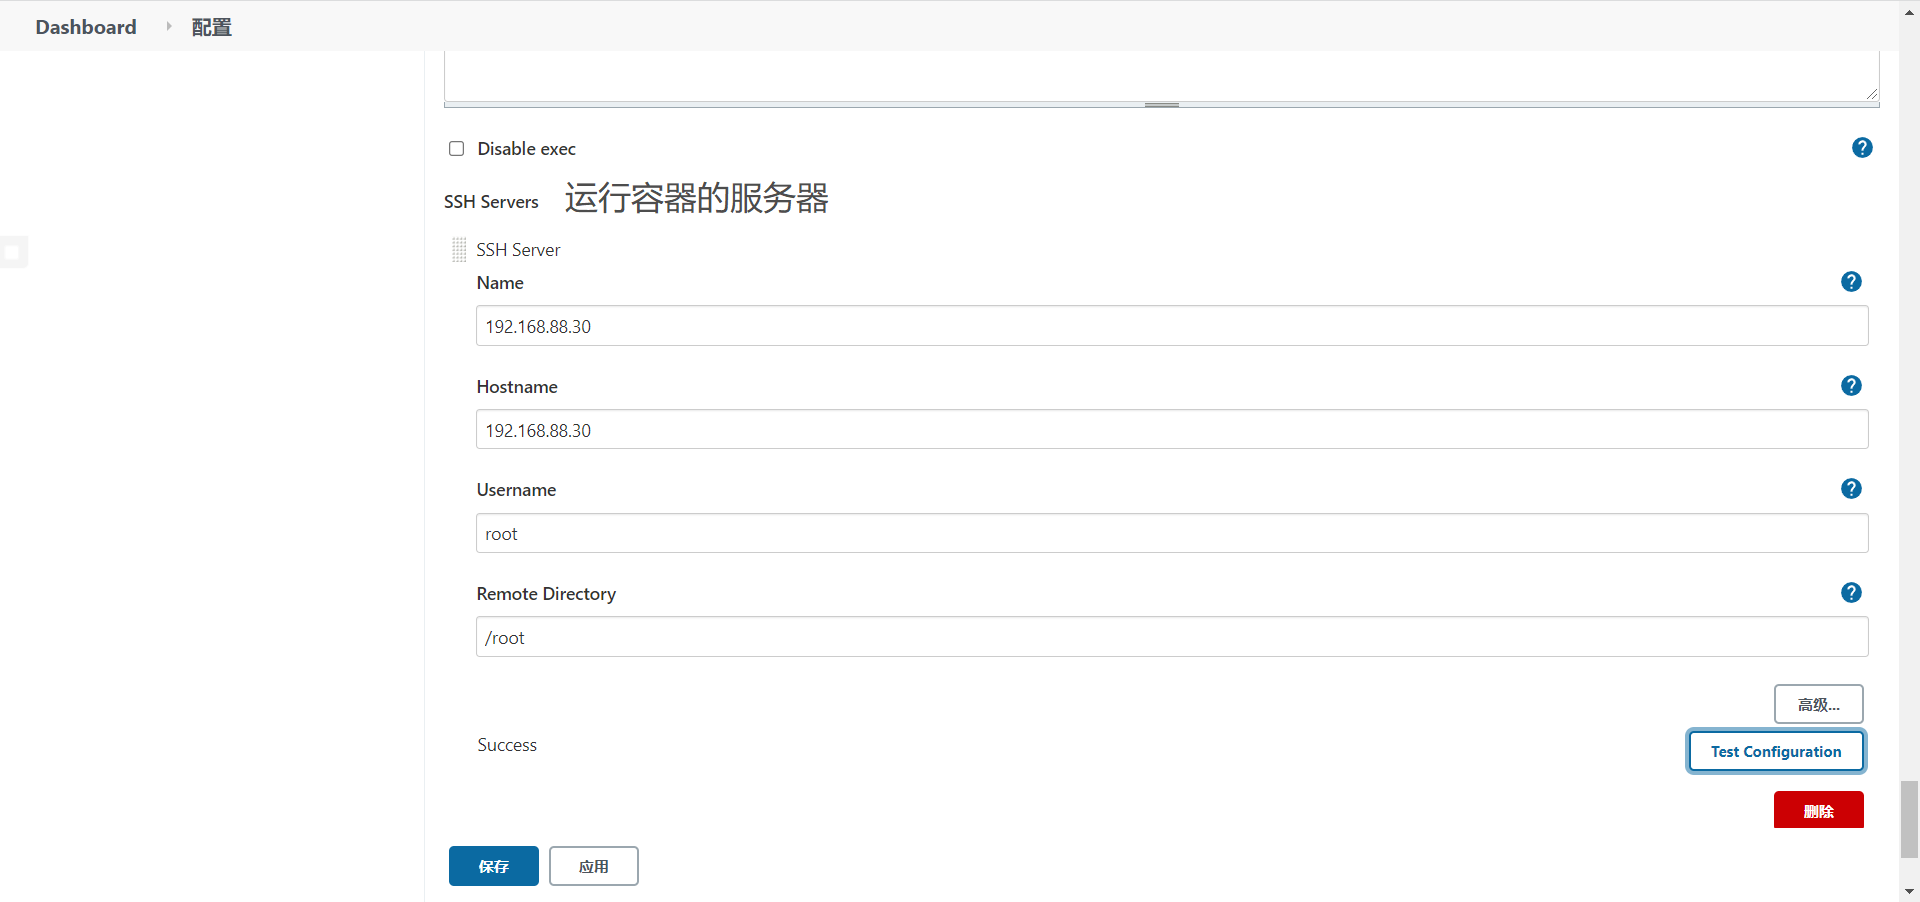
  1. Jenkins 安装 Publish Over SSH 插件,能够对远程主机发送 shell 命令,安装完后先给远程主机发送公钥
1
ssh-copy-id root@192.168.88.30
  • 发送完后在系统配置进行配置

微服务CICD十二


微服务CICD十三

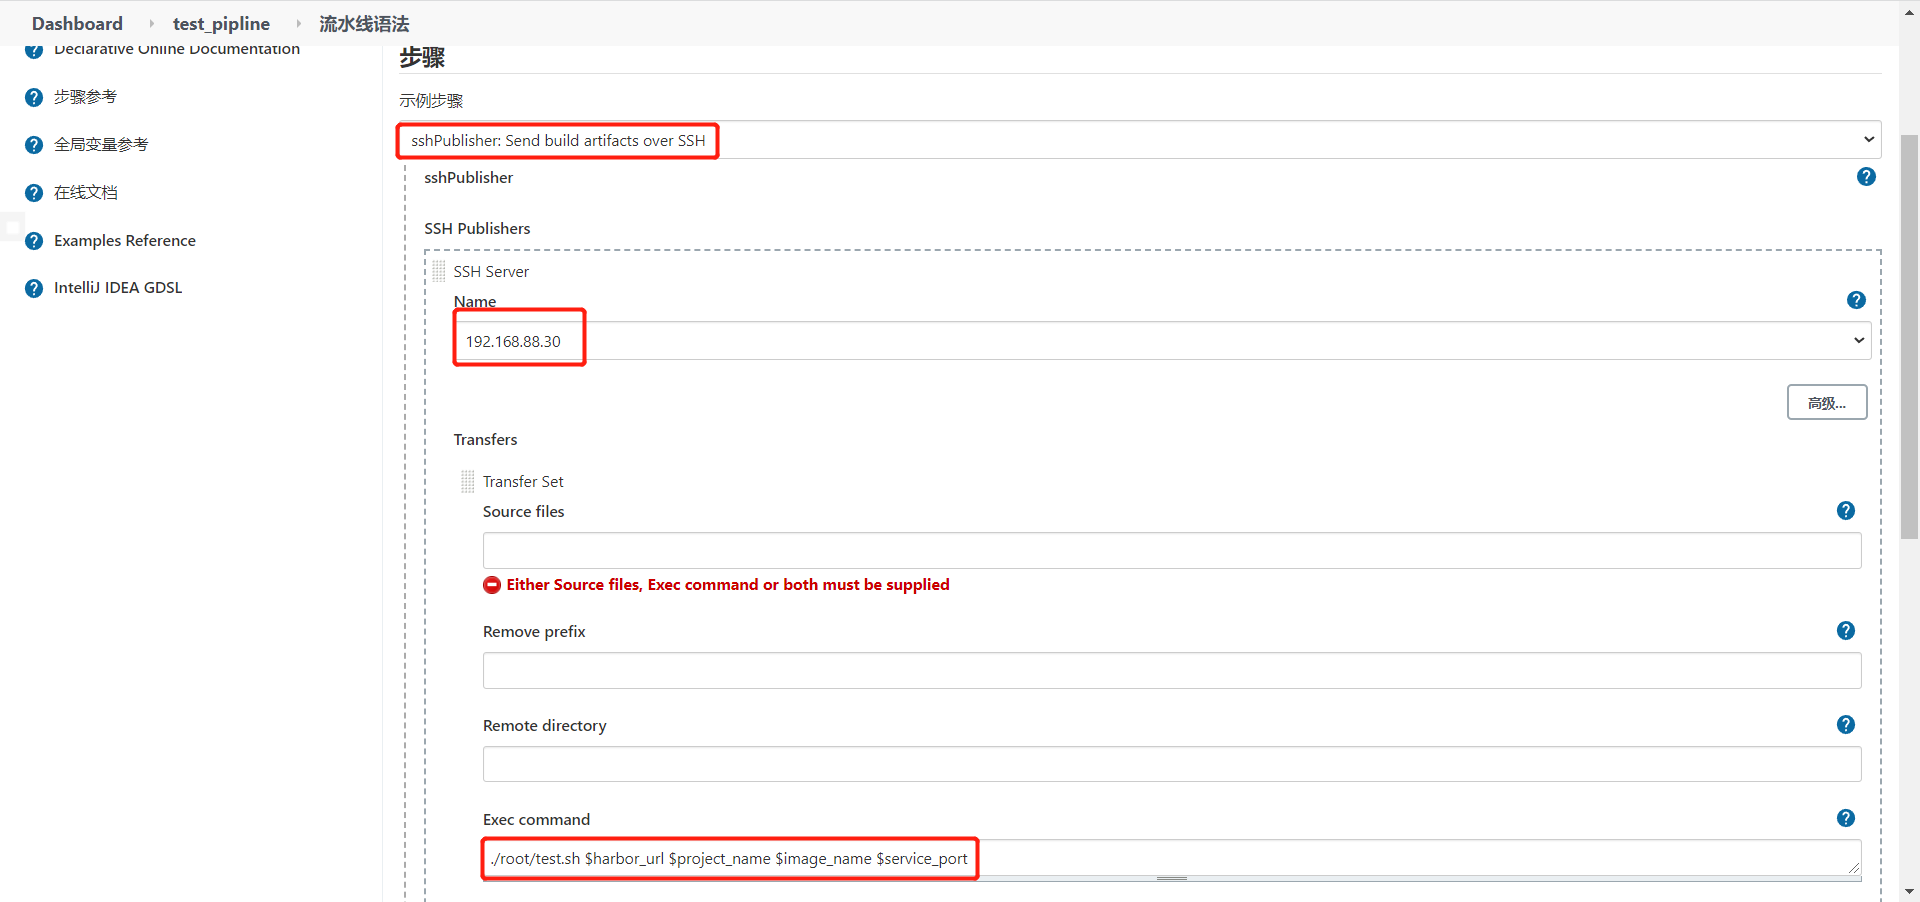
  • 接着生成流水线语法,去远程执行脚本文件 test.sh

微服务CICD十四

test.sh

1
2
3
4
5
6
7
8
9
10
11
12
13
14
15
16
17
18
19
20
21
22
23
24
25
26
27
28
29
30
31
32
33
34
35
36
37
38
39
40
41
42
43
44
45
46
47
48
49
50
51
52
53
54
55
56
57
58
59
60
61
62
63
64
65
66
#!/bin/bash

harbor_url=$1
project_name=$2
image_name=$3
service_port=$4

# 删除none容器
echo "docker rmi none..."
docker images | grep none | awk '{ print "docker rmi "$3 }' | sh &>/dev/null

# 检查是否有已运行容器
num=`docker ps | grep $project_name | wc -l`
if [ $num -gt 0 ]
then
docker stop $project_name && docker rm $project_name &>/dev/null
if [ `echo $?` -eq 0 ]
then
echo "docker stop $project_name && docker rm $project_name [OK]"
else
echo "ERROR: docker stop $project_name && docker rm $project_name"
fi
fi

# 检查是否有重命名镜像
temp=`docker images | grep $image_name | awk '{ print $1":"$2 }' | wc -l`
if [ $temp -eq 1 ]
then
docker rmi $image_name &>/dev/null
if [ `echo $?` -eq 0 ]
then
echo "docker rmi $image_name [OK]"
else
echo "ERROR: docker rmi $image_name"
fi
fi

# 登录镜像仓库
echo "docker login repository..."
docker login -u admin -p toortoor $harbor_url &>/dev/null
if [ `echo $?` -ne 0 ]
then
echo "ERROR: failed to login repository"
else
echo "docker login repository [OK]"
fi

# 拉取镜像
echo "docker pull image..."
docker pull $image_name &>/dev/null
if [ `echo $?` -ne 0 ]
then
echo "ERROR: failed to pull image"
else
echo "docker pull image [OK]"
fi

# 运行容器
echo "docker run container..."
docker run -d --name $project_name -p $service_port:8080 $image_name &>/dev/null
if [ `echo $?` -ne 0 ]
then
echo "ERROR: failed to run container"
else
echo "docker run container [OK]"
fi
  1. 最终的 Jenkinsfile
1
2
3
4
5
6
7
8
9
10
11
12
13
14
15
16
17
18
19
20
21
22
23
24
25
26
27
28
29
30
31
32
33
34
35
36
37
38
39
40
41
42
43
44
45
46
47
48
49
// git凭证id
def git_auth = "bad37d0d-7260-43a2-a350-9abf6e99753a"
// git凭证url
def git_url = "http://192.168.88.30/test_group/test_project.git"
// Harbor地址
def harbor_url = "192.168.88.30:81"
// 镜像仓库名称
def harbor_repository = "test"
// Harbor用户凭证ID
def harbor_auth = "c147d241-a254-48d6-be1c-0d5f0964ce9a"
// 镜像版本号
def image_version = "1.0"
// 拉取的微服务名称
def project_name = "test"
// 微服务所需端口号
def service_port = "8081"


node {
// 拉取代码
stage('Pull Code') {
git branch: "${branch}", credentialsId: "${git_auth}", url: "${git_url}"
}

// 编译,打包微服务工程,构建镜像
stage('Mvn clean package and Docker build') {
sh "mvn clean package dockerfile:build"
}

// 上传镜像至Harbor
stage('Push image to Harbor') {
// 镜像命名,打标签
def image_name = "${project_name}:${image_version}"
sh "docker tag ${project_name}:latest ${harbor_url}/${harbor_repository}/${image_name} && docker rmi ${project_name}:latest"
// 登录Harbor仓库
withCredentials([usernamePassword(credentialsId: "${harbor_auth}", passwordVariable: 'harbor_password', usernameVariable: 'harbor_user')]) {
sh "docker login -u ${harbor_user} -p ${harbor_password} ${harbor_url}"
}
// 镜像上传
sh "docker push ${harbor_url}/${harbor_repository}/${project_name}:${image_version}"
}

// 远程连接服务器拉取镜像运行
stage('Pull image and Running container') {
// 获取镜像命名
def image_name = "${project_name}:${image_version}"
sshPublisher(publishers: [sshPublisherDesc(configName: '192.168.88.30', transfers: [sshTransfer(cleanRemote: false, excludes: '', execCommand: './root/test.sh $harbor_url $project_name $harbor_url/$harbor_repository/image_name $service_port', execTimeout: 120000, flatten: false, makeEmptyDirs: false, noDefaultExcludes: false, patternSeparator: '[, ]+', remoteDirectory: '', remoteDirectorySDF: false, removePrefix: '', sourceFiles: '')], usePromotionTimestamp: false, useWorkspaceInPromotion: false, verbose: false)])
}
}

6.4 微服务架构CICD优化

从以上配置中可以看到,每次构建都只能选择一个服务,且部署的服务器也只有一台,是不符合生产环境的,主要需求有以下三个:

  • 多个微服务同时构建流水线工程
  • 批量处理镜像
  • 将微服务部署服务器集群
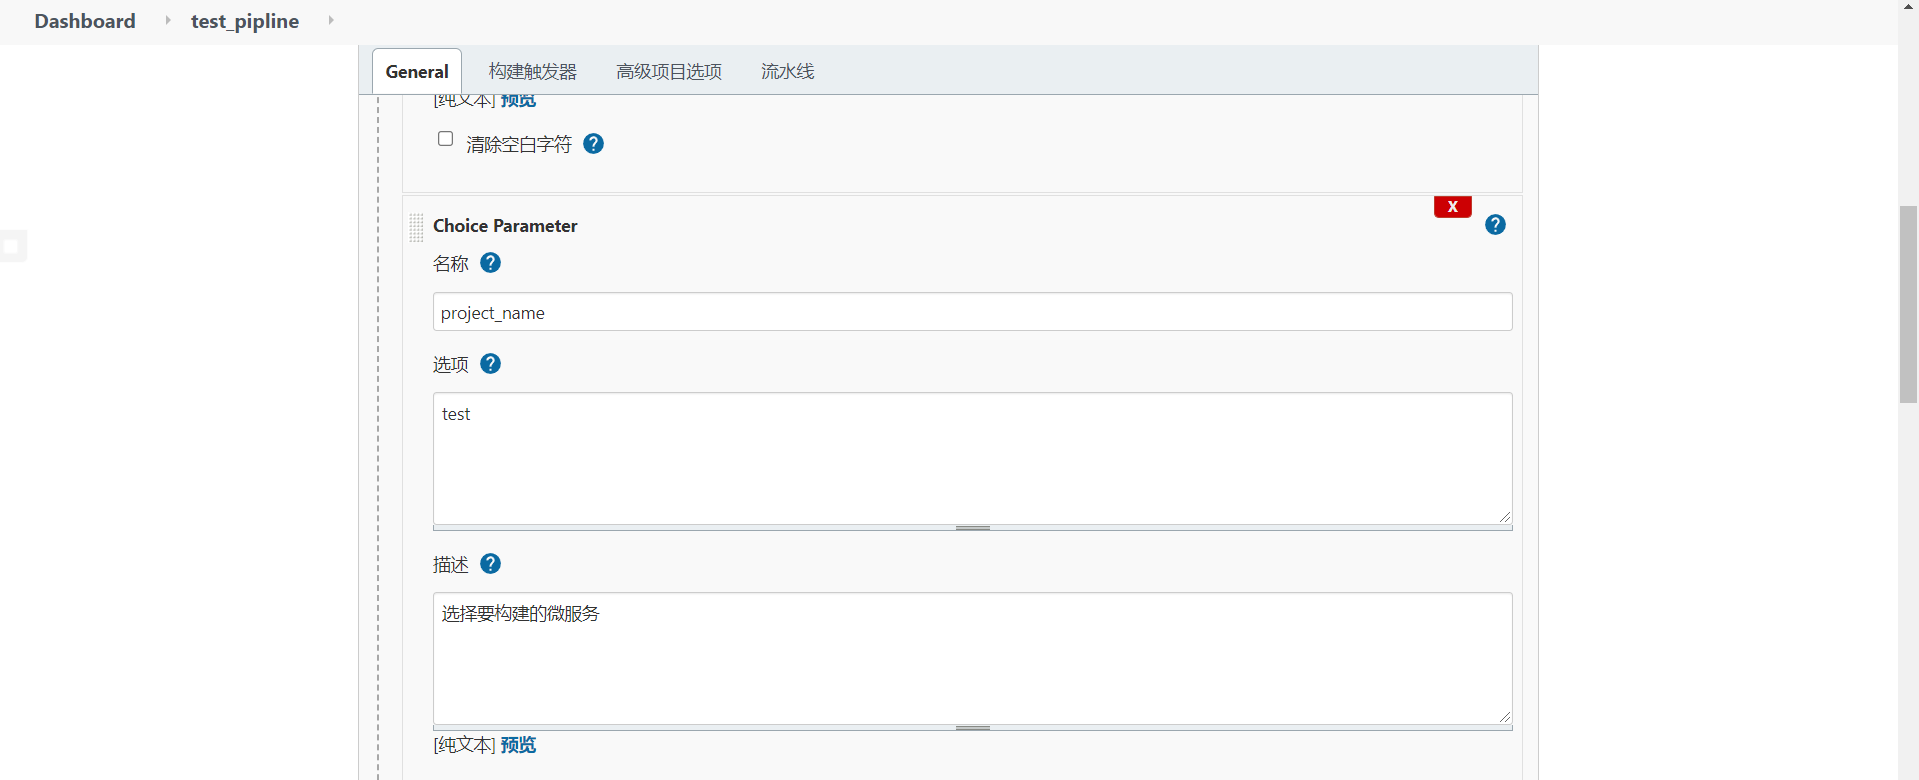
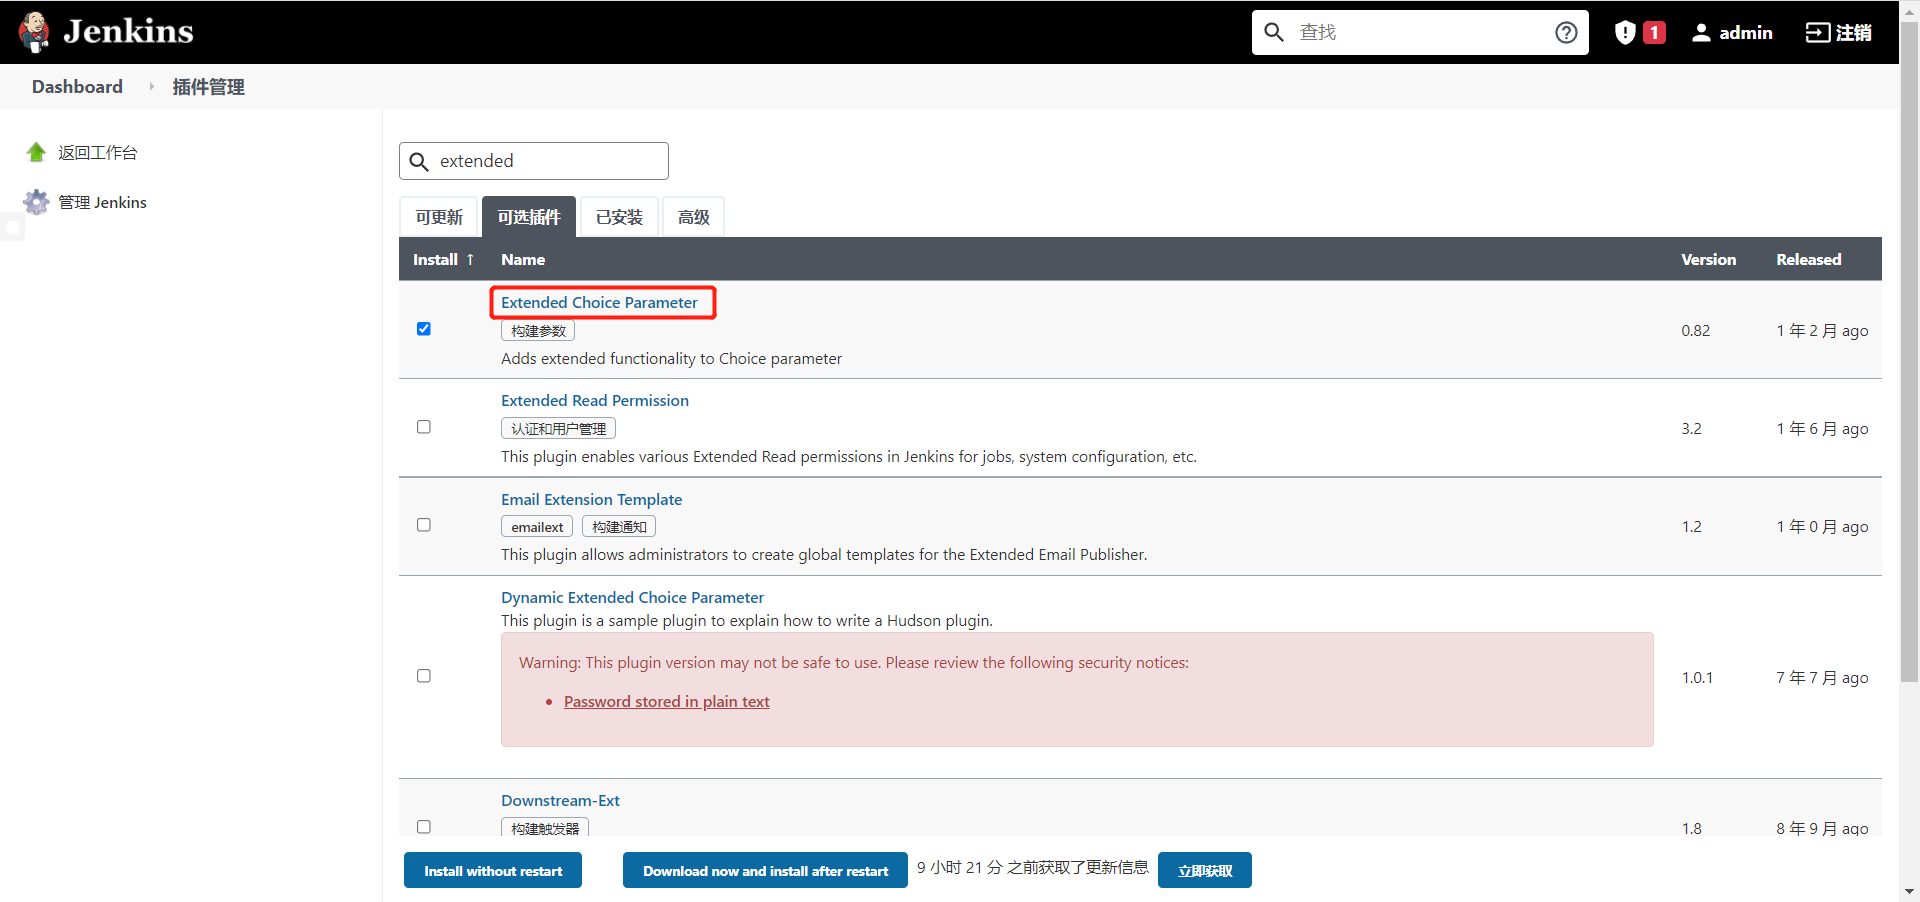
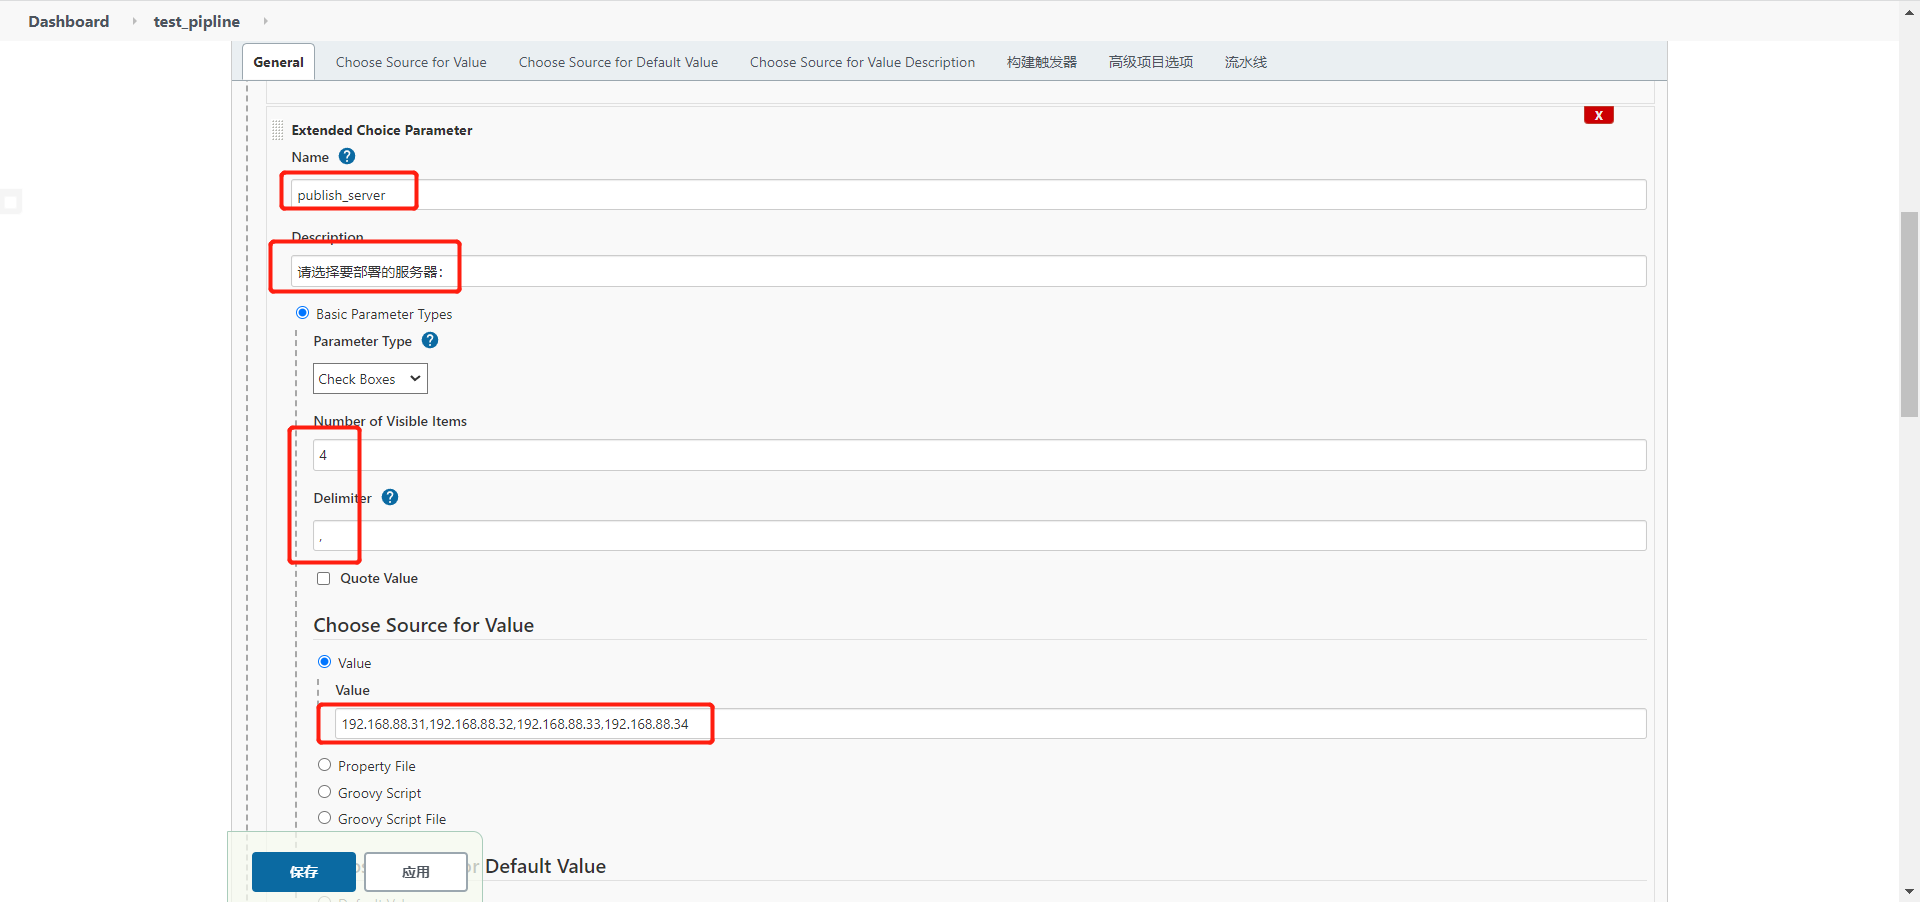
  1. 安装 Extended Choice Parameter 插件,实现多个微服务同时构建

微服务CICD十五

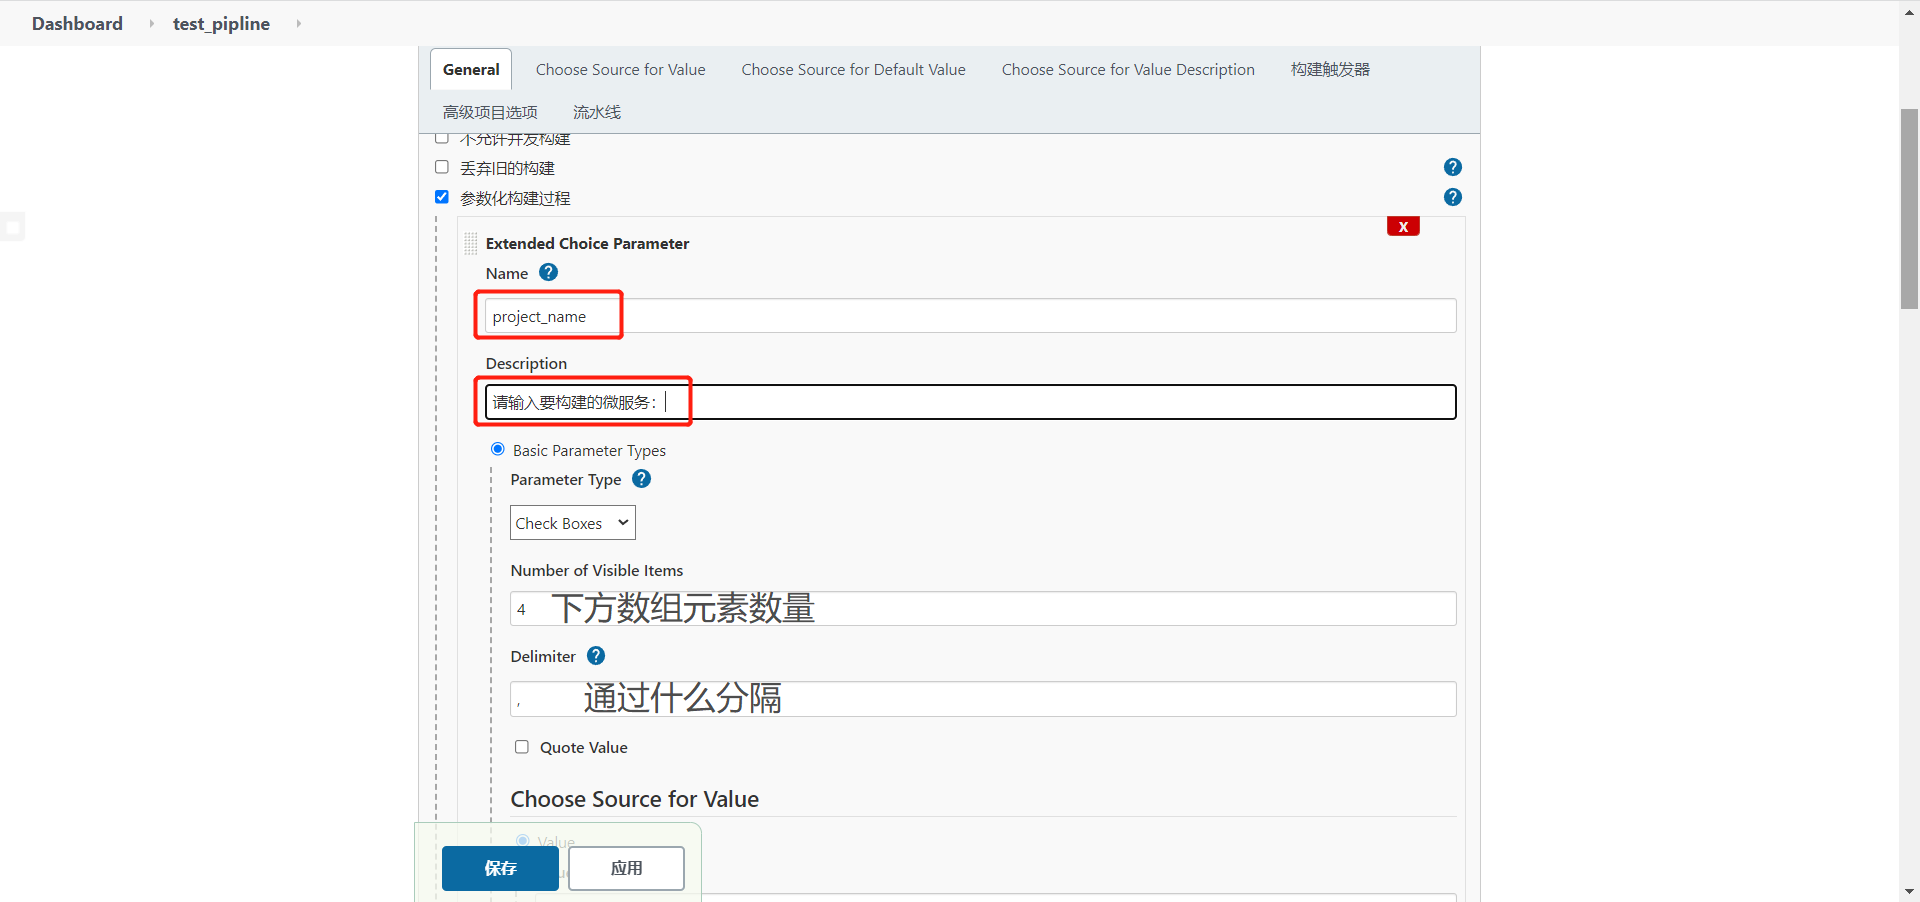
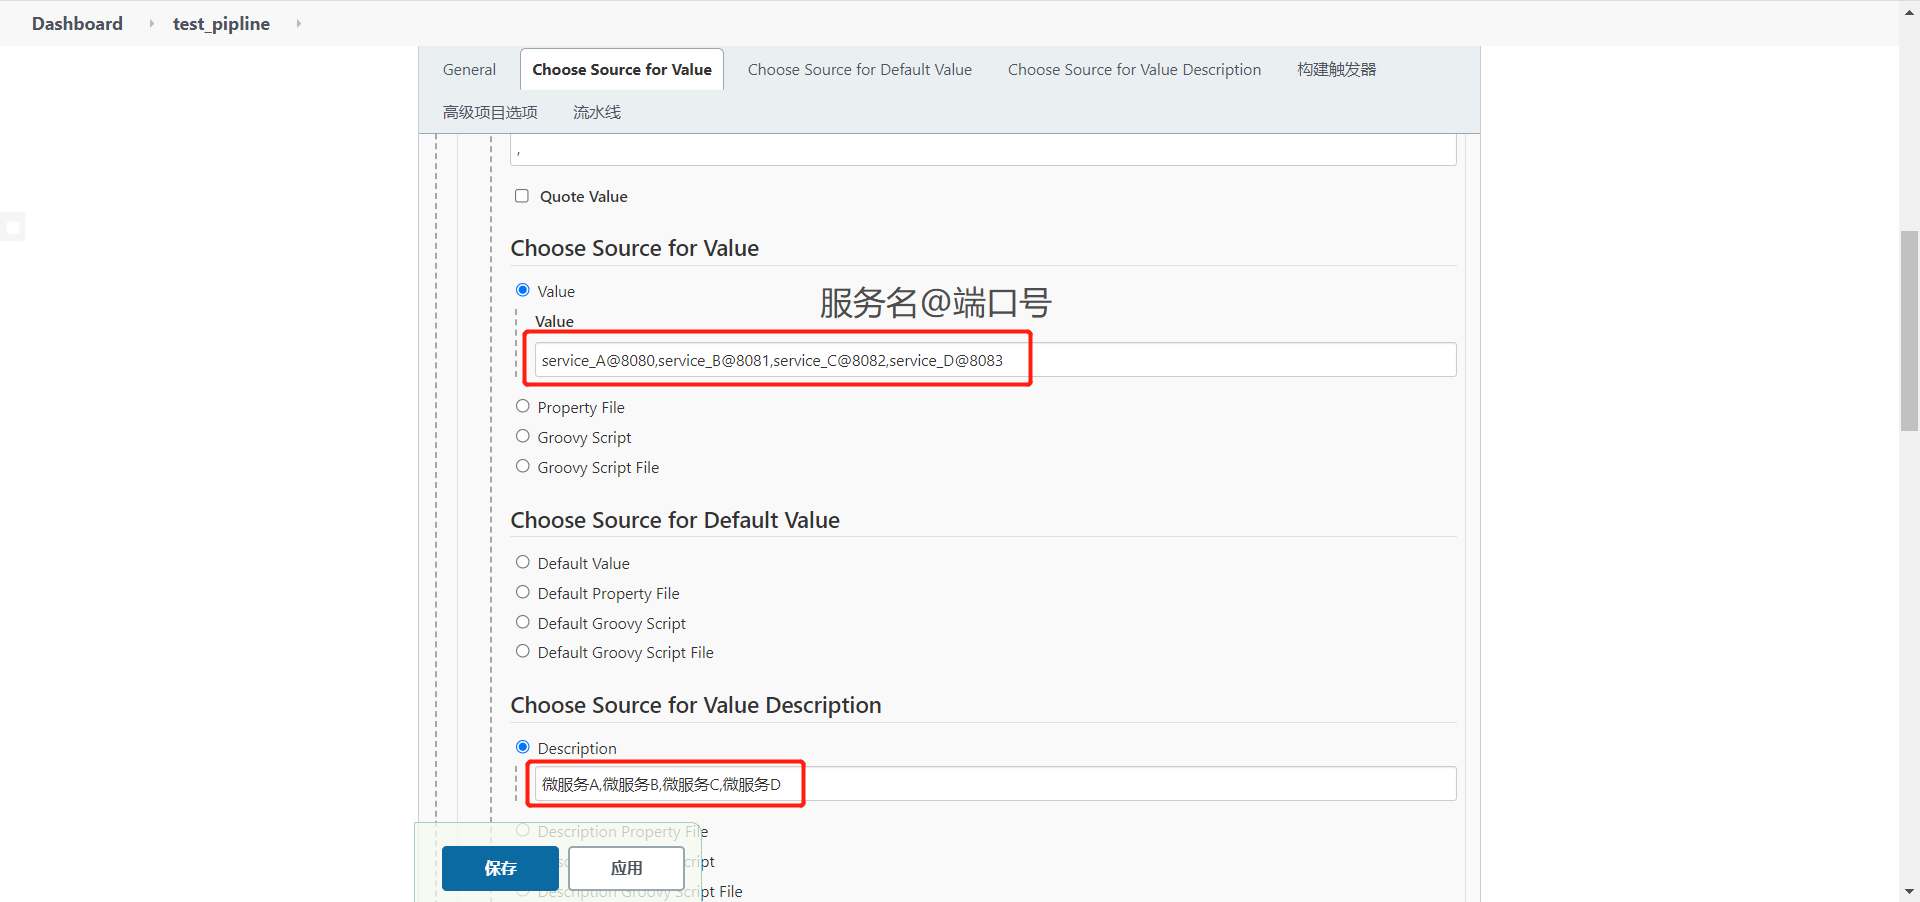
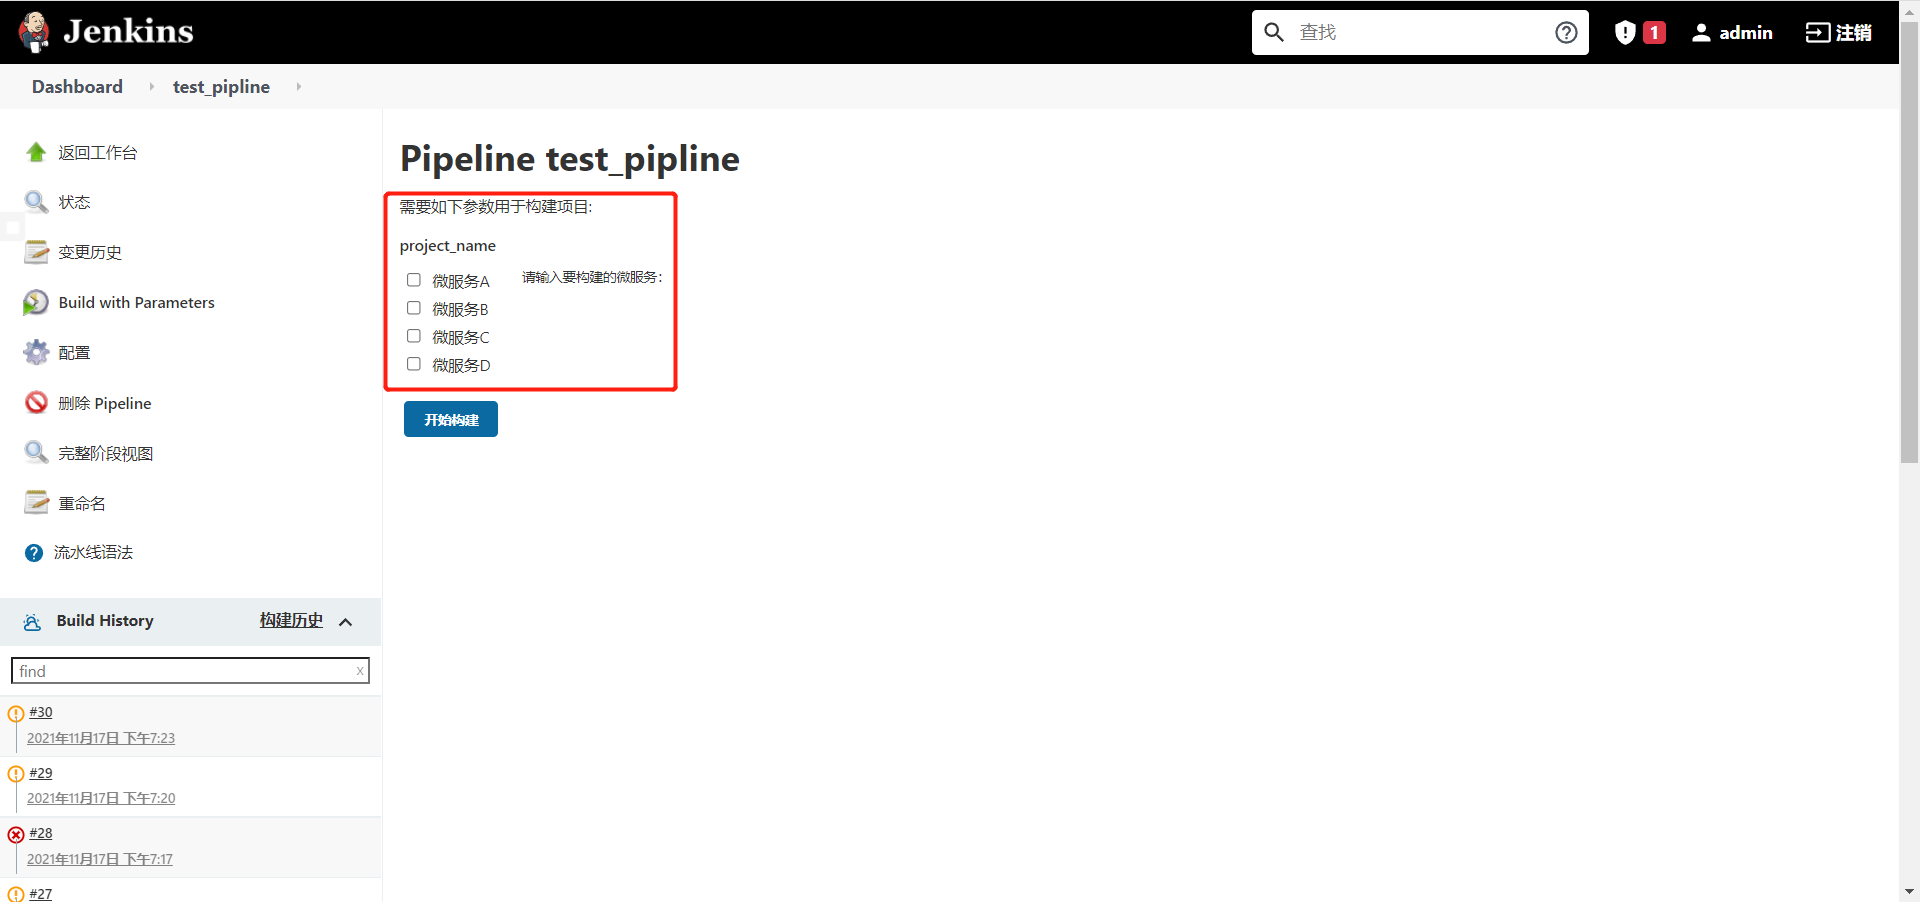
  1. 在创建流水线时设置选项

微服务CICD十六


微服务CICD十七


微服务CICD十八

  1. 将公钥下发,并在系统设置的 Publish over SSH 中添加多台主机
  2. 在流水线工程中添加多一个多选项配置,用于选择要部署的服务器

微服务CICD十九

  1. 修改流水线语法
1
2
3
4
5
6
7
8
9
10
11
12
13
14
15
16
17
18
19
20
21
22
23
24
25
26
27
28
29
30
31
32
33
34
35
36
37
38
39
40
41
42
43
44
45
46
47
48
49
50
51
52
53
54
55
56
57
58
59
60
61
62
63
64
65
66
67
68
69
70
71
72
73
74
75
// git凭证id
def git_auth = "bad37d0d-7260-43a2-a350-9abf6e99753a"
// git凭证url
def git_url = "http://192.168.88.30/test_group/test_project.git"
// Harbor地址
def harbor_url = "192.168.88.30:81"
// 镜像仓库名称
def harbor_repository = "test"
// Harbor用户凭证ID
def harbor_auth = "c147d241-a254-48d6-be1c-0d5f0964ce9a"
// 镜像版本号
def image_version = "1.0"

node {
// 获取服务名
def selectedProjectNames = "${project_name}".split(",")
// 获取集群地址
def selectedServices = "${publish_server}".split(",")

// 拉取代码
stage('Pull Code') {
git branch: "${branch}", credentialsId: "${git_auth}", url: "${git_url}"
}

// 编译,打包微服务工程,构建镜像
stage('Mvn clean package and Docker build') {
sh "mvn clean package dockerfile:build"
}

// 上传镜像至Harbor
stage('Push image to Harbor') {
for(int i=0; i<selectedProjectNames.length; i++) {
// 获取每个选项
def project_info = selectedProjectNames[i]
// 获取选项中的微服务名称
def current_project_name = "${project_info}".split("@")[0]
// 镜像命名,打标签
def image_name = "${current_project_name}:${image_version}"
sh "docker tag ${current_project_name}:latest ${harbor_url}/${harbor_repository}/${image_name} && docker rmi ${current_project_name}:latest"
// 登录Harbor仓库
withCredentials([usernamePassword(credentialsId: "${harbor_auth}", passwordVariable: 'harbor_password', usernameVariable: 'harbor_user')]) {
sh "docker login -u ${harbor_user} -p ${harbor_password} ${harbor_url}"
}
// 镜像上传
sh "docker push ${harbor_url}/${harbor_repository}/${current_project_name}:${image_version}"
}
}

// 远程连接服务器拉取镜像运行
stage('Pull image and Running container') {
for(int i=0; i<selectedProjectNames.length; i++) {
// 获取每个选项
def project_info = selectedProjectNames[i]
// 获取选项中的微服务名称
def current_project_name = "${project_info}".split("@")[0]
// 获取选项中的微服务所需端口
def current_project_port = "${project_info}".split("@")[1]
// 需要拉取的镜像
def image_name = "${current_project_name}:${image_version}"
// 遍历所有服务器,分别部署
for(int j=0; j<selectedServices.length; j++) {
// 获取当前服务器
def current_server = selectedServices[j]
// 加上参数配置,根据配置文件的不同选择不同的服务器部署
if(current_server == "192.168.88.31") {
activeProfile = activeProfile+"serviceName-server1"
}else if(current_server == "192.168.88.32") {
activeProfile = activeProfile+"serviceName-server2"
}
// 远程执行脚本
sshPublisher(publishers: [sshPublisherDesc(configName: "${current_server}", transfers: [sshTransfer(cleanRemote: false, excludes: '', execCommand: './root/test.sh $harbor_url $current_project_name $harbor_url/$harbor_repository/$image_name $current_project_port $activeProfile', execTimeout: 120000, flatten: false, makeEmptyDirs: false, noDefaultExcludes: false, patternSeparator: '[, ]+', remoteDirectory: '', remoteDirectorySDF: false, removePrefix: '', sourceFiles: '')], usePromotionTimestamp: false, useWorkspaceInPromotion: false, verbose: false)])
}
}
}
}
  1. 修改 test.sh
1
2
3
4
5
6
7
8
9
10
11
12
13
14
15
16
17
18
19
20
21
22
23
24
25
26
27
28
29
30
31
32
33
34
35
36
37
38
39
40
41
42
43
44
45
46
47
48
49
50
51
52
53
54
55
56
57
58
59
60
61
62
63
64
65
66
67
#!/bin/bash

harbor_url=$1
project_name=$2
image_name=$3
service_port=$4
profile=$6

# 删除none容器
echo "docker rmi none..."
docker images | grep none | awk '{ print "docker rmi "$3 }' | sh &>/dev/null

# 检查是否有已运行容器
num=`docker ps | grep $project_name | wc -l`
if [ $num -gt 0 ]
then
docker stop $project_name && docker rm $project_name &>/dev/null
if [ `echo $?` -eq 0 ]
then
echo "docker stop $project_name && docker rm $project_name [OK]"
else
echo "ERROR: docker stop $project_name && docker rm $project_name"
fi
fi

# 检查是否有重命名镜像
temp=`docker images | grep $image_name | awk '{ print $1":"$2 }' | wc -l`
if [ $temp -eq 1 ]
then
docker rmi $image_name &>/dev/null
if [ `echo $?` -eq 0 ]
then
echo "docker rmi $image_name [OK]"
else
echo "ERROR: docker rmi $image_name"
fi
fi

# 登录镜像仓库
echo "docker login repository..."
docker login -u admin -p toortoor $harbor_url &>/dev/null
if [ `echo $?` -ne 0 ]
then
echo "ERROR: failed to login repository"
else
echo "docker login repository [OK]"
fi

# 拉取镜像
echo "docker pull image..."
docker pull $image_name &>/dev/null
if [ `echo $?` -ne 0 ]
then
echo "ERROR: failed to pull image"
else
echo "docker pull image [OK]"
fi

# 运行容器
echo "docker run container..."
docker run -d --name $project_name -p $service_port:8080 $image_name $profile &>/dev/null
if [ `echo $?` -ne 0 ]
then
echo "ERROR: failed to run container"
else
echo "docker run container [OK]"
fi

七、基于K8S的CICD

基于 Kubernetes 平台来实现 CICD 功能。

K8SCICD一

7.1 Jenkins对接K8S

  • 首先通过 bitnami helm 部署 Jenkins(Master),需开放 jnlp 50000 端口
1
2
3
4
5
6
7
# 添加repo源
helm repo add bitnami https://charts.bitnami.com/bitnami
# 下载chart到本地
helm pull bitnami/jenkins
# 根据需求修改values.yaml
# 部署
helm install jenkins jeknins/

K8SCICD十六

  • RBAC 授权,SA 名为 jenkins,后续会用到
1
2
3
4
5
6
7
8
9
10
11
12
13
14
15
16
17
18
19
20
21
22
23
24
25
26
27
28
29
30
31
32
33
34
35
36
37
38
39
40
41
42
43
44
45
46
47
apiVersion: v1
kind: ServiceAccount
metadata:
name: jenkins
namespace: nextcloud

---

kind: Role
apiVersion: rbac.authorization.k8s.io/v1beta1
metadata:
name: jenkins
namespace: nextcloud
rules:
- apiGroups: [""]
resources: ["pods"]
verbs: ["create","delete","get","list","patch","update","watch"]
- apiGroups: [""]
resources: ["pods/exec"]
verbs: ["create","delete","get","list","patch","update","watch"]
- apiGroups: [""]
resources: ["pods/log"]
verbs: ["get","list","watch"]
- apiGroups: [""]
resources: ["secrets"]
verbs: ["get"]
- apiGroups: ["extensions", "apps"]
resources: ["deployments"]
verbs: ["get", "list", "watch", "create", "update", "patch", "delete"]
- apiGroups: [""]
resources: ["services"]
verbs: ["get", "list", "watch", "create", "update", "patch", "delete"]

---
apiVersion: rbac.authorization.k8s.io/v1beta1
kind: RoleBinding
metadata:
name: jenkins
namespace: nextcloud
roleRef:
apiGroup: rbac.authorization.k8s.io
kind: Role
name: jenkins
subjects:
- kind: ServiceAccount
name: jenkins
namespace: nextcloud
  • 获取刚刚创建的 ca.crt 信息
1
kubectl get secret jenkins-token-xxx -oyaml | awk '/ca.crt/{ print $2 }' | base64 -d
  • 在 Jenkins 创建凭据

K8SCICD二

  • 添加云,这里用到刚刚创建的凭据

K8SCICD三


K8SCICD四


设置 Pod Template,即 Jenkins Slave,将包含 jnlp 一个容器,来实现编译打包等功能。

K8SCICD五


K8SCICD六


这里需挂载宿主机的 docker.sock、docker 和 kubectl 的二进制文件。

K8SCICD七


然后使用到刚刚创建的 SA。

K8SCICD八


测试链接。

K8SCICD九

7.2 构建前准备

需要在项目的根目录下准备好 Dockerfile、Jenkinsfile、deploy.yaml。

  • Jenkinsfile
1
2
3
4
5
6
7
8
9
10
11
12
13
14
15
16
17
18
19
20
21
22
23
24
25
26
27
28
29
30
31
32
33
34
35
36
37
38
39
40
41
42
// gitlab及harbur凭据认证等信息
def git_auth = "764f29f3-8955-4551-a23a-659aa4c8deaa"
def git_url = "http://192.168.159.12:30098/root/nextcloud.git"
def harbor_url = "192.168.159.101"
def harbor_repository = "nextcloud"
def harbor_auth = "7ebc36f8-73a3-417f-864f-24856490b1a2"
def project_name = "nextcloud"

// jenkins-slave为pod template中的name
node('jenkins-slave') {

// jnlp为pod template中的容器名称
container('jnlp') {

// pipeline步骤
stage('Git Clone') {
git branch: "${branch}", credentialsId: "${git_auth}", url: "${git_url}"
}

stage('Docker Build') {
sh "docker build -t ${harbor_url}/${harbor_repository}/${project_name}:${branch}-${version} ."
}

stage('Docker Push') {
withCredentials([usernamePassword(credentialsId: "${harbor_auth}", passwordVariable: 'harbor_password', usernameVariable: 'harbor_user')]) {
sh "docker login -u ${harbor_user} -p ${harbor_password} ${harbor_url}"
}
sh "docker push ${harbor_url}/${harbor_repository}/${project_name}:${branch}-${version}"
sh "docker rmi ${harbor_url}/${harbor_repository}/${project_name}:${branch}-${version}"
}
}

// 在deploy.yaml中将镜像tag设为了build-tag,方便通过sed修改
stage('Sed YAML') {
sh "sed -i 's#build-tag#${branch}-${version}#g' deploy.yaml"
}

stage('Deploy to K8s') {
sh "kubectl apply -f deploy.yaml"
}

}

7.3 创建流水线项目

这里添加了两个字符参数,用于构建前选择分支和 tag 的标签定义。

K8SCICD十


K8SCICD十一


构建测试,会发现集群中创建了一个 jenkins-slave-xxx 的 pod,pod 中包含 jnlp 一个容器,通过观察日志可发现与 Jenkins Master 进行了连接。

K8SCICD十三


Jenkins 中查看流水线进度。

K8SCICD十四


流水线结束后,通过 kubectl 可看到项目已部署,且使用的镜像是刚刚构建好的。

K8SCICD十五

Redis

一、简介

REmote DIctionary Server(Redis)是一个由 Salvatore Sanfilippo 写的 key-value 存储系统,是跨平台的非关系型数据库。

redis_logo

Redis 就是一款 NoSQL,而 NoSQL 就是指非关系型数据库,主要分为四种:

  1. 键值型:Redis
  2. 文档型:ElasticSearch、Mongdb
  3. 面向列:Hbase
  4. 图形化:Neo4j

二、Redis基础

2.1 Redis安装

  1. 通过 docker-compose 安装 redis
1
2
3
4
5
6
7
8
9
10
version: '3.8'
services:
redis:
image: daocloud.io/library/redis:5.0.9
restart: always
container_name: redis
environment:
- TZ=Asia/Shanghai
ports:
- 6379:6379
  1. 进入容器内部测试 redis
1
2
3
4
5
6
# 连接redis
redis-cli
# set新建键值对
set key value
# get获取键值
get key

2.2 Redis常用命令

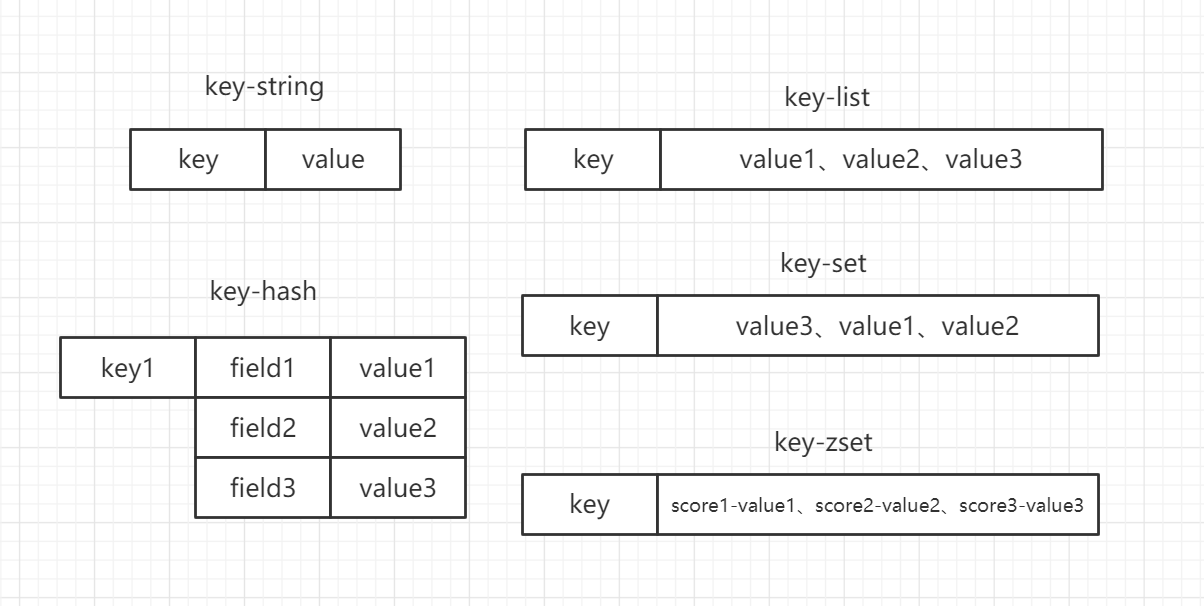
redis 的数据存储结构有以下几种:

  • key-string(字符串):一个 key 对应一个值
  • key-hash(哈希):一个 key 对应一个 map
  • key-list(列表):一个 key 对应一个列表
  • key-set(集合):一个 key 对应一个集合
  • key-zset(有序集合):一个 key 对应一个有序的集合

redis一

2.2.1 string常用命令

  1. 设置值
1
set key value
  1. 取值
1
get key
  1. 批量操作
1
2
mset key1 value1 key2 value2 ...
mget key1 key2 ...
  1. 自增
1
incr key
  1. 自减
1
decr key
  1. 自增自减指定数量
1
2
incrby key number
decrby key number
  1. 设置值的同时指定生存时间
1
setex key seconds value
  1. 设置值,如果当前 key 不存在如同 set,如果存在则说明都不做
1
setex key value
  1. 在 key 对应的 value 后追加内容
1
append key value
  1. 查看 value 字符串长度
1
strlen key

2.2.2 hash常用命令

  1. 存储数据
1
hset key field value
  1. 获取数据
1
hget key field
  1. 批量操作
1
2
hmset key1 field1 value1 field2 value2 ...
hmget key1 firle1 field2 ...
  1. 指定自增
1
hincrby key field number
  1. 设置值,如果当前 key 不存在如同 set,如果存在则说明都不做
1
hsetnx key field value
  1. 检查 field 是否存在
1
hexists key field
  1. 删除某个 field
1
hdel key field1 field2 ...
  1. 获取当前 hash 结构中的全部 field 和 value
1
hgetall key
  1. 获取当前 hash 结构中的全部 field
1
hkeys key
  1. 获取当前 hash 结构中的全部 value
1
hvals key
  1. 获取当前 hash 中 field 的数量
1
hlen key

2.2.3 list常用命令

  1. 存储数据
1
2
3
4
5
6
7
8
9
10
11
# 从左侧插入数据
lpush key value1 value2 ...
# 从右侧插入数据
rpush key value1 value2 ...

# 如果key不存在,什么都不做,如果key存在但不是list结构,也什么都不做
lpushx key value1 value2 ...
rpushx key value1 value2 ...

# 通过索引位置添加value
lset key index value
  1. 获取数据
1
2
3
4
5
6
7
8
9
10
11
12
13
# 左侧弹出数据并移除
lpop key
# 右侧弹出数据并移除
rpop key

# 获取一定范围的数据,start从0开始,stop为-1时为最后一个value,-2时为倒数第二个value
lrange key start stop

# 根据索引位置获取value
lindex key index

# 获取整个list的长度
llen key
  1. 删除数据
1
2
3
4
5
6
7
8
# 删除list中count个value的值,当count>0,从左向右删除,但count<0,从右向左删除,但count==0,全部删除
lrem key count value

# 保留列表中指定范围内的数据,超出这个范围的都会被移除
ltrim start stop

# 将list1中的最后一个数据弹出,插入到list2中的第一个位置
rpoplpush key1 key2

2.2.4 set常用命令

  1. 存储数据
1
2
# value不允许重复,且数据无序排列
sadd key value1 value2 ...
  1. 获取数据
1
2
3
4
5
6
7
8
9
10
11
12
13
14
15
16
17
# 获取全部数据
smembers key

# 随机获取数据,并移除,可加弹出数量
spop key number

# 取多个set的交集
sinter key1 key2 ...

# 取多个set的并集
sunion key1 key2 ...

# 取多个set的差集
sdiff key1 key2 ...

# 查看当前set是否包含某个值
sismember key value
  1. 删除数据
1
srem key value1 value2 ...

2.2.5 zset常用命令

  1. 存储数据
1
2
3
4
5
# score必须是数值,value不允许重复
zadd key score1 value1 score2 value2 ...

# 修改score,如果value存在则增加分数,如果不存在则相当于zadd
zincrby key number value
  1. 获取数据
1
2
3
4
5
6
7
8
9
10
11
12
13
14
15
16
17
18
# 查看指定value的分数
zscore key value

# 获取value数量
zcard key

# 根据score范围查询value数量
zcount key min max

# 根据分数从小到大排序,获取指定范围内的数据,添加了withscores参数会返回value的具体score
zrange key start stop withscores

# 从大到小
zrevrange key start stop withscores

# 根据分数的范围获取数据,如果不希望包括min和max的值可以用(min max)的方式,最大最小值用±inf表示
zrangebyscore key min max withscores [limit,offset,count]
zrevrangebyscore key max min withscores [limit,offset,count]
  1. 删除数据
1
zrem key value1 value2 ...

2.2.6 key常用命令

  1. 查看所有key
1
keys *
  1. 查看某个key是否存在
1
exists key
  1. 删除key
1
del key
  1. 设置key的生存时间
1
2
3
4
5
6
7
8
9
10
11
12
13
14
15
16
# 单位为s
expire key seconds

# 单位为ms
pexpire key milliseconds

# 指定生存到某个时间点
expireat key timestamp
pexpireat key millseconds

# 查看key的剩余生存时间,返回-2则key不存在,-1则没设置生存时间
ttl key
pttl key

# 移除生存时间
persist key
  1. 选择操作的库
1
2
3
4
5
# redis默认有16个库
select 0~15

# 移动key到另一个库中
move key db

2.2.7 库的常用命令

  1. 清空当前所在数据库
1
flushdb
  1. 清空所有数据库
1
flushdball
  1. 查看当前库有多少key
1
dbsize
  1. 查看最后一次操作的时间
1
lastsave
  1. 实时监控redis接收到的命令
1
monitor

三、Redis配置

3.1 Redis的AUTH

  1. docker-compose.yaml
1
2
3
4
5
6
7
8
9
10
11
12
13
version: '3.8'
services:
redis:
image: daocloud.io/library/redis:5.0.9
container_name: redis
restart: always
environment:
- TZ=Asia/Shanghai
ports:
- 6379:6379
volumes:
- ./redis.conf:/usr/local/redis/redis.conf
command: ["redis-server", "/usr/local/redis/redis.conf"]
  1. 设置 Redis 连接密码
1
2
vim redis.conf
requirepass toortoor
1
docker-compose up -d
  1. 进入 Redis 之后都需要输入密码才可以创建 key
1
2
redis-cli
auth toortoor

3.2 Redis的事务

Redis 事务可以一次执行多个命令, 并且带有以下三个重要的保证:

  • 批量操作在发送 EXEC 命令前被放入队列缓存
  • 收到 EXEC 命令后进入事务执行,事务中任意命令执行失败,其余的命令依然被执行
  • 在事务执行过程,其他客户端提交的命令请求不会插入到事务执行命令序列中

一个事务从开始到执行会经历以下几个阶段:

  • 开始事务:multi
  • 命令入队:……
  • 执行事务:exec
  • 取消事务:discard
  • 监听:在开启事务之前,先通过 watch 监听事务中要操作的 key,如果在事务过程中有其他的客户端修改了 key,那么事务将会被取消

事务可以理解为一个打包的批量执行脚本,但批量指令并非原子化的操作,中间某条指令的失败不会导致前面已做指令的回滚,也不会造成后续的指令不做。

  1. 监听
1
watch name age gander
  1. 开始事务
1
multi
  1. 命令入队
1
2
3
set name cqm
set age 22
set gander male
  1. 执行事务/取消事务
1
exec/discard

3.3 Redis的持久化

3.3.1 RDB持久化

Redis 的配置文件位于 Redis 安装目录, ROB 是默认的持久化机制。

  1. docker-compose.yaml
1
2
3
4
5
6
7
8
9
10
11
12
13
14
15
version: '3.8'
services:
redis:
image: daocloud.io/library/redis:5.0.9
container_name: redis
restart: always
environment:
- TZ=Asia/Shanghai
ports:
- 6379:6379
volumes:
- ./redis.conf:/usr/local/redis/redis.conf
- ./data:/data
# 加载redis.conf
command: ["redis-server", "/usr/local/redis/redis.conf"]
  1. redis.conf
1
2
3
4
5
6
7
8
9
vim redis.conf
# 在900秒内有1一个 key 发生了变化,就执行 RDB 持久化
save 900 1
save 300 10
save 60 10000
# 开启RDB持久化
rdbchecksum yes
# RDB持久化名称
dbfilename dump.rdb
  1. 测试持久化
1
2
3
4
set name cqm
set age 22
# 关闭redis并保存
shutdown save
  1. 可以看到 data 目录下多了个 rdb 文件,即使 redis 容器重启也不会造成 key 的丢失

redis二

3.3.2 AOF持久化

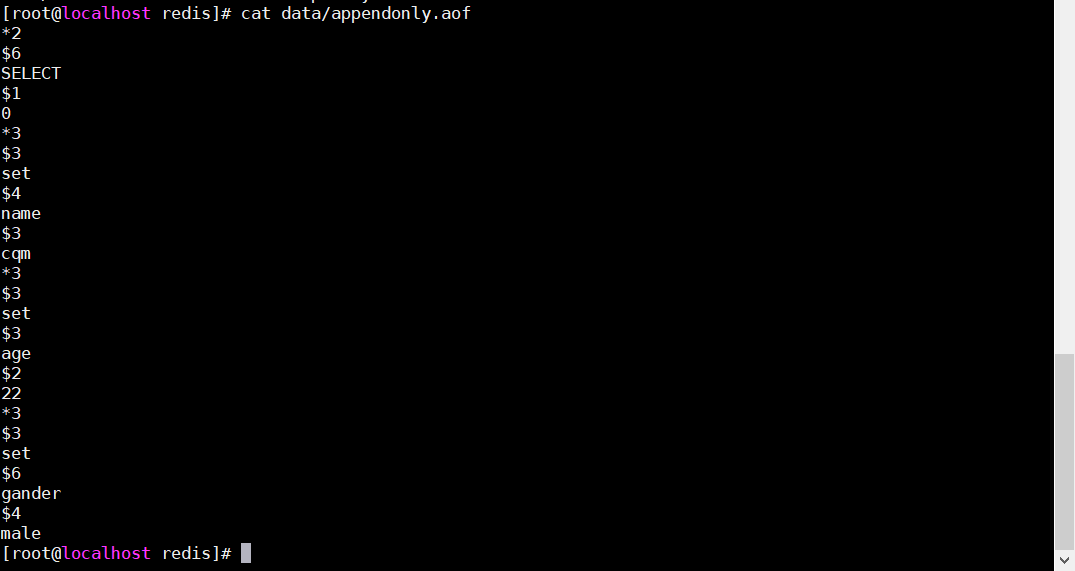
AOF 比起 RDB 有更高的数据安全性,如果同时开启了 AOF 和 RDB,那么前者比后者的优先级更高,且如果先开启了 RDB 在开启 AOF,那么 RDB 中的内容会被 AOF 的内容覆盖。

  1. redis.conf
1
2
3
4
5
6
7
8
9
# 开启AOF持久化
appendonly yes
# AOF文件名
appendfilename appendonly.aof
# AOF持久化执行策略
# always:每次执行写操作都调用fsync
# everysec:最多每秒调用一次fsync
# no:根据环境的不同在不确定的时间调用fsync
appendfsync always|everysec|no
  1. 重启 docker-compose 测试
1
2
3
set gander male
# 不RDB持久化
shutdown nosave
  1. 可以看到 data 目录下多了个 aof 文件,即 AOF 持久化生成的文件

redis三

3.4 Redis主从架构

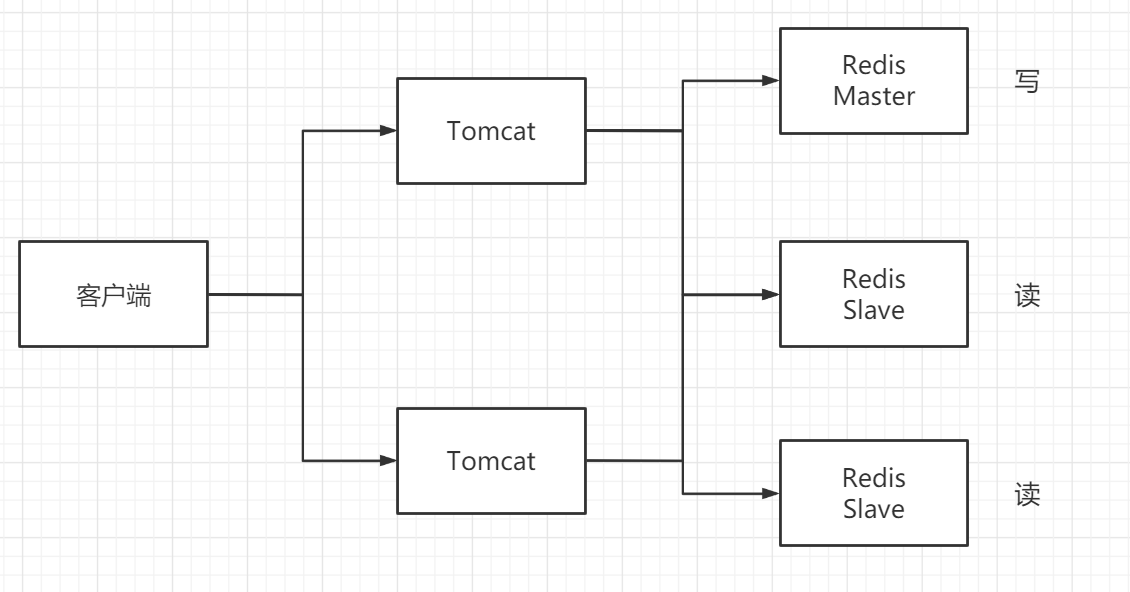
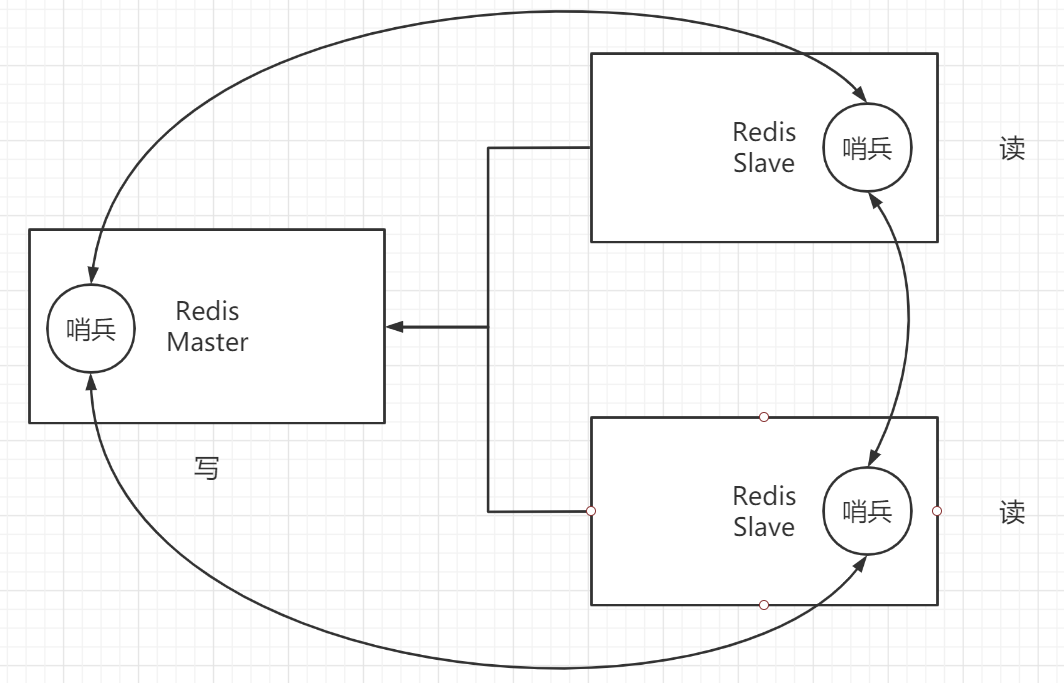
Redis 的主从架构是指 Master 节点负责写操作,而其余的 Slave 节点负责读操作。

redis四

  1. docker-compose.yaml
1
2
3
4
5
6
7
8
9
10
11
12
13
14
15
16
17
18
19
20
21
22
23
24
25
26
27
28
29
30
31
32
33
34
35
36
37
38
39
40
41
42
43
version: '3.8'
services:
redis-master:
container_name: redis-master
image: daocloud.io/library/redis:5.0.9
restart: always
environment:
- TZ=Asia/Shanghai
ports:
- 7001:6379
volumes:
- ./redis1.conf:/usr/local/redis/redis.conf
- ./data1:/data
command: ["redis-server", "/usr/local/redis/redis.conf"]
redis-slave1:
container_name: redis-slave1
image: daocloud.io/library/redis:5.0.9
restart: always
environment:
- TZ=Asia/Shanghai
ports:
- 7002:6379
volumes:
- ./redis2.conf:/usr/local/redis/redis.conf
- ./data2:/data
command: ["redis-server", "/usr/local/redis/redis.conf"]
# 连接redis-master容器,并将该容器ip地址映射为master
links:
- redis-master:master
redis-slave2:
container_name: redis-slave2
image: daocloud.io/library/redis:5.0.9
restart: always
environment:
- TZ=Asia/Shanghai
ports:
- 7003:6379
volumes:
- ./redis3.conf:/usr/local/redis/redis.conf
- ./data3:/data
command: ["redis-server", "/usr/local/redis/redis.conf"]
links:
- redis-master:master
  1. 从节点 redis.conf
1
2
# slaveof <主节点地址> <端口>
slaveof master 6379
  1. 启动后进入容器内部通过 info 可看到节点信息

redis五

3.5 Redis哨兵模式

Redis 的主从架构有一个很明显的问题,就是当 Master 节点出现问题宕机后,那么 Redis 集群就没有可以进行写操作的 Redis 了,而哨兵就可以解决该问题。

在每个节点中都会有个哨兵与 Redis 进行连接,且哨兵与哨兵之间也会进行连接,如果 Master 节点出现故障宕机了,那么哨兵们就会选出一个 Slave 来作为新的 Master 来提供写的操作。

redis六

  1. docker-compose.yaml
1
2
3
4
5
6
7
8
9
10
11
12
13
14
15
16
17
18
19
20
21
22
23
24
25
26
27
28
29
30
31
32
33
34
35
36
37
38
39
40
41
42
43
44
45
version: '3.8'
services:
redis-master:
container_name: redis-master
image: daocloud.io/library/redis:5.0.9
restart: always
environment:
- TZ=Asia/Shanghai
ports:
- 7001:6379
volumes:
- ./redis1.conf:/usr/local/redis/redis.conf
- ./data1:/data
- ./sentinel1.conf:/data/sentinel.conf
command: ["redis-server", "/usr/local/redis/redis.conf"]
redis-slave1:
container_name: redis-slave1
image: daocloud.io/library/redis:5.0.9
restart: always
environment:
- TZ=Asia/Shanghai
ports:
- 7002:6379
volumes:
- ./redis2.conf:/usr/local/redis/redis.conf
- ./data2:/data
- ./sentinel2.conf:/data/sentinel.conf
command: ["redis-server", "/usr/local/redis/redis.conf"]
links:
- redis-master:master
redis-slave2:
container_name: redis-slave2
image: daocloud.io/library/redis:5.0.9
restart: always
environment:
- TZ=Asia/Shanghai
ports:
- 7003:6379
volumes:
- ./redis3.conf:/usr/local/redis/redis.conf
- ./data3:/data
- ./sentinel3.conf:/data/sentinel.conf
command: ["redis-server", "/usr/local/redis/redis.conf"]
links:
- redis-master:master
  1. Master 节点 sentinel.conf
1
2
3
4
5
6
# 以守护进程的方式运行redis
daemonize yes
# 指定Master节点,sentinel monitor <名称> <ip> <端口> <Slave个数>
sentinel monitor master localhost 6379 2
# 指定哨兵每隔多久检测一次redis主从架构
sentinel down-after-milliseconds master 10000
  1. Slave 节点 sentinel.conf
1
2
3
daemonize yes
sentinel monitor master master 6379 2
sentinel down-after-milliseconds master 10000
  1. 进入容器启动哨兵,当 Master 节点出现问题后,就会在两个 Slave 中选出一个作为新的 Master,而旧的 Master 启动后就会变为新的 Slave
1
redis-sentinel /data/sentinel.conf

3.6 Redis集群

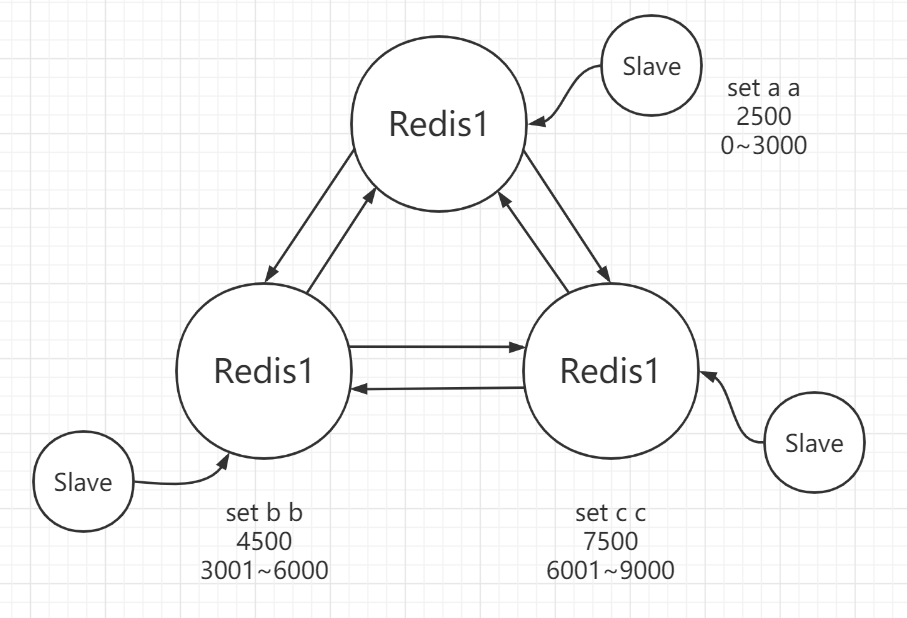
Redis 集群在保证主从和哨兵的基本功能之外,还能提高 Redis 存储数据的能力,主要的特点如下

  • Redis 集群是无中心的
  • Redis 集群有ping-pang的机制
  • 投票机制,集群节点的数量必须是 2n+1
  • 分配了 16484 个 hash 槽,在存储数据时,会对 key 进行 crc16 的算法,并对 16384 进行取余,通过结果分配到对应的节点上,每个节点都有自己维护的 hash 槽
  • 每个主节点都要跟一个从节点,但这里的从节点只管备份,不管查询
  • 集群中半数的节点宕机后,那么集群就瘫痪

redis七

  1. docker-compose.yaml
1
2
3
4
5
6
7
8
9
10
11
12
13
14
15
16
17
18
19
20
21
22
23
24
25
26
27
28
29
30
31
32
33
34
35
36
37
38
39
40
41
42
43
44
45
46
47
48
49
50
51
52
53
54
55
56
57
58
59
60
61
62
63
64
65
66
67
68
69
70
71
72
73
74
version: '3.8'
services:
redis1:
container_name: redis1
image: daocloud.io/library/redis:5.0.9
restart: always
environment:
- TZ=Asia/Shanghai
ports:
- 7001:7001
- 17001:17001
volumes:
- ./conf.d/redis1.conf:/usr/local/redis/redis.conf
command: ["redis-server", "/usr/local/redis/redis.conf"]
redis2:
container_name: redis2
image: daocloud.io/library/redis:5.0.9
restart: always
environment:
- TZ=Asia/Shanghai
ports:
- 7002:7002
- 17002:17002
volumes:
- ./conf.d/redis2.conf:/usr/local/redis/redis.conf
command: ["redis-server", "/usr/local/redis/redis.conf"]
redis3:
container_name: redis3
image: daocloud.io/library/redis:5.0.9
restart: always
environment:
- TZ=Asia/Shanghai
ports:
- 7003:7003
- 17003:17003
volumes:
- ./conf.d/redis3.conf:/usr/local/redis/redis.conf
command: ["redis-server", "/usr/local/redis/redis.conf"]
redis4:
container_name: redis4
image: daocloud.io/library/redis:5.0.9
restart: always
environment:
- TZ=Asia/Shanghai
ports:
- 7004:7004
- 17004:17004
volumes:
- ./conf.d/redis4.conf:/usr/local/redis/redis.conf
command: ["redis-server", "/usr/local/redis/redis.conf"]
redis5:
container_name: redis5
image: daocloud.io/library/redis:5.0.9
restart: always
environment:
- TZ=Asia/Shanghai
ports:
- 7005:7005
- 17005:17005
volumes:
- ./conf.d/redis5.conf:/usr/local/redis/redis.conf
command: ["redis-server", "/usr/local/redis/redis.conf"]
redis6:
container_name: redis6
image: daocloud.io/library/redis:5.0.9
restart: always
environment:
- TZ=Asia/Shanghai
ports:
- 7006:7006
- 17006:17006
volumes:
- ./conf.d/redis6.conf:/usr/local/redis/redis.conf
command: ["redis-server", "/usr/local/redis/redis.conf"]
  1. redis{1..6}.conf,x 为 {1..6}
1
2
3
4
5
6
7
8
9
10
11
12
# 指定redis端口
port 700x
# 开启集群
cluster-enabled yes
# 集群信息文件
cluster-config-file nodes-700x.conf
# 集群对外ip
cluster-announce-ip 192.168.88.135
# 集群对外端口
cluster-announce-port 700x
# 集群总线端口
cluster-announce-bus-port 1700x
  1. 进入任意 reids 容器创建集群
1
2
# --cluster-replicas:每个主节点分配的从节点个数
redis-cli --cluster create 192.168.88.135:7001 192.168.88.135:7002 192.168.88.135:7003 192.168.88.135:7004 192.168.88.135:7005 192.168.88.135:7006 --cluster-replicas 1
  1. 由于每个主节点都被分配了不同的 hash 槽,所以要在容器内任意切换不同的 redis 节点需要加参数 -c
1
redis-cli -h 192.168.88.135 -p 7001 -c

四、Redis常见问题

4.1 Redis的删除策略

当 key 的生存时间到了,Redis 并不会立即删除该 key,而是遵守以下删除策略来进行删除

  • 定期删除:Redis 每隔一段时间就回去查看设置了生存时间的 key,默认是 100ms 查看 3 个 key
  • 惰性删除:当用户去查询已经超过了生存时间的 key,Redis 会先查看该 key 是否已经超过了生存时间,如果超过,那么 Redis 会将该 key 删除并给用户返回一个空值

4.2 Redis的淘汰机制

当 Redis 内存满的时候添加了一个新的数据,那么就会执行 Redis 的淘汰机制,通过 maxmemory-policy 来设置,参数如下

  1. volatile-lru:当内存不足时,会删除一个设置了生存时间且最近最少使用的 key

  2. allkeys-lru:当内存不足时,会删除一个设置了最近最少使用的 key

  3. volatile-lfu:当内存不足时,会删除一个设置了生存时间且最近使用频率最低的 key

  4. allkeys-lfu:当内存不足时,会删除一个设置了最近使用频率最低的 key

  5. volatile-random:当内存不足时,会随机删除一个设置了生存时间的 key

  6. allkeys-random:当内存不足时,会随机删除一个 key

  7. volatile-ttl:当内存不足时,会删除一个生存时间最少的 key

  8. noeviction:内存不足时,直接报错

4.3 缓存问题

缓存穿透

当客户查询的数据 Redis 中没有,数据库中也没有,且请求量特别大时,就会导致数据库的压力过大,解决方法如下

  • 根据 id 查询时,如果 id 是自增的,那么可以将最大的 id 放到 Reids 中,当查询数据时直接对比 id 即可
  • 如果 id 不是 int 型,那么可以将全部的 id 放入 set 中,用户查询之前可以先到 set 查看是否有该 id
  • 获取用户的 ip 地址,对该地址进行访问限制

缓存击穿

当用户查询的是热点数据时,那么并发量肯定是很高的,当 Redis 中的热点数据过期了,那么数据库的压力就会很大,甚至宕机,解决方法如下

  • 在访问热点数据时,缓存中没有的时候,可以添加一把锁,让几个请求去访问数据库,避免数据库宕机
  • 把热点数据的生存时间去掉

缓存雪崩

当大量缓存同时到期时,导致请求都去到了数据库,也很容易导致数据库宕机,解决方法如下

  • 对缓存中的数据设置一个随机的生存时间,避免同时过期

缓存倾斜

如果将热点数据放在集群中的某一 Redis 节点上时,那么大量的数据都会去到该 Redis 节点,导致节点宕机,解决方法如下

  • 主从架构,准备大量的从节点
  • 在 Tomcat 中做 JVM 缓存,在查询 Redis 前先查询 JVM 缓存

linux基础网络服务

一、DHCP服务

1.1 DHCP服务介绍

DHCP服务即动态主机配置协议,被运用在局域网中,主要的作用是分配IP地址。

DHCP服务采用的是UDP协议,发送采用UDP67端口,接受则采用UDP68端口。

1.2 DHCP服务部署

  1. 安装DHCP
1
yum -y install dhcp
  1. DHCP配置文件详解
1
2
3
4
5
6
7
8
9
10
11
12
13
14
15
16
17
18
19
20
21
22
23
24
25
26
27
28
29
30
31
32
33
34
35
36
37
38
39
40
41
42
43
44
45
46
47
48
49
50
51
52
53
54
55
56
57
58
59
60
61
62
63
64
65
66
67
68
69
70
71
72
73
74
75
76
77
78
79
80
81
82
83
84
85
86
87
88
89
90
91
92
93
94
95
96
97
98
99
100
101
102
103
104
105
106
107
108
109
110
111
112
113
114
115
116
117
118
119
120
121
122
123
124
125
126
127
128
129
130
131
132
133
134
135
136
137
138
139
140
141
142
143
144
145
146
147
148
149
150
cp /usr/share/doc/dhcp*/dhcpd.conf.example /etc/dhcp/dhcpd.conf
cat /etc/dhcp/dhcpd.conf
# DHCP服务配置文件分为全局配置和作用域配置,很好区分:subnet的就是作用域 不在subnet里面的就是全局设置。
# dhcpd.conf
#
# Sample configuration file for ISC dhcpd
#
# DNS全局选项,指定DNS服务器的地址,可以是IP,也可以是域名。
# option definitions common to all supported networks...
# DNS的域名
option domain-name "example.org";
# 具体的DNS服务器
option domain-name-servers ns1.example.org, ns2.example.org;
# 租约设置,默认租约为600s
default-lease-time 600;
# 租约设置,最大租约为7200s,当客户端未请求明确的租约时间。
max-lease-time 7200;
# 动态DNS更新方式(none:不支持;interim:互动更新模式;ad-hoc:特殊更新模式)
# Use this to enble / disable dynamic dns updates globally.
# ddns-update-style none;
# 如果该DHCP服务器是本地官方DHCP就将此选项打开,避免其他DHCP服务器的干扰。
# 当一个客户端试图获得一个不是该DHCP服务器分配的IP信息,DHCP将发送一个拒绝消息,而不会等待请求超时。
# 当请求被拒绝,客户端会重新向当前DHCP发送IP请求获得新地址。
# 保证IP是自己发出去的
#
# If this DHCP server is the official DHCP server for the local
# network, the authoritative directive should be uncommented.
# 开启此项表权威DHCP
# authoritative;
# Use this to send dhcp log messages to a different log file (you also
# have to hack syslog.conf to complete the redirection).
# 日志级别
log-facility local7;
# No service will be given on this subnet, but declaring it helps the
# DHCP server to understand the network topology.
#作用域相关设置指令
# subnet 定义一个作用域
# netmask 定义作用域的掩码
# range 允许发放的IP范围
# option routers 指定网关地址
# option domain-name-servers 指定DNS服务器地址
# option broadcast-address 广播地址
#
#
# 案例:定义一个作用域 网段为10.152.187.0 掩码为255.255.255.0
# 此作用域不提供任何服务
subnet 10.152.187.0 netmask 255.255.255.0 {
}
# This is a very basic subnet declaration.
# 案例:定义一个基本的作用域
# 网段10.254.239.0 掩码255.255.255.224
# 分发范围10.254.239.10-20
# 网关为rtr-239-0-1.example.org, rtr-239-0-2.example.org
subnet 10.254.239.0 netmask 255.255.255.224 {
range 10.254.239.10 10.254.239.20;
option routers rtr-239-0-1.example.org, rtr-239-0-2.example.org;
}
# This declaration allows BOOTP clients to get dynamic addresses,
# which we don't really recommend.
# 案例:允许采用bootp协议的客户端动态获得地址
# bootp DHCP的前身
# BOOTP用于无盘工作站的局域网中,可以让无盘工作站从一个中心服务器上获得IP地址。通过BOOTP协议可以为局域网中的无盘工作站分配动态IP地址,
# 这样就不需要管理员去为每个用户去设置静态IP地址。
subnet 10.254.239.32 netmask 255.255.255.224 {
range dynamic-bootp 10.254.239.40 10.254.239.60;
option broadcast-address 10.254.239.31;
option routers rtr-239-32-1.example.org;
}
# 案例:一个简单的作用域案例
# A slightly different configuration for an internal subnet.
subnet 10.5.5.0 netmask 255.255.255.224 {
range 10.5.5.26 10.5.5.30;
option domain-name-servers ns1.internal.example.org;
option domain-name "internal.example.org";
option routers 10.5.5.1;
option broadcast-address 10.5.5.31;
default-lease-time 600;
max-lease-time 7200;
}
# Hosts which require special configuration options can be listed in
# host statements. If no address is specified, the address will be
# allocated dynamically (if possible), but the host-specific information
# will still come from the host declaration.
#
# 保留地址:可以将指定的IP分发给指定的机器,根据网卡的MAC地址来做触发
# host: 启用保留。
# hardware:指定客户端的mac地址
# filename:指定文件名
# server-name:指定下一跳服务器地址
# fixed-address: 指定保留IP地址
#
#
# 案例:这个案例中分发给客户端的不是IP地址信息,而是告诉客户端去找toccata.fugue.com服务器,并且下载vmunix.passacaglia文件
host passacaglia {
hardware ethernet 0:0:c0:5d:bd:95;
filename "vmunix.passacaglia";
server-name "toccata.fugue.com";
}
# Fixed IP addresses can also be specified for hosts. These addresses
# should not also be listed as being available for dynamic assignment.
# Hosts for which fixed IP addresses have been specified can boot using
# BOOTP or DHCP. Hosts for which no fixed address is specified can only
# be booted with DHCP, unless there is an address range on the subnet
# to which a BOOTP client is connected which has the dynamic-bootp flag
# set.
# 案例:保留地址,将指定IP(fantasia.fugue.com对应的IP)分给指定客户端网卡(MAC:08:00:07:26:c0:a5)
host fantasia {
hardware ethernet 08:00:07:26:c0:a5;
fixed-address fantasia.fugue.com;
}
# 超级作用域
# 超级作用域是DHCP服务中的一种管理功能,使用超级作用域,可以将多个作用域组合为单个管理实体。
# You can declare a class of clients and then do address allocation
# based on that. The example below shows a case where all clients
# in a certain class get addresses on the 10.17.224/24 subnet, and all
# other clients get addresses on the 10.0.29/24 subnet.
# 在局域网中,可以配置策略根据各个机器的具体信息分配IP地址和其他的网络参数,客户机的具体信息:客户机能够给dhcp服务提供的信息由两个,
# 第一个就是网卡的dhcp-client-identifier(mac地址),
# 第二个就是设备的vendor-class-identifier。
# 管理员可以根据这两个信息给不同的机器分组。
# 案例:
# 按client某种类型分组DHCP,而不是按物理接口网段
# 例子: SUNW 分配地址段10.17.224.0/24
# 非SUNW的主机,分配地址段10.0.29.0/24
# 定义一个dhcp类:foo
# request广播中vendor-class-identifier字段对应的值前四个字节如果是"SUNW",则视合法客户端.
class "foo" {
match if substring (option vendor-class-identifier, 0, 4) = "SUNW";
}
# 定义一个超级作用域: 224-29
shared-network 224-29 {
# 定义第一个作用域
subnet 10.17.224.0 netmask 255.255.255.0 {
option routers rtr-224.example.org;
}
# 定义第二个作用域
subnet 10.0.29.0 netmask 255.255.255.0 {
option routers rtr-29.example.org;
}
# 关连池,如果客户端匹配foo类,将获得该池地址
pool {
allow members of "foo";
range 10.17.224.10 10.17.224.250;
}
# 关连池,如果客户端配置foo类,则拒绝获得该段地址
pool {
deny members of "foo";
range 10.0.29.10 10.0.29.230;
}
}

1.3 配置作用域

  1. 配置作用域
1
2
3
4
5
6
7
8
subnet 192.168.88.0 netmask 255.255.255.0 {
range 192.168.88.150 192.168.88.160; # 发放地址范围
option routers 192.168.88.0; # 网关
option broadcast-address 192.168.88.255; # 广播地址
option domain-name-servers 8.8.8.8, 114.114.114.114; # 设置DNS
default-lease-time 7200; # 默认租约2小时
max-lease-time 10800; # 最大租约3小时
}
  1. 将另一台主机网卡设置为DHCP模式

DHCP一

1
2
# 重启网络服务
systemctl restart network
  1. 用dhclient命令进行测试
1
2
3
4
# 释放IP
dhclient -r ens33
# 获取IP
dhclient -d ens33

DHCP二

  1. 查看是否获取了150-160网段内的地址

DHCP三

1.4 保留地址

当租约到期的时候,client端只能乖乖交出IP地址,下一次获取就未必是同样的地址了,但公司中往往有些机器要用固定的地址,例如打印机、文件服务器等等,所以在DHCP中可以设置保留地址为其使用。

DHCP是根据主机网卡的MAC地址来做匹配,将保留的IP地址分给相应的主机网卡MAC地址。

  1. 获取网卡MAC地址

DHCP四

  1. 添加保留地址配置
1
2
3
4
5
vim /etc/dhcp/dhcpd.conf
host fantasia {
hardware ethernet 00:0c:29:6c:6f:0d;
fixed-address 192.168.88.155;
}
  1. 查看是否获取相应地址
1
2
dhclient -r ens37
dhclient -d ens37

DHCP五

1.5 超级作用域

超级作用域简单来说就是将两个或两个以上的不同网段的作用域合成一个作用域。

  1. 添加超级作用域
1
2
3
4
5
6
7
8
9
10
11
12
13
14
15
16
17
18
19
20
21
22
# 添加作用域之前DHCP必须拥有两个网段的网卡
shared-network supernet {

subnet 192.168.88.0 netmask 255.255.255.0 {
range 192.168.88.150 192.168.88.160;
option routers 192.168.88.2;
option broadcast-address 192.168.88.255;
option domain-name-servers 8.8.8.8, 114.114.114.114;
default-lease-time 7200;
max-lease-time 10800;
}

subnet 192.168.99.0 netmask 255.255.255.0 {
range 192.168.99.150 192.168.99.160;
option routers 192.168.99.0;
option broadcast-address 192.168.99.255;
option domain-name-servers 8.8.8.8, 114.114.114.114;
default-lease-time 7200;
max-lease-time 10800;
}

}

二、DNS服务

2.1 DNS服务介绍

DNS即域名系统,在互联网中为域名和IP地址进行相互映射的一个分布式数据库。

DNS采用UDP协议,使用UDP53端口进行传输。

DNS记录类型:

  • A:ipv4 记录,将域名映射到 ipv4 地址
  • AAAA:ipv6 记录,将域名映射到 ipv6 地址
  • CNAME:别名记录,将域名映射到另一个域名
  • MX:电邮交互记录,将域名映射到邮件服务器地址
  • TXT:文本记录,是任意可读的文本 DNS 记录
  • SRV:服务器资源记录,用来标识某个服务器使用了某个服务,创建于微软系统的目录管理
  • NS:名称服务器记录,支持将子域名委托给其他 DNS 服务商解析
  • CAA:CAA 资源记录,可以限定域名颁发证书和 CA 之间的关系

2.2 DNS服务部署

  1. 安装DNS
1
2
yum -y install bind bind-chroot
# bind-chroot是bind的一个功能,使bind可以在一个chroot的模式下运行.也就是说,bind运行时的/(根)目录,并不是系统真正的/(根)目录,只是系统中的一个子目录而已.这样做的目的是为了提高安全性.因为在chroot的模式下,bind可以访问的范围仅限于这个子目录的范围里,无法进一步提升,进入到系统的其他目录中。bind的默认启动方式就是chroot方式。
  1. 将配置文件和区域数据库文件拷贝到chroot目录下
1
2
3
4
5
cp -p /etc/named.conf /var/named/chroot/etc/
cp -pr /var/named/name* /var/named/chroot/var/named/
chown -R named:named /var/named/chroot/*
# 配置文件 /var/named/chroot/etc/named.conf
# 区域数据库文件 /var/named/chroot/var/named/
  1. 配置文件详解
1
2
3
4
5
6
7
8
9
10
11
12
13
14
15
16
17
18
19
20
21
22
23
24
25
26
27
28
29
30
31
32
33
34
35
36
37
38
39
40
41
42
43
44
45
46
47
48
49
50
51
52
53
54
55
56
57
58
59
60
61
62
63
64
65
66
67
68
69
70
71
72
73
74
75
76
77
78
79
80
81
82
83
84
85
86
87
88
89
90
91
92
93
94
95
96
97
98
99
100
101
102
103
104
105
106
107
108
109
110
111
112
113
114
115
116
117
118
119
120
121
122
123
124
125
126
127
128
129
130
131
132
133
134
135
136
137
138
139
140
141
142
143
144
145
146
147
148
149
150
151
152
153
154
155
156
157
158
159
160
161
162
163
164
165
166
167
168
169
170
171
172
173
174
175
176
177
178
179
180
181
182
183
184
185
186
187
188
189
190
191
192
193
194
195
196
197
198
199
200
201
202
203
204
205
206
207
208
209
210
211
212
213
214
215
216
217
218
219
220
221
222
223
224
225
226
227
228
229
230
231
232
233
234
235
236
237
238
239
240
241
242
243
244
245
246
247
248
249
250
251
252
253
254
255
256
257
258
259
260
261
262
263
264
265
266
267
268
269
270
271
272
273
274
/*
Sample named.conf BIND DNS server 'named' configuration file
for the Red Hat BIND distribution.
See the BIND Administrator's Reference Manual (ARM) for details about the
configuration located in /usr/share/doc/bind-{version}/Bv9ARM.html
*/
options
{
// Put files that named is allowed to write in the data/ directory:
#指定区域数据库文件的路径目录
directory "/var/named"; // "Working" directory
#CACHE文件路径,指定服务器在收到rndc dump命令时,转储数据到文件的路径。默认named_dump.db
dump-file "data/cache_dump.db";
#静态文件路径,指定服务器在收到rndc stats命令时,追加统计数据的文件路径。默认named.stats
statistics-file "data/named_stats.txt";
#内存静态文件路径,服务器在退出时,将内存统计写到文件的路径。默认named.memstats
memstatistics-file "data/named_mem_stats.txt";
# 指定服务器在通过rndc recursing命令指定转储当前递归请求到的文件路径。默认named.recursing
recursing-file "data/named.recursing";
#在收到rndc secroots指令后,服务器转储安全根的目的文件的路径名。默认named.secroots
secroots-file "data/named.secroots";
/*
Specify listenning interfaces. You can use list of addresses (';' is
delimiter) or keywords "any"/"none"
*/
#IPV4监听端口为53,允许任何人连接
//listen-on port 53 { any; };
#IPv4监听端口为53,只允许本机连接
listen-on port 53 { 127.0.0.1; };
#IPV6监听端口为53,允许任何人连接
//listen-on-v6 port 53 { any; };
#IPv6监听端口为53,只允许本机连接
listen-on-v6 port 53 { ::1; };
/*
访问控制
Access restrictions
两个重要选项
There are two important options:
allow-query { argument; };
- allow queries for authoritative data
允许查询来自权威数据
allow-query-cache { argument; };
- allow queries for non-authoritative data (mostly cached data)
允许查询来自非权威数据
You can use address, network address or keywords "any"/"localhost"/"none" as argument
大括号中可以使用IP地址、网段、或者关键字 any任何人 localhost本机 none任何人不允许
Examples:
allow-query { localhost; 10.0.0.1; 192.168.1.0/8; };
allow-query-cache { ::1; fe80::5c63:a8ff:fe2f:4526; 10.0.0.1; };
*/
#指定允许哪些主机可以进行普通的DNS查询,可以是关键字:any/localhost/none,也可以是IPV4,IPV6地址
allow-query { localhost; };
#指定允许哪些主机可以对缓存的访问
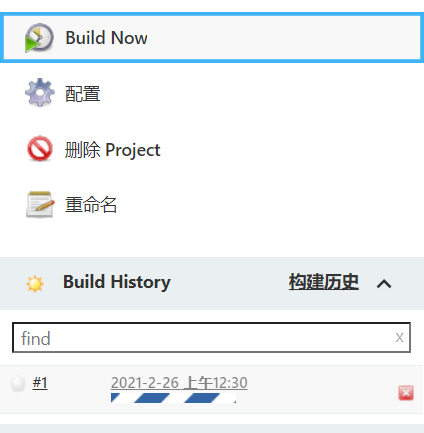
allow-query-cache { localhost; };
/* Enable/disable recursion - recursion yes/no;
递归查询开关
- If you are building an AUTHORITATIVE DNS server, do NOT enable recursion.
假如你建立的是一个权威DNS你不需要开启递归
- If you are building a RECURSIVE (caching) DNS server, you need to enable
recursion.
假如你建立的是一个递归DNS,你需要开启递归服务
- If your recursive DNS server has a public IP address, you MUST enable access
如果你的递归DNS是具有公网IP,你必须要设置访问控制来限制对合法用户的查询.
control to limit queries to your legitimate users. Failing to do so will
cause your server to become part of large scale DNS amplification
否者你的DNS会被大规模的攻击
attacks. Implementing BCP38 within your network would greatly
在您的网络中实现BCP38将非常重要减少此类攻击面
reduce such attack surface
*/
#开启递归
recursion yes;
#Domain Name System Security Extensions (DNS安全扩展)
/* DNSSEC related options. See information about keys ("Trusted keys", bellow) */
/* Enable serving of DNSSEC related data - enable on both authoritative
and recursive servers DNSSEC aware servers */
#开启DNSSEC在权威或者递归服务器之间信任服务
dnssec-enable yes;
/* Enable DNSSEC validation on recursive servers */
#开启DNSSEC验证在递归服务器
dnssec-validation yes;
/* In RHEL-7 we use /run/named instead of default /var/run/named
so we have to configure paths properly. */
#PID文件路径
pid-file "/run/named/named.pid";
#session-keyfile文件路径
session-keyfile "/run/named/session.key";
#指定目录,其中保存着跟踪被管理DNSSEC密钥文件。默认为工作目录。
managed-keys-directory "/var/named/dynamic";
};
logging
{
#开启DNS日志记录
/* If you want to enable debugging, eg. using the 'rndc trace' command,
* named will try to write the 'named.run' file in the $directory (/var/named).
* By default, SELinux policy does not allow named to modify the /var/named directory,
* so put the default debug log file in data/ :
*/
channel default_debug {
file "data/named.run";
severity dynamic;
};
/*
##日志分为两种 告警和访问
logging {
channel warning {
file "data/dns_warning" versions 10 size 10m;
severity warning;
print-category yes;
print-severity yes;
print-time yes;
};
channel general_dns {
file "data/dns_log" versions 10 size 100m;
severity info;
print-category yes;
print-severity yes;
print-time yes;
};
#默认日志 warning
category default {
warning;
};
#访问日志级别 general_dns info
category queries {
general_dns;
};
};
*/
};
/*
通过Views指令配置智能查询DNS
Views let a name server answer a DNS query differently depending on who is asking.
By default, if named.conf contains no "view" clauses, all zones are in the
"default" view, which matches all clients.
Views are processed sequentially. The first match is used so the last view should
match "any" - it's fallback and the most restricted view.
If named.conf contains any "view" clause, then all zones MUST be in a view.
*/
#配置一个明称为localhost_resolver的智能访问视图
view "localhost_resolver"
{
/* This view sets up named to be a localhost resolver ( caching only nameserver ).
* If all you want is a caching-only nameserver, then you need only define this view:
*/
#允许使用该视图解析的客户端 localhost本机 any 任何机器 或者网段
match-clients { localhost; };
#允许递归
recursion yes;
# all views must contain the root hints zone:
#根域
zone "." IN {
#域类型为hint,还有master slave forward等类型
type hint;
#区域数据库文件路径
file "/var/named/named.ca";
};
/* these are zones that contain definitions for all the localhost
* names and addresses, as recommended in RFC1912 - these names should
* not leak to the other nameservers:
*/
#包含子配置文件
include "/etc/named.rfc1912.zones";
};
#定义视图internal
view "internal"
{
/* This view will contain zones you want to serve only to "internal" clients
that connect via your directly attached LAN interfaces - "localnets" .
*/
match-clients { localnets; };
recursion yes;
zone "." IN {
type hint;
file "/var/named/named.ca";
};
/* these are zones that contain definitions for all the localhost
* names and addresses, as recommended in RFC1912 - these names should
* not leak to the other nameservers:
*/
include "/etc/named.rfc1912.zones";
// These are your "authoritative" internal zones, and would probably
// also be included in the "localhost_resolver" view above :
/*
NOTE for dynamic DNS zones and secondary zones:
DO NOT USE SAME FILES IN MULTIPLE VIEWS!
If you are using views and DDNS/secondary zones it is strongly
recommended to read FAQ on ISC site (www.isc.org), section
"Configuration and Setup Questions", questions
"How do I share a dynamic zone between multIPle views?" and
"How can I make a server a slave for both an internal and an external
view at the same time?"
*/
zone "my.internal.zone" {
type master;
file "my.internal.zone.db";
};
zone "my.slave.internal.zone" {
type slave;
file "slaves/my.slave.internal.zone.db";
masters { /* put master nameserver IPs here */ 127.0.0.1; } ;
// put slave zones in the slaves/ directory so named can update them
};
zone "my.ddns.internal.zone" {
type master;
allow-update { key ddns_key; };
file "dynamic/my.ddns.internal.zone.db";
// put dynamically updateable zones in the slaves/ directory so named can update them
};
};
#设置DDNS_key
#主从复制加密使用
key ddns_key
{
#加密方式 hmac-md5
algorithm hmac-md5;
secret "use /usr/sbin/dnssec-keygen to generate TSIG keys";
};
view "external"
{
/* This view will contain zones you want to serve only to "external" clients
* that have addresses that are not match any above view:
*/
match-clients { any; };
zone "." IN {
type hint;
file "/var/named/named.ca";
};
recursion no;
// you'd probably want to deny recursion to external clients, so you don't
// end up providing free DNS service to all takers
// These are your "authoritative" external zones, and would probably
// contain entries for just your web and mail servers:
zone "my.external.zone" {
type master;
file "my.external.zone.db";
};
};
/* Trusted keys
#定义信任的dnssec密钥。
This statement contains DNSSEC keys. If you want DNSSEC aware resolver you
have to configure at least one trusted key.
Note that no key written below is valid. Especially root key because root zone
is not signed yet.
*/
/*
trusted-keys {
// Root Key
"." 257 3 3 "BNY4wrWM1nCfJ+CXd0rVXyYmobt7sEEfK3clRbGaTwSJxrGkxJWoZu6I7PzJu/
E9gx4UC1zGAHlXKdE4zYIPRhaBKnvcC2U9mZhkdUpd1Vso/HAdjNe8LmMlnzY3
zy2Xy4klWOADTPzSv9eamj8V18PHGjBLaVtYvk/ln5ZApjYghf+6fElrmLkdaz
MQ2OCnACR817DF4BBa7UR/beDHyp5iWTXWSi6XmoJLbG9Scqc7l70KDqlvXR3M
/lUUVRbkeg1IPJSidmK3ZyCllh4XSKbje/45SKucHgnwU5jefMtq66gKodQj+M
iA21AfUVe7u99WzTLzY3qlxDhxYQQ20FQ97S+LKUTpQcq27R7AT3/V5hRQxScI
Nqwcz4jYqZD2fQdgxbcDTClU0CRBdiieyLMNzXG3";
// Key for forward zone
example.com. 257 3 5 "AwEAAaxPMcR2x0HbQV4WeZB6oEDX+r0QM65KbhTjrW1ZaARmPhEZZe
3Y9ifgEuq7vZ/zGZUdEGNWy+JZzus0lUptwgjGwhUS1558Hb4JKUbb
OTcM8pwXlj0EiX3oDFVmjHO444gLkBO UKUf/mC7HvfwYH/Be22GnC
lrinKJp1Og4ywzO9WglMk7jbfW33gUKvirTHr25GL7STQUzBb5Usxt
8lgnyTUHs1t3JwCY5hKZ6CqFxmAVZP20igTixin/1LcrgX/KMEGd/b
iuvF4qJCyduieHukuY3H4XMAcR+xia2 nIUPvm/oyWR8BW/hWdzOvn
SCThlHf3xiYleDbt/o1OTQ09A0=";
// Key for reverse zone.
2.0.192.IN-ADDRPA.NET. 257 3 5 "AQOnS4xn/IgOUpBPJ3bogzwcxOdNax071L18QqZnQQQA
VVr+iLhGTnNGp3HoWQLUIzKrJVZ3zggy3WwNT6kZo6c0
tszYqbtvchmgQC8CzKojM/W16i6MG/ea fGU3siaOdS0
yOI6BgPsw+YZdzlYMaIJGf4M4dyoKIhzdZyQ2bYQrjyQ
4LB0lC7aOnsMyYKHHYeRv PxjIQXmdqgOJGq+vsevG06
zW+1xgYJh9rCIfnm1GX/KMgxLPG2vXTD/RnLX+D3T3UL
7HJYHJhAZD5L59VvjSPsZJHeDCUyWYrvPZesZDIRvhDD
52SKvbheeTJUm6EhkzytNN2SN96QRk8j/iI8ib";
};
*/
  1. 配置主配文件
1
2
3
4
5
6
7
8
9
10
11
12
13
14
15
16
17
18
19
20
21
22
23
24
25
26
27
28
29
30
31
vim /var/named/chroot/etc/named.conf

options {
listen-on port 53 { 192.168.88.132; };
#listen-on-v6 port 53 { ::1; };
directory "/var/named";
dump-file "/var/named/data/cache_dump.db";
statistics-file "/var/named/data/named_stats.txt";
memstatistics-file "/var/named/data/named_mem_stats.txt";
recursing-file "/var/named/data/named.recursing";
secroots-file "/var/named/data/named.secroots";
allow-query { any; };

recursion yes;

dnssec-enable yes;
dnssec-validation yes;

pid-file "/run/named/named.pid";
session-keyfile "/run/named/session.key";
};

zone "." IN {
type hint;
file "named.ca";
};

include "/etc/named.rfc1912.zones";
include "/etc/named.root.key";

systemctl start named-chroot
  1. 区域数据库文件详解
1
2
3
4
5
6
7
8
9
10
11
12
13
14
15
16
17
18
19
20
21
22
23
24
25
26
27
28
29
30
# 正向解析 named.localhost
;缓存时间
$TTL 1D
;@表示相应的域名
@ IN SOA @ rname.invalid. (
;解析的域名 类型 授权域 授权域名服务器 管理员邮箱
0 ; serial 序列号,每次更新该文件系列号都应该变大
1D ; refresh 刷新时间,即规定从域名服务器多长时间查询一个主服务器,以保证从服务器的数据是最新的
1H ; retry 重试时间,即当从服务试图在主服务器上查询更时,而连接失败了,则这个值规定了从服务多长时间后再试
1W ; expire 过期时间,从服务器在向主服务更新失败后多长时间后清除对应的记录
3H ) ; minimum 这个数据用来规定缓冲服务器不能与主服务联系上后多长时间清除相应的记录
NS @
;NS 名称服务器,表示这个主机为域名服务器
A 127.0.0.1
;主机头 A记录 IP
AAAA ::1
; AAAA 解析为IPV6地址

# 反向解析 named.loopback
$TTL 1D
@ IN SOA @ rname.invalid. (
0 ; serial
1D ; refresh
1H ; retry
1W ; expire
3H ) ; minimum
NS @
PTR localhost
;IP 反向指针 域名
;PTR 反向指针 反解

2.3 正向解析

  1. 修改主配文件
1
2
3
4
zone "cqm.com" IN {
type master;
file "cqm.com.zone";
};
  1. 创建区域数据库文件
1
2
3
4
5
6
7
8
9
10
11
12
13
14
15
16
17
18
19
20
21
22
23
24
25
cp /var/named/chroot/var/named/named.localhost /var/named/chroot/var/named/cqm.com.zone
chgrp named cqm.com.zone
vim /var/named/chroot/var/named/cqm.com.zone

$TTL 1D
cqm.com. IN SOA dns.cqm.com. rname.invalid. (
0 ; serial
1D ; refresh
1H ; retry
1W ; expire
3H ) ; minimum
# A:IPv4解析为域名
# PTR:域名解析为IP
# MX
# CNAME:设置别名
NS dns.cqm.com.
# 解析dns为192.168.88.132
dns A 192.168.88.132
# 解析www为192.168.88.132
www A 192.168.88.132
# 用news访问也解析为www
news CNAME www

# 检测文件是否有误
named-checkzone cqm.com cqm.com.zone
  1. 在客户端上配置DNS
1
2
vim /etc/resolve.conf
nameserver 192.168.88.132
  1. 通过host命令进行测试
1
2
3
4
5
6
7
yum -y install bind-utils
host www.cqm.com
www.cqm.com has address 192.168.88.132

host news.cqm.com
news.cqm.com is an alias for www.cqm.com.
www.cqm.com has address 192.168.88.132

2.4 反向解析

  1. 修改主配文件
1
2
3
4
zone "88.168.192.in-addr.arpa" IN {
type master;
file "192.168.88.arpa";
};
  1. 创建区域数据库文件
1
2
3
4
5
6
7
8
9
10
11
12
13
14
cp /var/named/chroot/var/named/named.loopback /var/named/chroot/var/named/192.168.88.arpa
vim /var/named/chroot/var/named/192.168.88.arpa

$TTL 1D
88.168.192.in-addr.arpa. IN SOA dns.cqm.com. rname.invalid. (
0 ; serial
1D ; refresh
1H ; retry
1W ; expire
3H ) ; minimum
NS dns.cqm.com.
132 PTR www.cqm.com.

named-checkzone 88.168.192.in-addr.arpa 192.168.88.arpa
  1. 测试
1
2
host 192.168.88.132
132.88.168.192.in-addr.arpa domain name pointer www.cqm.com.

2.5 主从同步

即配置两台DNS服务器,由于上边我们以及配置过主DNS了,接下来再配置一台辅DNS服务器即可。

主DNS服务器IP:192.168.88.132

辅DNS服务器IP:192.168.88.135

  1. 安装DNS
1
yum -y install bind bind-chroot
  1. 配置主配置文件
1
2
3
4
5
6
7
8
9
10
11
12
13
14
15
16
17
18
19
20
21
22
23
24
25
26
27
28
29
30
31
32
33
34
35
36
37
38
39
40
41
42
43
44
45
scp root@192.168.88.132:/var/named/chroot/etc/named.conf /var/named/chroot/etc/named.conf
chgrp named /var/named/chroot/etc/named.conf
vim /var/named/chroot/etc/named.conf

options {
listen-on port 53 { 192.168.88.135; };
#listen-on-v6 port 53 { ::1; };
directory "/var/named";
dump-file "/var/named/data/cache_dump.db";
statistics-file "/var/named/data/named_stats.txt";
memstatistics-file "/var/named/data/named_mem_stats.txt";
recursing-file "/var/named/data/named.recursing";
secroots-file "/var/named/data/named.secroots";
allow-query { any; };
# 从主DNS服务器拷过来的数据不进行加密
masterfile-format text;

recursion yes;

dnssec-enable yes;
dnssec-validation yes;

pid-file "/run/named/named.pid";
session-keyfile "/run/named/session.key";
};

zone "." IN {
type hint;
file "named.ca";
};

zone "cqm.com" IN {
type slave;
file "cqm.com.zone";
masters { 192.168.88.132; };
};

zone "88.168.192.in-addr.arpa" IN {
type slave;
file "192.168.88.arpa";
masters { 192.168.88.132; };
};

include "/etc/named.rfc1912.zones";
include "/etc/named.root.key";
  1. 配置和主DNS服务器相同的区域数据库文件
1
2
3
4
vim cqm.com.zone
...
vim 192.168.88.arpa
...
  1. 将DNS服务器设为自己后进行测试
1
2
3
4
vim /etc/reslove.comf
nameserver 192.168.88.135
host www.cqm.com
...

2.6 智能解析

在DNS中植入全世界的IP库以及IP对应的地域,当用户发来请求时,会根据用户属于哪个地区来找那个地区的区域数据库文件来进行解析,从而使得不同地域的用户解析不同。

例子:

部署一台智能解析DNS服务器,对cqm.com进行解析

深圳用户解析为1.1.1.1

广州用户解析为2.2.2.2

佛山用户解析为3.3.3.3

  1. 修改主配文件
1
2
3
4
5
6
7
8
9
10
11
12
13
14
15
16
17
18
19
20
21
22
23
24
25
26
27
28
29
30
31
32
33
34
35
36
37
38
39
40
41
42
43
44
45
46
47
48
49
50
51
52
53
54
55
56
57
58
59
60
61
62
63
64
65
66
67
68
69
70
71
options {
listen-on port 53 { 192.168.88.132; };
#listen-on-v6 port 53 { ::1; };
directory "/var/named";
dump-file "/var/named/data/cache_dump.db";
statistics-file "/var/named/data/named_stats.txt";
memstatistics-file "/var/named/data/named_mem_stats.txt";
recursing-file "/var/named/data/named.recursing";
secroots-file "/var/named/data/named.secroots";
allow-query { any; };

recursion yes;

dnssec-enable yes;
dnssec-validation yes;

pid-file "/run/named/named.pid";
session-keyfile "/run/named/session.key";
};

acl sz {
# 假设该网段是深圳的IP地址段
192.168.77.0/24;
};

acl gz {
192.168.88.0/24;
};

acl fs {
192.168.99.0/24;
};

view shenzhen {
match-clients { sz; };
zone "." IN {
type hint;
file "named.ca";
};

zone "cqm.com" IN {
type master;
file "cqm.com.zone.SZ";
};
};

view guangzhou {
match-clients { gz; };
zone "." IN {
type hint;
file "named.ca";
};

zone "cqm.com" IN {
type master;
file "cqm.com.zone.GZ";
};
};

view foshan {
match-clients { fs; };
zone "." IN {
type hint;
file "named.ca";
};

zone "cqm.com" IN {
type master;
file "cqm.com.zone.FS";
};
};
  1. 添加区域数据库文件
1
2
3
4
5
6
7
8
9
10
11
12
13
14
15
16
17
18
19
20
21
22
23
24
25
26
27
28
29
30
31
32
33
34
35
36
37
38
39
40
41
42
43
cp cqm.com.zone cqm.com.zone.SZ
cp cqm.com.zone cqm.com.zone.GZ
cp cqm.com.zone cqm.com.zone.FS
chgrp named cqm.com.zone.*

# 深圳
$TTL 1D
cqm.com. IN SOA dns.cqm.com. rname.invalid. (
0 ; serial
1D ; refresh
1H ; retry
1W ; expire
3H ) ; minimum
NS dns.cqm.com.
dns A 192.168.88.132
www A 1.1.1.1
news CNAME www

# 广州
$TTL 1D
cqm.com. IN SOA dns.cqm.com. rname.invalid. (
0 ; serial
1D ; refresh
1H ; retry
1W ; expire
3H ) ; minimum
NS dns.cqm.com.
dns A 192.168.88.132
www A 2.2.2.2
news CNAME www
# 佛山

$TTL 1D
cqm.com. IN SOA dns.cqm.com. rname.invalid. (
0 ; serial
1D ; refresh
1H ; retry
1W ; expire
3H ) ; minimum
NS dns.cqm.com.
dns A 192.168.88.132
www A 3.3.3.3
news CNAME www
  1. 测试
1
2
3
# 测试主机的地址段为192.168.88.0/24网段的,所以属于广州区域,即匹配解析到2.2.2.2
host www.cqm.com
www.cqm.com has address 2.2.2.2

三、FTP文件传输服务

3.1 FTP服务介绍

FTP即文件传输协议,是TCP/IP协议组的协议之一。

FTP默认采用TCP20和21端口,20用于传输数据,21用于控制传输信息。

FTP分别有主动传输方式和被动传输方式两种,当FTP为主动传输方式时运用20和21端口,而当FTP为被动传输方式时则会随即打开一个大于1024的端口来进行数据的传输。

3.2 FTP服务部署

  1. 安装vsftpd
1
yum -y install vsftpd
  1. 主配文件详解
1
2
3
4
5
6
7
8
9
10
11
12
13
14
15
16
17
18
19
20
21
22
23
24
25
26
27
28
29
30
31
32
33
34
35
36
37
38
39
40
41
42
43
44
45
46
47
48
49
50
51
52
53
54
55
56
57
58
59
60
61
62
63
64
65
66
67
68
69
70
71
72
73
74
75
76
77
78
79
80
81
82
83
84
85
86
87
88
89
90
91
92
93
94
95
96
97
98
99
100
101
102
103
104
105
106
107
108
109
110
111
112
113
114
115
116
117
118
119
120
121
122
123
124
125
126
127
128
129
130
131
132
133
134
135
136
137
138
139
140
141
142
143
144
145
146
147
148
149
150
151
152
153
154
155
156
157
158
159
160
161
162
163
164
165
166
167
# Example config file /etc/vsftpd/vsftpd.conf
#
# The default compiled in settings are fairly paranoid. This sample file
# loosens things up a bit, to make the ftp daemon more usable.
# Please see vsftpd.conf.5 for all compiled in defaults.
#
# READ THIS: This example file is NOT an exhaustive list of vsftpd options.
# Please read the vsftpd.conf.5 manual page to get a full idea of vsftpd's
# capabilities.
#
#匿名用户访问,YES是允许,NO是拒绝
# Allow anonymous FTP? (Beware - allowed by default if you comment this out).
anonymous_enable=YES
#
# Uncomment this to allow local users to log in.
# 本地用户登录,YES是允许,NO是拒绝.默认访问的是本地用户家目录,如果你开启了selinux
# 请设置开启布尔值ftp_home_dir为ON
# When SELinux is enforcing check for SE bool ftp_home_dir
local_enable=YES
#
#允许本地用户上传
# Uncomment this to enable any form of FTP write command.
write_enable=YES
#
# Default umask for local users is 077. You may wish to change this to 022,
# 上传的权限是022,使用的是umask权限。对应的目录是755,文件是644
# if your users expect that (022 is used by most other ftpd's)
local_umask=022
#
# Uncomment this to allow the anonymous FTP user to upload files. This only
# has an effect if the above global write enable is activated. Also, you will
# obviously need to create a directory writable by the FTP user.
# When SELinux is enforcing check for SE bool allow_ftpd_anon_write, allow_ftpd_full_access
# 开启匿名用户上传功能,默认是拒绝的
#anon_upload_enable=YES
#
# Uncomment this if you want the anonymous FTP user to be able to create
# new directories.
# 开启匿名用户创建文件或文件夹权限
#anon_mkdir_write_enable=YES
#
# Activate directory messages - messages given to remote users when they
# go into a certain directory.
# 开启目录欢迎消息,一般对命令行登陆有效
dirmessage_enable=YES
#
# Activate logging of uploads/downloads.
# 开启上传和下载日志记录功能
xferlog_enable=YES
#
#使用标准模式
# Make sure PORT transfer connections originate from port 20 (ftp-data).
connect_from_port_20=YES
#
# If you want, you can arrange for uploaded anonymous files to be owned by
# a different user. Note! Using "root" for uploaded files is not
# recommended!
# 声明匿名用户上传文件的所有者
# 允许更改匿名用户上传文件的所有者
#chown_uploads=YES
#所有者为whoever
#chown_username=whoever
#
# You may override where the log file goes if you like. The default is shown
# below.
# 日志文件路径
#xferlog_file=/var/log/xferlog
#
# If you want, you can have your log file in standard ftpd xferlog format.
# Note that the default log file location is /var/log/xferlog in this case.
# 日志文件采用标准格斯
xferlog_std_format=YES
#
# You may change the default value for timing out an idle session.
# 会话超时时间
#idle_session_timeout=600
#
# You may change the default value for timing out a data connection.
# 数据传输超时时间
#data_connection_timeout=120
#
# It is recommended that you define on your system a unique user which the
# ftp server can use as a totally isolated and unprivileged user.
# FTP子进程管理用户
#nopriv_user=ftpsecure
#
# Enable this and the server will recognise asynchronous ABOR requests. Not
# recommended for security (the code is non-trivial). Not enabling it,
# however, may confuse older FTP clients.
# 是否允许客户端发起“async ABOR”请求,该操作是不安全的默认禁止。
#async_abor_enable=YES
#
# By default the server will pretend to allow ASCII mode but in fact ignore
# the request. Turn on the below options to have the server actually do ASCII
# mangling on files when in ASCII mode. The vsftpd.conf(5) man page explains
# the behaviour when these options are disabled.
# Beware that on some FTP servers, ASCII support allows a denial of service
# attack (DoS) via the command "SIZE /big/file" in ASCII mode. vsftpd
# predicted this attack and has always been safe, reporting the size of the
# raw file.
# ASCII mangling is a horrible feature of the protocol.
# 该选项用于指定是否允许上传时以ASCII模式传输数据
#ascii_upload_enable=YES
#该选项用于指定是否允许下载时以ASCII模式传输数据
#ascii_download_enable=YES
#
# You may fully customise the login banner string:
# FTP文本界面登陆欢迎词
#ftpd_banner=Welcome to blah FTP service.
#
# You may specify a file of disallowed anonymous e-mail addresses. Apparently
# useful for combatting certain DoS attacks.
# 是否开启拒绝的Email功能
#deny_email_enable=YES
# (default follows)
# 指定保存被拒接的Email地址的文件
#banned_email_file=/etc/vsftpd/banned_emails
#
# You may specify an explicit list of local users to chroot() to their home
# directory. If chroot_local_user is YES, then this list becomes a list of
# users to NOT chroot().
# (Warning! chroot'ing can be very dangerous. If using chroot, make sure that
# the user does not have write access to the top level directory within the
# chroot)
# 是否开启对本地用户chroot的限制,YES为默认所有用户都不能切出家目录,NO代表默认用户都可以切出家目录
# 设置方法类似于:YES拒绝所有允许个别;NO允许所有拒绝个别
#chroot_local_user=YES
# 开启特例列表
#chroot_list_enable=YES
# (default follows)
# 如果chroot_local_user的值是YES则该文件中的用户是可以切出家目录,如果是NO,该文件中的用户则不能切出家目录
# 一行一个用户。
#chroot_list_file=/etc/vsftpd/chroot_list
#
# You may activate the "-R" option to the builtin ls. This is disabled by
# default to avoid remote users being able to cause excessive I/O on large
# sites. However, some broken FTP clients such as "ncftp" and "mirror" assume
# the presence of the "-R" option, so there is a strong case for enabling it.
# 是否开启ls 递归查询功能 ls -R
#ls_recurse_enable=YES
#
# When "listen" directive is enabled, vsftpd runs in standalone mode and
# listens on IPv4 sockets. This directive cannot be used in conjunction
# with the listen_ipv6 directive.
# 是否开启ftp独立模式在IPV4
listen=NO
#
# This directive enables listening on IPv6 sockets. By default, listening
# on the IPv6 "any" address (::) will accept connections from both IPv6
# and IPv4 clients. It is not necessary to listen on *both* IPv4 and IPv6
# sockets. If you want that (perhaps because you want to listen on specific
# addresses) then you must run two copies of vsftpd with two configuration
# files.
# Make sure, that one of the listen options is commented !!
# 是否开启ftp独立模式在ipv6
listen_ipv6=YES
#启用pam模块验证
pam_service_name=vsftpd
#是否开启userlist功能.
定义对列表中的用户做定义
userlist_deny=NO
#NO拒绝所有人访问,对应列表中的用户可以访问,YES允许所有人访问,列表中的用户无法访问。
#只有userlist_file=/etc/vsftpd/user_list定义的用户才可以访问或拒绝访问
userlist_enable=YES
#是否开启tcp_wrappers管理,TCP_Wrappers是一个工作在第四层(传输层)的的安全工具,
#对有状态连接的特定服务进行安全检测并实现访问控制
tcp_wrappers=YES
  1. 匿名用户和本地用户

    • 需要注意的是,匿名用户访问的是/var/ftp,而本地用户访问的话是家目录。

    • 关于权限,在主配文件中设置的权限是反码,文件实际权限 = 666 - 反码。

    • 假如主配文件中设置为022,那么文件实际权限 = 666 - 022 = 644,文件夹实际权限 = 777 - 022 = 755。

    • 在linux端访问FTP服务器时,无论FTP服务器是否开启了匿名用户访问,客户访问时都要输入用户名和密码,匿名用户用户名ftp,密码随意,但是需要为带有@的email地址。

  2. 开启chroot

1
2
3
4
5
6
7
8
9
10
# 是否开启对本地用户chroot的限制,YES为默认所有用户都不能切出家目录,NO代表默认用户都可以切出家目录
# 设置方法类似于:YES拒绝所有允许个别;NO允许所有拒绝个别
chroot_local_user=YES
chroot_list_enable=YES
# 特例列表
chroot_list_file=/etc/vsftpd/chroot_list

# 如果用户家目录有写权限的话,则该用户登陆不上
# 如果想在有写权限的家目录登录的话,需在配置文件加上
allow_writeable_chroot=YES

3.3 FTP命令

登录到FTP服务器后,基本命令如下

1
2
3
4
5
6
7
8
9
help # 打印命令菜单
!+linux命令 # 执行linux命令
lcd 目录路径 # 切换linux当前路径
put mput # 上传 批量上传
get mget # 下载 批量下载
ls dir # 列出目录内容
mkdir cd delete rmdir # 创建目录 进入目录 删除文件 删除目录
pwd # 现实FTP当前路径
open close bye # 开启/关闭/退出FTP

3.4 虚拟用户

由于FTP是采用本地用户来进行登录的,所以会将本地用户暴露在互联网中,如果没有相关安全设置,就会造成FTP不安全。

因此FTP可以设置虚拟用户来解决该问题。

在主配文件中开启虚拟用户

1
2
3
4
5
6
guest_enable=YES
guest_username=cqm
# 虚拟用户不用本地用户的权限
virtual_use_local_privs=NO
# 用户文件存放地址
user_config_dir=/etc/vsftpd/vconf.d

3.5 基于虚拟用户配置的安全FTP

案例要求:

  • 公司公共文件可以通过匿名下载
  • 公式A部门、B部门、C部门分别由自己的文件夹,并相互隔离
  • 部门之间只有主管拥有上传权限,部门员工只有下载权限
  • 禁止用户查看家目录以外的数据
  • 确保FTP账号安全
  1. 创建虚拟用户映射本地账号
1
useradd -s /sbin/nologin -d /var/tmp/vuser_ftp cqm
  1. 创建目录,所有操作都只能在此目录进行
1
2
3
4
chmod 500 /var/tmp/vuser_ftp
mkdir /var/tmp/vuser_ftp/{A,B,C}
chmod 700 /var/tmp/vuser_ftp/*
chown -R cqm:cqm /var/tmp/vuser_ftp
  1. 创建虚拟用户账号密码文件,并生成db文件
1
2
3
4
5
6
7
8
9
10
11
12
13
14
15
vim /etc/vsftpd/vuser
A_01
123
B_01
123
C_01
123
A_02
123
B_02
123
C_02
123
db_load -T -t hash -f /etc/vsftpd/vuser /etc/vsftpd/vuser.db
chmod 600 /etc/vsftpd/vuser.db
  1. 设置虚拟用户pam认证
1
2
3
vim /etc/pam.d/vsftpd
auth sufficient /lib64/security/pam_userdb.so db=/etc/vsftpd/vuser
account sufficient /lib64/security/pam_userdb.so db=/etc/vsftpd/vuser
  1. 要求不能切出家目录,所以要设置chroot_list
1
2
3
4
5
6
7
vim /etc/vsftpd/chroot_list
A_01
B_01
C_01
A_02
B_02
C_02
  1. 创建子配置文件
1
2
3
4
5
6
7
8
9
10
11
12
13
14
15
16
17
18
19
20
mkdir /etc/vsftpd/vconf.d
# A主管文件
vim /etc/vsftpd/vconf.d/A_01
# 指定家目录
local_root=/var/tmp/vuser_ftp/A
# 指定权限
anon_umask=077
# 下载权限
anon_world_readable_only=NO
# 上传权限
anon_upload_enable=YES
# 创建目录权限
anon_mkdir_write_enable=YES
# 删除和重命名目录权限
anon_other_write_enable=YES

# A员工文件
vim /etc/vsftpd/vconf.d/A_02
local_root=/var/tmp/vuser_ftp/A
anon_world_readable_only=NO
  1. 配置主配文件
1
2
3
4
5
6
7
8
9
10
11
12
13
14
15
16
17
18
19
20
21
vim /etc/vsftpd/vsftpd.conf
anonymous_enable=YES
local_enable=YES
write_enable=YES
local_umask=022
dirmessage_enable=YES
xferlog_enable=YES
connect_from_port_20=YES
xferlog_std_format=YES
chroot_local_user=YES
chroot_list_enable=YES
chroot_list_file=/etc/vsftpd/chroot_list
listen=YES
listen_ipv6=NO
pam_service_name=vsftpd
userlist_enable=YES
tcp_wrappers=YES
guest_enable=YES
guest_username=cqm
virtual_use_local_privs=NO
user_config_dir=/etc/vsftpd/vconf.d
  1. 测试主管用户和员工用户的权限
1
2
3
4
ftp 192.168.88.132
A_01
123
230 Login successful

四、Samba服务

4.1 Samba服务介绍

Samba是可以实现不同计算机系统之间文件共享的服务,即是在Linux和UNIX系统上实现SMB协议的一个免费软件。

SMB(Server Messages Block,信息服务块)是一种在局域网上共享文件和打印机的一种通信协议,它为局域网内的不同计算机之间提供文件及打印机等资源的共享服务。

Samba采用到的端口有:

  • UDP 137:NetBIOS 名字服务
  • UDP 138:NetBIOS 数据报服务
  • UDP 139:SMB
  • TCP 389:用于 LDAP (Active Directory Mode)
  • TCP 445:NetBIOS服务在windos 2000及以后版本使用此端口, (Common Internet File System,CIFS,它是SMB协议扩展到Internet后,实现Internet文件共享)
  • TCP 901:用于 SWAT,用于网页管理Samba

4.2 Samba服务部署

  1. 安装samba
1
2
yum -y install samba samba-client
systemctl start smb nmb
  1. 主配文件详解
1
2
3
4
5
6
7
8
9
10
11
12
13
14
15
16
17
18
19
20
21
22
23
24
25
26
27
28
29
30
31
32
33
34
35
36
37
38
39
40
41
42
43
44
45
46
47
48
49
50
51
52
53
54
55
56
57
58
59
60
61
62
63
64
65
66
67
68
69
70
71
72
73
74
75
76
77
78
79
80
81
82
83
84
85
86
87
88
89
90
91
92
93
94
95
96
97
98
99
100
101
102
103
104
105
106
107
108
109
110
111
112
113
114
115
116
117
118
119
120
121
122
123
124
125
126
127
128
129
130
131
132
133
134
135
136
137
138
139
140
141
142
143
144
145
146
147
148
149
150
151
152
153
154
155
156
157
158
159
160
161
162
163
164
165
166
167
168
169
170
171
172
173
174
175
176
177
178
179
180
181
182
183
184
185
186
187
188
189
190
191
192
193
194
195
196
197
198
199
200
201
202
203
204
205
206
207
208
209
210
211
212
213
214
215
216
217
218
219
220
221
222
223
224
225
226
227
228
229
230
231
232
233
234
235
236
237
238
239
240
241
242
243
244
245
246
247
248
249
250
251
252
253
254
255
256
257
258
259
260
261
262
263
264
265
266
267
268
269
270
271
272
273
274
275
276
277
278
279
280
281
282
283
284
285
286
287
288
289
290
291
292
293
294
295
296
297
298
299
300
301
302
303
304
305
306
307
308
309
310
311
312
313
314
315
316
317
318
319
320
321
322
323
324
325
326
327
328
329
330
331
332
333
334
335
336
337
338
339
340
341
342
343
344
345
346
347
348
349
350
351
cat /etc/samba/smb.conf.example
# This is the main Samba configuration file. For detailed information about the
# options listed here, refer to the smb.conf(5) manual page. Samba has a huge
# number of configurable options, most of which are not shown in this example.
#
# The Samba Wiki contains a lot of step-by-step guides installing, configuring,
# and using Samba:
# https://wiki.samba.org/index.php/User_Documentation
#
# In this file, lines starting with a semicolon (;) or a hash (#) are
# comments and are ignored. This file uses hashes to denote commentary and
# semicolons for parts of the file you may wish to configure.
#
# NOTE: Run the "testparm" command after modifying this file to check for basic
# syntax errors.
#
#---------------
#
#SAMBA selinux相关设置,如果你开启了selinux,请注意下面的说明
#
#
#Security-Enhanced Linux (SELinux) Notes:
#
# Turn the samba_domain_controller Boolean on to allow a Samba PDC to use the
# useradd and groupadd family of binaries. Run the following command as the
# root user to turn this Boolean on:
# 如果你在域环境中使用samba那么请设置下面的bool值
# setsebool -P samba_domain_controller on
#
# Turn the samba_enable_home_dirs Boolean on if you want to share home
# directories via Samba. Run the following command as the root user to turn this
# Boolean on:
#
# 假如希望通过samba共享用户家目录请设置下面的bool值
# setsebool -P samba_enable_home_dirs on
#
# If you create a new directory, such as a new top-level directory, label it
# with samba_share_t so that SELinux allows Samba to read and write to it. Do
# not label system directories, such as /etc/ and /home/, with samba_share_t, as
# such directories should already have an SELinux label.
#
#加入你想将目录通过samba共享,请确认其目录标签为sambe_share_t
# Run the "ls -ldZ /path/to/directory" command to view the current SELinux
# label for a given directory.
#
# Set SELinux labels only on files and directories you have created. Use the
# chcon command to temporarily change a label:
# 标签设置方法
# chcon -t samba_share_t /path/to/directory
#
# Changes made via chcon are lost when the file system is relabeled or commands
# such as restorecon are run.
#
# Use the samba_export_all_ro or samba_export_all_rw Boolean to share system
# directories. To share such directories and only allow read-only permissions:
# 对共享目录的权限的bool设置,只读或读写
# setsebool -P samba_export_all_ro on
# To share such directories and allow read and write permissions:
# setsebool -P samba_export_all_rw on
#
# To run scripts (preexec/root prexec/print command/...), copy them to the
# /var/lib/samba/scripts/ directory so that SELinux will allow smbd to run them.
# Note that if you move the scripts to /var/lib/samba/scripts/, they retain
# their existing SELinux labels, which may be labels that SELinux does not allow
# smbd to run. Copying the scripts will result in the correct SELinux labels.
# Run the "restorecon -R -v /var/lib/samba/scripts" command as the root user to
# apply the correct SELinux labels to these files.
#
#--------------
#
#======================= Global Settings =====================================
#全局设置,对整个服务都生效
[global]
#网络设置
# ----------------------- Network-Related Options -------------------------
#
# workgroup = the Windows NT domain name or workgroup name, for example, MYGROUP.
#
# server string = the equivalent of the Windows NT Description field.
#
# netbios name = used to specify a server name that is not tied to the hostname,
# maximum is 15 characters.
#
# interfaces = used to configure Samba to listen on multiple network interfaces.
# If you have multiple interfaces, you can use the "interfaces =" option to
# configure which of those interfaces Samba listens on. Never omit the localhost
# interface (lo).
#
# hosts allow = the hosts allowed to connect. This option can also be used on a
# per-share basis.
#
# hosts deny = the hosts not allowed to connect. This option can also be used on
# a per-share basis.
#
#定义计算机的工作组,如果希望和windows共享,可以设置为workgroup,这样就可以在windows的网上邻居中找到linux计算机
workgroup = MYGROUP
#对samba服务器的描述信息
server string = Samba Server Version %v
#设置netbios计算机名称
; netbios name = MYSERVER
#samba使用本机的那块网卡
; interfaces = lo eth0 192.168.12.2/24 192.168.13.2/24
#允许那个网段访问samba服务器共享
; hosts allow = 127. 192.168.12. 192.168.13.
#
#日志选项
# --------------------------- Logging Options -----------------------------
#
# log file = specify where log files are written to and how they are split.
#
# max log size = specify the maximum size log files are allowed to reach. Log
# files are rotated when they reach the size specified with "max log size".
#
#samba日志文件路径
# log files split per-machine:
log file = /var/log/samba/log.%m
#日志文件大小,0为不限制,注意不建议这样设置
# maximum size of 50KB per log file, then rotate:
max log size = 50
#独立服务选项
# ----------------------- Standalone Server Options ------------------------
#
# security = the mode Samba runs in. This can be set to user, share
# (deprecated), or server (deprecated).
#
# passdb backend = the backend used to store user information in. New
# installations should use either tdbsam or ldapsam. No additional configuration
# is required for tdbsam. The "smbpasswd" utility is available for backwards
# compatibility.
#
#samba安全级别
#share: 不需要账号密码,公开共享
#user: 需要提供sam账号密码才能访问共享,私密共享
#server:依靠其他Windows NT/2000或Samba Server来验证用户的账号和密码,是一种代理验证。此种安全模式下,系统管理员可以把所有的Windows用户和口令集中到一个NT系统上,>使用Windows NT进行Samba认证, 远程服务器可以自动认证全部用户和口令,如果认证失败,Samba将使用用户级安全模式作为替代的方式。
#domain:域安全级别,使用主域控制器(PDC)来完成认证。
#
#一般情况下我们使用share和user的比较多,除非公司有完整的域环境
security = user
#该方式则是使用一个数据库文件来建立用户数据库。数据库文件叫passdb.tdb,默认在/etc/samba目录下。passdb.tdb 用户数据库可以使用smbpasswd –a来建立Samba用户,不过要建立的Samba用户必须先是系统用户。我们也可以使用pdbedit命令来建立Samba账户并由其pdbedit管理。
passdb backend = tdbsam
#域成员选项
# ----------------------- Domain Members Options ------------------------
#
# security = must be set to domain or ads.
#
# passdb backend = the backend used to store user information in. New
# installations should use either tdbsam or ldapsam. No additional configuration
# is required for tdbsam. The "smbpasswd" utility is available for backwards
# compatibility.
#
# realm = only use the realm option when the "security = ads" option is set.
# The realm option specifies the Active Directory realm the host is a part of.
#
# password server = only use this option when the "security = server"
# option is set, or if you cannot use DNS to locate a Domain Controller. The
# argument list can include My_PDC_Name, [My_BDC_Name], and [My_Next_BDC_Name]:
#
# password server = My_PDC_Name [My_BDC_Name] [My_Next_BDC_Name]
#
# Use "password server = *" to automatically locate Domain Controllers.
#设置域共享
; security = domain
; passdb backend = tdbsam
#定义域名称
; realm = MY_REALM
#域验证服务器
; password server =
#域控选项
# ----------------------- Domain Controller Options ------------------------
#
# security = must be set to user for domain controllers.
#
# passdb backend = the backend used to store user information in. New
# installations should use either tdbsam or ldapsam. No additional configuration
# is required for tdbsam. The "smbpasswd" utility is available for backwards
# compatibility.
#
# domain master = specifies Samba to be the Domain Master Browser, allowing
# Samba to collate browse lists between subnets. Do not use the "domain master"
# option if you already have a Windows NT domain controller performing this task.
#
# domain logons = allows Samba to provide a network logon service for Windows
# workstations.
#
# logon script = specifies a script to run at login time on the client. These
# scripts must be provided in a share named NETLOGON.
#
# logon path = specifies (with a UNC path) where user profiles are stored.
#
#
; security = user
; passdb backend = tdbsam
; domain master = yes
; domain logons = yes
# the following login script name is determined by the machine name
# (%m):
; logon script = %m.bat
# the following login script name is determined by the UNIX user used:
; logon script = %u.bat
; logon path = \\%L\Profiles\%u
# use an empty path to disable profile support:
; logon path =
# various scripts can be used on a domain controller or a stand-alone
# machine to add or delete corresponding UNIX accounts:
; add user script = /usr/sbin/useradd "%u" -n -g users
; add group script = /usr/sbin/groupadd "%g"
; add machine script = /usr/sbin/useradd -n -c "Workstation (%u)" -M -d /nohome -s /bin/false "%u"
; delete user script = /usr/sbin/userdel "%u"
; delete user from group script = /usr/sbin/userdel "%u" "%g"
; delete group script = /usr/sbin/groupdel "%g"
#这些设置选项主要用于SMB网络中进行浏览时,设置samba服务器的行为。缺省情况不让 samba服务器参加broswser的推举过程,为了使得samba服务器能成为browser,就需要设定local master =yes。然后samba服务就可以根据os level设置的权重进行推举,缺省的os level为0,这个权重不会赢得推举。但可以取消注释,将os level设置为33,这将在与所有Windows计算机(包括Windows NT)的推举竞赛中获得胜利,因为NT server的权重为32。设置比33更高的权重,只是在不同的samba 服务器之间进行选择时才有意义。
#
# preferred master 可以设置自己优先成为浏览服务器候选人
#
# ----------------------- Browser Control Options ----------------------------
#
# local master = when set to no, Samba does not become the master browser on
# your network. When set to yes, normal election rules apply.
#
# os level = determines the precedence the server has in master browser
# elections. The default value should be reasonable.
#
# preferred master = when set to yes, Samba forces a local browser election at
# start up (and gives itself a slightly higher chance of winning the election).
#
; local master = no
; os level = 33
; preferred master = yes
#
#
#wins服务,如果网络中配置了wins服务器可以在此设置wins相关项
#----------------------------- Name Resolution -------------------------------
#
# This section details the support for the Windows Internet Name Service (WINS).
#
# Note: Samba can be either a WINS server or a WINS client, but not both.
#
# wins support = when set to yes, the NMBD component of Samba enables its WINS
# server.
#
# wins server = tells the NMBD component of Samba to be a WINS client.
#
# wins proxy = when set to yes, Samba answers name resolution queries on behalf
# of a non WINS capable client. For this to work, there must be at least one
# WINS server on the network. The default is no.
#
# dns proxy = when set to yes, Samba attempts to resolve NetBIOS names via DNS
# nslookups.
#设置nmb进程支持wins服务
; wins support = yes
#设置wins服务器ip
; wins server = w.x.y.z
#设置wins代理IP
; wins proxy = yes
#设置Samba服务器是否在无法联系WINS服务器时通过DNS去解析主机的NetBIOS名
; dns proxy = yes
#该部分包括Samba服务器打印机相关设置
# --------------------------- Printing Options -----------------------------
#
# The options in this section allow you to configure a non-default printing
# system.
#
# load printers = when set you yes, the list of printers is automatically
# loaded, rather than setting them up individually.
#
# cups options = allows you to pass options to the CUPS library. Setting this
# option to raw, for example, allows you to use drivers on your Windows clients.
#
# printcap name = used to specify an alternative printcap file.
#
#是否启用共享打印机
load printers = yes
cups options = raw
#打印机配置文件
; printcap name = /etc/printcap
# obtain a list of printers automatically on UNIX System V systems:
; printcap name = lpstat
#打印机的系统类型,现在支持的打印系统有:bsd, sysv, plp, lprng, aix, hpux, qnx,cups
; printing = cups
#该部分包括Samba服务器如何保留从Windows客户端复制或移动到Samba服务器共享目录文件的Windows文件属性的相关配置.
# --------------------------- File System Options ---------------------------
#
# The options in this section can be un-commented if the file system supports
# extended attributes, and those attributes are enabled (usually via the
# "user_xattr" mount option). These options allow the administrator to specify
# that DOS attributes are stored in extended attributes and also make sure that
# Samba does not change the permission bits.
#
# Note: These options can be used on a per-share basis. Setting them globally
# (in the [global] section) makes them the default for all shares.
#当Windows客户端将文件复制或移动到Samba服务器共享目录时,是否保留文件在Windows中的存档属性。默认no。
; map archive = no
#当Windows客户端将文件复制或移动到Samba服务器共享目录时,是否保留文件在Windows中的隐藏属性。默认no。
; map hidden = no
#当Windows客户端将文件复制或移动到Samba服务器共享目录时,是否保留文件在Windows中的只读属性。默认为no。
; map read only = no
#当Windows客户端将文件复制或移动到Samba服务器共享目录时,是否保留文件在Windows中的系统文件属性。默认为no。
; map system = no
#当Windows客户端将文件复制或移动到Samba服务器共享目录时,是否保留文件在Windows中的相关属性(只读、系统、隐藏、存档属性)。默认为yes
; store dos attributes = yes
#共享设置
#============================ Share Definitions ==============================
#用户家目录共享
#共享名称
[homes]
#描述
comment = Home Directories
#是否支持浏览
browseable = no
#是否允许写入
writable = yes
#允许访问该共享资源的smb用户,@组
; valid users = %S
; valid users = MYDOMAIN\%S
#打印机共享
[printers]
#描述
comment = All Printers
#路径
path = /var/spool/samba
#是否可浏览,no类似隐藏共享
browseable = no
#是否支持guest访问,和public指令类似
guest ok = no
#是否可写
writable = no
#是否允许打印
printable = yes
# Un-comment the following and create the netlogon directory for Domain Logons:
; [netlogon]
; comment = Network Logon Service
; path = /var/lib/samba/netlogon
; guest ok = yes
; writable = no
; share modes = no
# Un-comment the following to provide a specific roaming profile share.
# The default is to use the user's home directory:
; [Profiles]
; path = /var/lib/samba/profiles
; browseable = no
; guest ok = yes
# A publicly accessible directory that is read only, except for users in the
# "staff" group (which have write permissions):
; [public]
; comment = Public Stuff
; path = /home/samba
; public = yes
; writable = no
; printable = no
#定义允许哪些smb用户写入
; write list = +staff

4.3 Samba共享

案例:在Windows上访问Samba服务器,共享目录为/common,指定用cqm1、cqm2用户才能访问,且只有cqm2有写权限。

  1. 创建Samba用户
1
2
3
4
5
6
7
8
9
10
# smbpasswd用户命令
# -a 添加用户 smbpasswd -a cqm
# -x 删除用户 smbpasswd -x cqm
# -d 禁用帐号 smbpasswd -d cqm
# -e 取消禁用 smbpasswd -e cqm
# -n 清除密码 smbpasswd -a cqm
useradd -s /sbin/nologin cqm1
useradd -s /sbin/nologin cqm2
smbpasswd -a cqm1
smbpasswd -a cqm2
  1. 创建共享目录
1
2
3
mkdir /common
# 设置757是为了让cqm2有写权限
chmod 757 /common
  1. 修改主配文件
1
2
3
4
5
6
7
8
9
10
11
[global]
workgroup = WORKGROUP
...
[common]
comment = samba share directory
path = /common
browseable = YES
hosts allow = 10.0.0.0/8,192.168.88.0/24
valid users = cqm1,cqm2
writable = No
write list = cqm2
  1. 在Windows中输入 \\192.168.88.132 访问
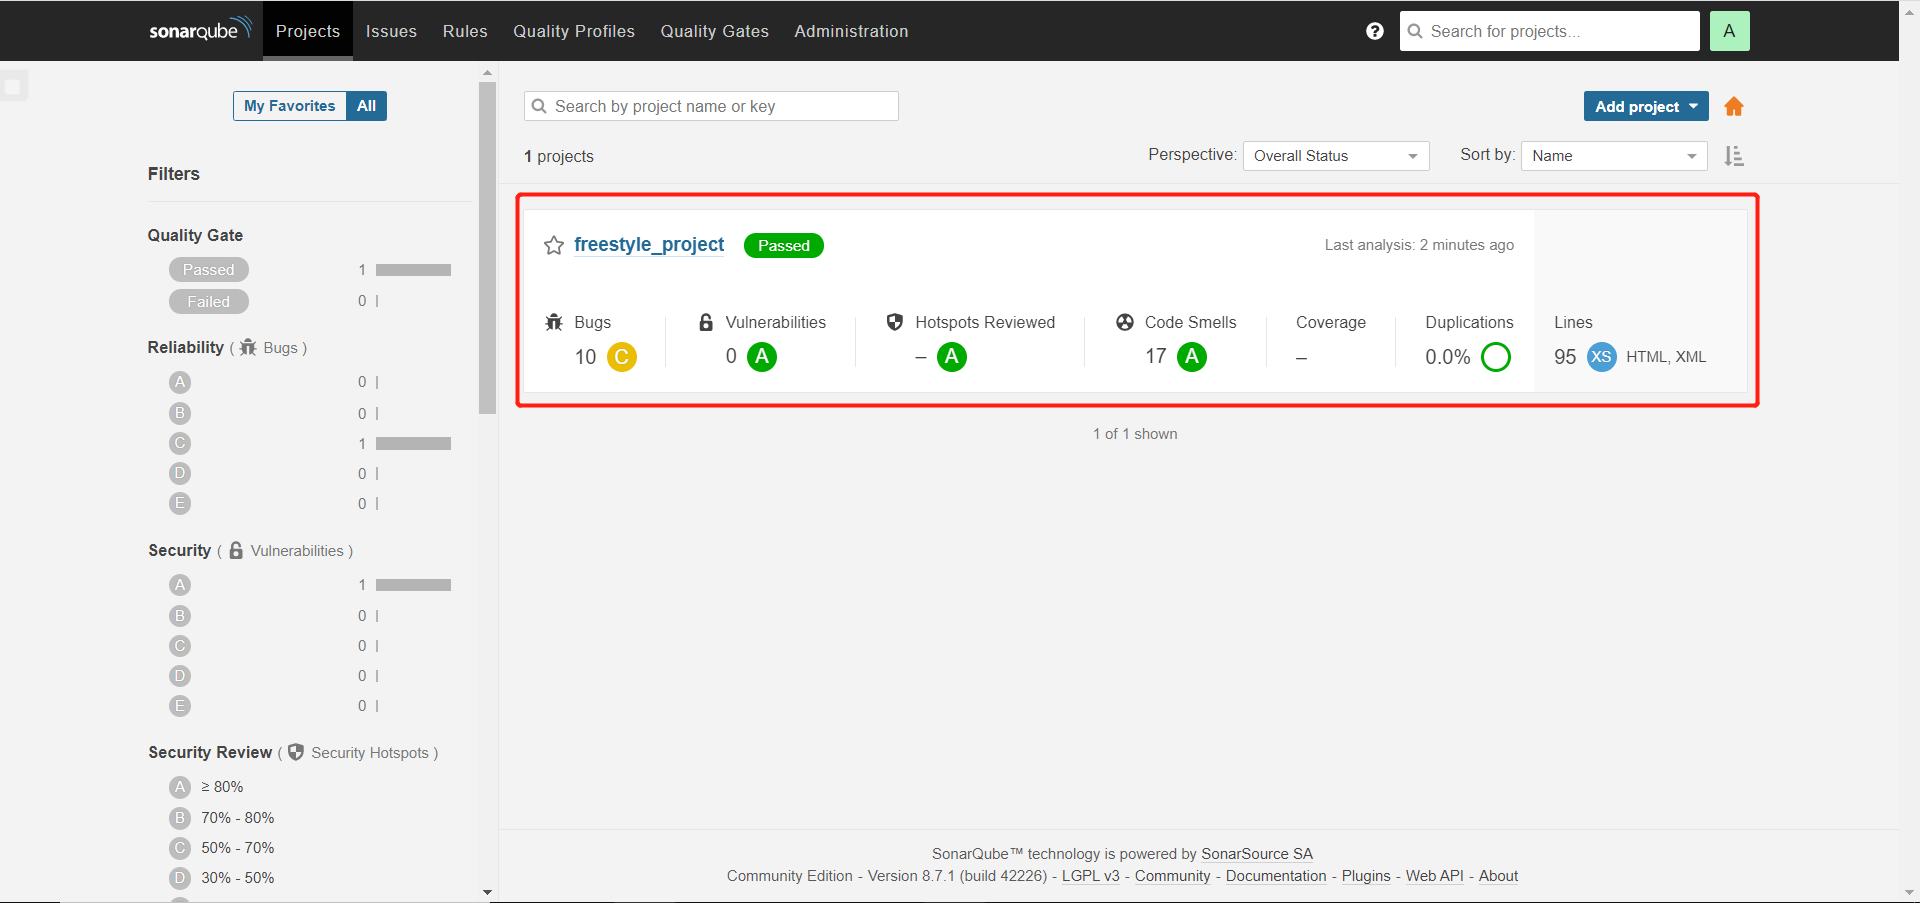
首先是cqm1用户

Samba一

可以看到cqm1用户没有写入权限

Samba二

cqm2用户

Samba三

可以看到cqm2用户有创建文件夹的权限

Samba四

4.4 Linux挂载

  1. 在客户端上安装samba-client
1
yum -y install samba-client
  1. 通过smbclient命令访问
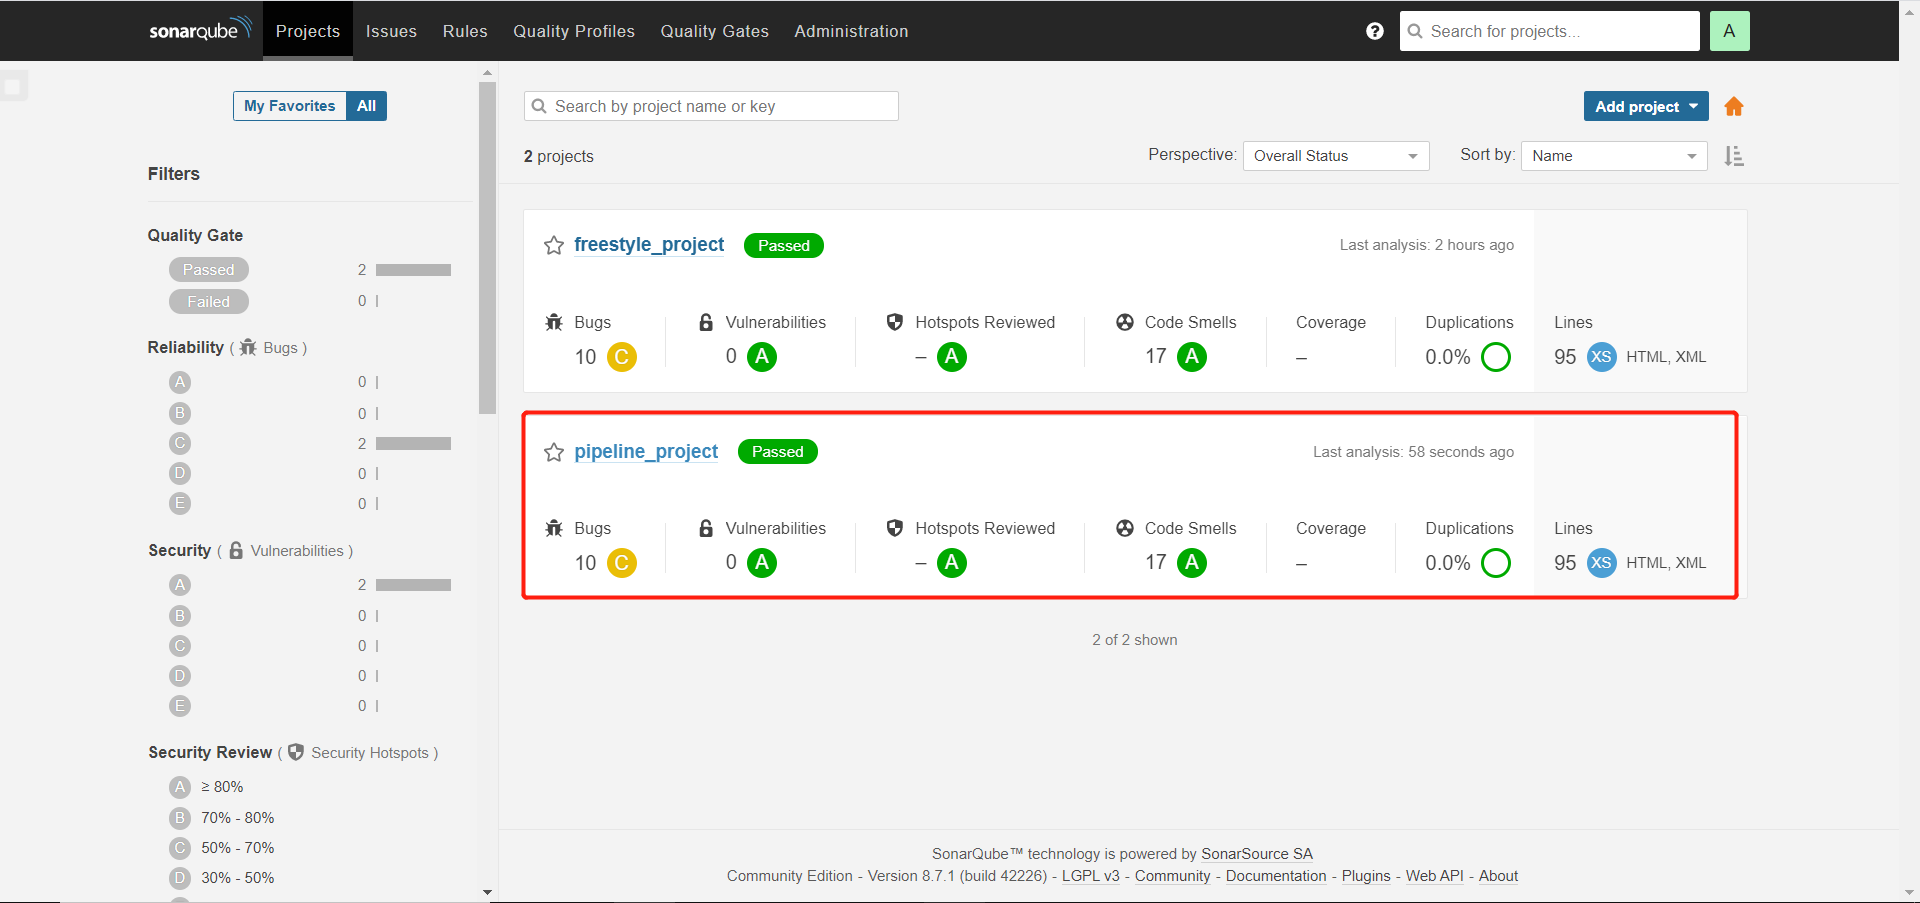
1
smbclient //192.168.88.132/common -U cqm2%toortoor
  1. 通过mount命令挂载
1
2
3
4
mkdir /common
mount -o username=cqm2,password=toortoor -t cifs //192.168.88.132/common /common
mount
//192.168.88.132/common on /common type cifs (rw,relatime,vers=default,cache=strict,username=cqm2,domain=LOCALHOST,uid=0,noforceuid,gid=0,noforcegid,addr=192.168.88.132,file_mode=0755,dir_mode=0755,soft,nounix,serverino,mapposix,rsize=1048576,wsize=1048576,echo_interval=60,actimeo=1)

五、NFS文件服务

5.1 NFS服务介绍

NFS即网络文件系统,它允许网络中的计算机之间通过TCP/IP网络共享资源。在NFS的应用中,本地NFS的客户端应用可以透明地读写位于远端NFS服务器上的文件,就像访问本地文件一样。

NFS应用场景:

  • 共享存储服务器:图片服务器、视频服务器
  • 家目录漫游:域用户家目录服务器
  • 文件服务器:文件存储服务器

5.2 NFS实现共享

  1. 安装NFS
1
2
3
yum -y install nfs-utils
systemctl start rpcbind
systemctl start nfs
  1. /etc/exports共享文件
1
2
3
4
5
6
7
8
9
10
11
12
13
14
15
16
17
18
19
20
21
22
# 共享格式
# 共享目录绝对路径 IP地址或网段地址(权限1,权限2)
/test 192.168.88.132(rw,sync)
# 权限说明
ro 只读访问
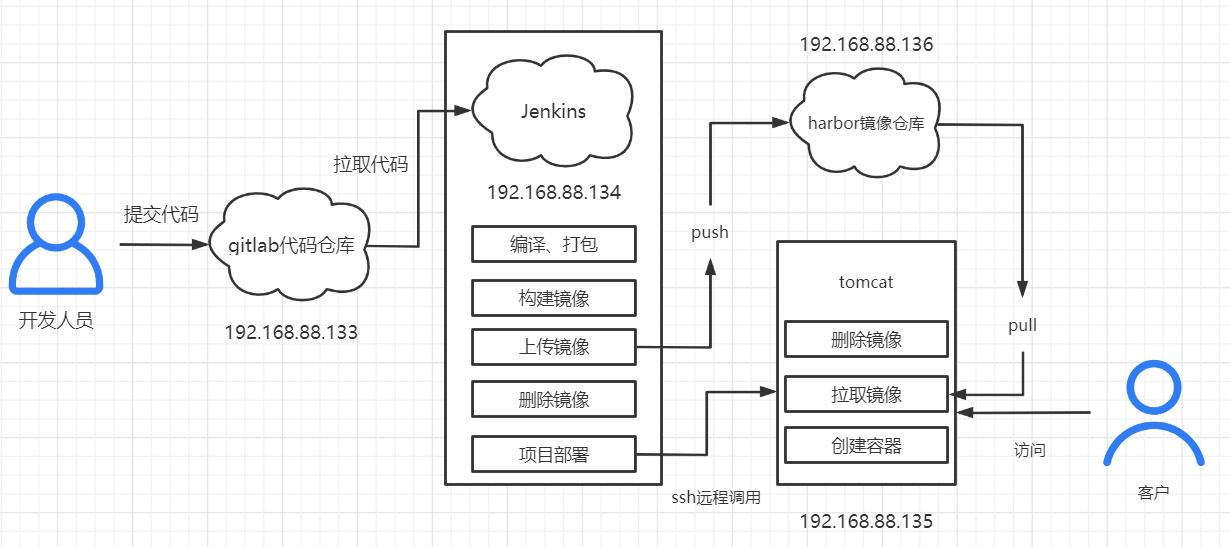
rw 读写访问
sync 所有数据在请求时写入共享
async NFS在写入数据前可以相应请求
secure NFS通过1024以下的安全TCP/IP端口发送
insecure NFS通过1024以上的端口发送
wdelay 如果多个用户要写入NFS目录,则归组写入(默认)
no_wdelay 如果多个用户要写入NFS目录,则立即写入,当使用async时,无需此设置。
hide 在NFS共享目录中不共享其子目录
no_hide 共享NFS目录的子目录
subtree_check 如果共享/usr/bin之类的子目录时,强制NFS检查父目录的权限(默认)
no_subtree_check 和上面相对,不检查父目录权限
all_squash 共享文件的UID和GID映射匿名用户anonymous,适合公用目录。
no_all_squash 保留共享文件的UID和GID(默认)
root_squash root用户的所有请求映射成如anonymous用户一样的权限(默认)
no_root_squash root用户具有根目录的完全管理访问权限
anonuid=xxx 指定NFS服务器/etc/passwd文件中匿名用户的UID
anongid=xxx 指定NFS服务器/etc/passwd文件中匿名用户的GID
  1. exportfs共享管理命令
1
2
3
4
5
6
7
8
9
10
exportfs命令:
-a 打开或取消所有目录共享。
-o options,... 指定一列共享选项,与 exports(5) 中讲到的类似。
-i 忽略 /etc/exports 文件,从而只使用默认的和命令行指定的选项。
-r 重新共享所有目录。它使/var/lib/nfs/xtab和/etc/exports同步。它将/etc/exports中已删除的条目从 /var/lib/nfs/xtab中删除,将内核共享表中任何不再有效的条目移除。
-u 取消一个或多个目录的共享。
-f 在“新”模式下,刷新内核共享表之外的任何东西。
任何活动的客户程序将在它们的下次请求中得到mountd 添加的新的共享条目。
-v 输出详细信息。当共享或者取消共享时,显示在做什么。
显示当前共享列表的时候,同时显示共享的选项。
  1. 设置共享
1
2
3
4
5
6
7
8
9
10
# 创建被共享目录
mkdir /test
# 设置exports
vim /etc/exports
/test 192.168.88.0/24(rw,sync)
# 共享
exportfs -r
# 查看是否共享
exportfs -v
showmount -e 192.168.88.132
  1. 客户端挂载

客户端挂载是使用nfsnobody用户进行的,如果是root创建的共享目录,且客户端挂载后要进行读写的话,得给目录757的权限。

1
mount -t nfs 192.168.88.132:/test /test

六、iSCSI服务

6.1 iSCSI介绍

iSCSI即网络小型计算机系统接口,又被称为IPSAN。实际就是通过网络来共享设备。

数据存储技术:

  • DSA(Direct Attached Storage 直接附加存储):IDE SATA SAS SCSI(本地磁盘)
  • NSA(Network Attached Storage 网络附加存储):Samba NFS(共享文件夹)
  • SAN(Storage Attached Network 网络附加存储):iSCSI(共享设备)

6.2 iSCSI服务部署

  1. 准备好要被挂载的磁盘,这里共享sdb1

iSCSI一

  1. 安装iSCSI
1
2
yum -y install targetcli
sysetmctl start target
  1. 通过targetcli命令添加设备共享
1
2
3
4
5
6
7
8
9
10
11
12
13
14
15
16
17
18
19
20
21
22
23
24
# 进入命令行
targetcli
ls
...
# backstores 代表后端存储,iscsi通过使用文件、逻辑卷或任何类型的磁盘作为底层存储来仿真呈现为目标的scsi设备
# block 后端存储是个块设备
# fileio 后端存储是一个文件
# pscsi 物理scsi设备
# ramdisk 后端存储是内存上的空间,在内存上创建一个指定大小的ramdisk设备可以通过help命令来打印可用命令

# 将要共享的设备添加到backstores存储库中
cd backstores/
block/ creat block /dev/sdb1

# 设置IQN标识
# 格式:iqn.年-月.二级域名倒写:共享名
cd ..
iscsi/ create iqn.2021-04.com.cqm:storage

# 设置TPG组中对应的三个问题 谁 从哪里 访问什么设备
cd iscsi/iqn.2021-04.com.cqm:storage/tpg1/
acls/ create iqn.2021-04.com.cqm:client
luns/ create /backstores/block/block
exit

6.3 iSCSI客户端挂载

  1. 安装iSCSI客户端
1
yum -y install iscsi-initiator-utils
  1. 设置客户端名称
1
2
3
vim /etc/iscsi/initiatorname.iscsi
InitiatorName=iqn.2021-04.com.cqm:client
systemctl start iscsi
  1. 发现共享设备
1
iscsiadm --mode discoverydb --type sendtargets --portal 192.168.88.132:3260 --discover
  1. 连接远程设备
1
2
3
4
iscsiadm --mode node --targetname iqn.2021-04.com.cqm:storage --portal 192.168.88.132:3260 --login
lsblk
...
sdb
  1. 分区格式化
1
2
3
4
fdisk /dev/sdb
...
mkfs.ext4 /dev/sdb1
...
  1. 挂载共享磁盘
1
2
3
4
mkdir /root/sdb1
vim /etc/fstab
/dev/sdb1 /root/sdb1 ext4 _netdev 0 0
mount -a

6.4 iSCSI取消挂载

  1. 客户端
1
2
3
iscsiadm --mode node --targetname iqn.2021-04.com.cqm:storage --portal 192.168.88.132:3260 --logout
rm -rf /var/lib/iscsi/nodes/iqn.2021-04.com.cqm\:storage/
rm -rf /var/lib/iscsi/send_targets/192.168.88.132,3260/
  1. 服务端
1
2
3
4
5
6
7
# 倒着删
targetcli
iscsi/iqn.2021-04.com.cqm:storage/tpg1/portals/ delete 0.0.0.0 3260
iscsi/iqn.2021-04.com.cqm:storage/tpg1/luns/ delete lun=0
iscsi/iqn.2021-04.com.cqm:storage/tpg1/acls/ delete iqn.2021-04.com.cqm:client
iscsi/ delete iqn.2021-04.com.cqm:storage
backstores/block/ delete block

七、IPSAN多链路部署

在上边的环境中的共享设备是通过单链路共享的,如果这条链路出现了故障,那么就会出现连接不上共享设备的问题,所以在生产环境中都会配置多链路进行部署。

iSCSI服务端和客户端分别拥有两张不同网段的网卡,就可以配置多链路部署。

7.1 部署多链路

  1. 在服务端上设置共享设备,并用两个IP进行共享

iSCSI五

  1. 在客户端发现共享设备
1
2
3
4
5
6
7
8
9
vim /etc/iscsi/initiatorname.iscsi
InitiatorName=iqn.2021-04.com.cqm:client

systemctl start iscsi

iscsiadm --mode discoverydb --type sendtargets --portal 192.168.88.132:3260 --discover 192.168.88.132:3260,1 iqn.2021-04.com.cqm:storage 192.168.99.130:3260,1 iqn.2021-04.com.cqm:storage

iscsiadm --mode node --targetname iqn.2021-04.com.cqm:storage --portal 192.168.88.132:3260 --login
iscsiadm --mode node --targetname iqn.2021-04.com.cqm:storage --portal 192.168.99.130:3260 --login

这时候通过lsblk命令可以看到多了两块设备,但其实是同一个设备不同名

iSCSI三

  1. 安装多路径软件
1
2
3
yum -y install device-mapper-multipath
cp /usr/share/doc/device-mapper-multipath-0.4.9/multipath.conf /etc/
systemctl start multipathd

再用lsblk命令查看可发现

iSCSI四

  1. 配置多路径运行模式
1
2
3
4
5
6
7
8
9
10
11
12
13
14
15
16
17
18
19
20
21
22
23
24
25
26
27
28
29
30
multipath -ll
# wwid:36001405ac25fe1abdfd4eecb1d0624b2
mpatha (36001405ac25fe1abdfd4eecb1d0624b2) dm-2 LIO-ORG ,block
...

vim /etc/multipath.conf
multipaths {
multipath {
wwid 36001405ac25fe1abdfd4eecb1d0624b2 # wwid
alias cqm # 起名
path_grouping_policy multibus # 多路径组策略
path_selector "round-robin 0" # 负载均衡模式
failback manual
rr_weight priorities # 按优先级轮询
no_path_retry 5 # 重试时间5s
}
multipath {
wwid 1DEC_____321816758474
alias red
}
}
systemctl restart multipathd
systemctl restart iscsi

multipath -ll
cqm (36001405ac25fe1abdfd4eecb1d0624b2) dm-2 LIO-ORG ,block
size=1023M features='1 queue_if_no_path' hwhandler='0' wp=rw
`-+- policy='round-robin 0' prio=1 status=active
|- 5:0:0:0 sdb 8:16 active ready running
`- 6:0:0:0 sdc 8:32 active ready running
  1. 挂载
1
2
mkdir /root/test
mount /dev/mapper/cqm1 /root/test

7.2 测试

将一块网卡断掉,看是否还能使用iSCSI设备

  1. 断开网卡ens33
1
ifdown ens33

iSCSI六

  1. 依旧可以在iSCSI设备上写入数据

iSCSI七